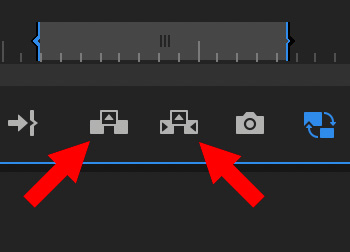
Lift and Extract simplify moving edited media between sequences.
Lift (left) and Extract (right) allows fast transfer of clips between sequences.
OK, I confess, this is a long-time feature in Premiere that I’ve never used: Lift and Extract. Sigh… so much to learn. Here’s how these work.
In Sequence “A,” set an In and/or an Out for the section you want to move. (You can move portions or all of one or more clips.)
NOTE: Selections won’t work.
Lift. Copies the edited media to your clipboard and removes it from the timeline and leaves a gap in the timeline.
Extract. Copies the edited media to your clipboard, removes it from the timeline, and closes the gap.
BIG NOTE: Lift ignores any clips on inactive tracks. Extract copies all clips, whether on active tracks or not.
Then, move to Sequence “B,” position the playhead where you want these clips to appear and paste.
NOTE: If you don’t press any modifier keys, the clips will overwrite the timeline. If you press Shift while pasting, the clips will insert into the timeline.
Shadow & Highlight Tints are quick ways to affect the dominant grayscale values in an image.
An image as captured (left) and after tints were applied. (Image courtesy of J. Putch and “Route 30, Too!“)
There’s an unlimited range of looks and emotions we can evoke with the color tools in Premiere. Here’s a technique using two tools I haven’t worked with before to boost the emotion in a scene.
In the screen shot, the image on the left is how it was shot. The image on the right was adjusted using three settings in the Lumetri Color > Creative panel:
Vibrance was decreased 30% to reduce saturation.
Shadow Tint was pushed deeply toward dark blue affecting the darker portions of the frame.
Highlight Tint was pushed slightly toward red.
Look how much more stressed and anguished she looks, just in changing these simple settings.
The benefit to using Shadow and Highlight Tints is that you can quickly alter the color balance of a scene by affecting shadows, which our eye responds to at a much deeper level than highlights.
EXTRA CREDIT
When altering saturation, Vibrance is a better tool than Saturation, because Vibrance only affects mid-tone values.
Please rate the helpfulness of this tip.
Click on a star to rate it!
https://www.theinsidetips.com/wp-content/uploads/2019/09/Tips-Logo-700x150.jpg00Larry Jordanhttps://www.theinsidetips.com/wp-content/uploads/2019/09/Tips-Logo-700x150.jpgLarry Jordan2020-10-20 01:30:002020-10-16 19:11:45Tip #1097: Creative Color Tints
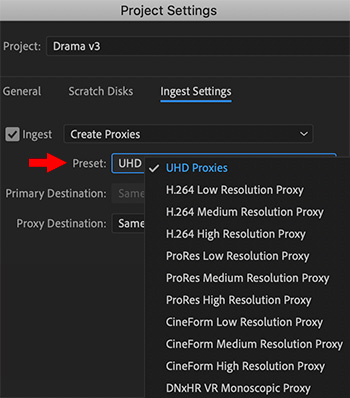
For most projects, choose ProRes; though use H.264 where file size is critical.
Ingest options for Media Browser, indicating the default proxy options.
Premiere continues to improve its proxy workflow, most recently by adopting the ProRes family of codecs across all apps, both Windows and Mac. When it comes to creating proxies, we can now choose between four different codecs:
H.264
ProRes
CineForm
DNxHR VR
If you want the smallest possible proxy file size, H.264 is the choice. However, this is not an efficient format to edit, especially on older computers.
My personal preference is ProRes, though CineForm is an excellent alternative.
The DNx options are specifically for 360° VR video, either monoscopic or stereo.
NOTE: Resolution refers to the frame size of the proxy file: full resolution, half resolution or quarter resolution. For most projects and rough cuts, half resolution is the best balance between file size and image quality.
EXTRA CREDIT
UHD Proxies, in case you were wondering, use ProRes Proxy at 1/4 resolution, which makes the files efficient to edit, but small in size at 960×540.
Please rate the helpfulness of this tip.
Click on a star to rate it!
https://www.theinsidetips.com/wp-content/uploads/2019/09/Tips-Logo-700x150.jpg00Larry Jordanhttps://www.theinsidetips.com/wp-content/uploads/2019/09/Tips-Logo-700x150.jpgLarry Jordan2020-10-20 01:30:002020-10-16 19:13:52Tip #1096: Select the Right Proxy Format
For me, proxy preferred is the best option when working with proxies in Final Cut.
The Proxy Preferred option in the View menu at the top right of the Viewer.
Proxy Preferred is a new feature in the 10.4.9 update. What does it do and when should we use it?
As frame sizes expand well beyond 4K and multicam shooting and editing become ubiquitous, proxies are becoming even more important. Proxies allow us to create a rough cut of our project without continuously hammering your storage moving massive data files.
NOTE: Depending upon how you configure them, a proxy file can be 1/20th the size of the camera master – yet still provide images sufficient for editing.
In the 10.4.9 release, Apple improved their overall proxy workflow in a variety of ways, one of which is Proxy Preferred.
In the past, we could either view the master file or the proxy file. However, this option, located in the View menu at the top right corner of the Viewer, tells Final Cut to display proxies if they exist for each clip. And, if they don’t exist, to display the camera native media.
This solves the problem of seeing a bunch of red blocks instead of clips when proxy files are missing.
NOTE: This option is my preferred way to display proxies because even if proxies don’t exist, I can still see clips to edit.
EXTRA CREDIT
To create proxies for clips that are already imported, select the clips in the Browser, then choose File > TranscodeMedia.
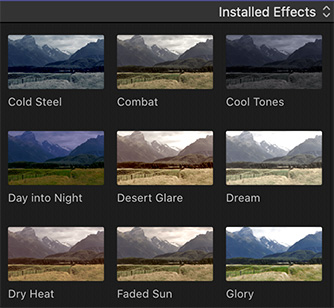
Looks are a series of presets that allow you to quickly adjust the color of a clip.
9 of the 26 Looks provided in Final Cut. (Effects > Looks)
Mike Southon asks: “What are the Color Looks in Final Cut and what do they do?”
Looks are a very fast way to change the color “look” of a clip without requiring you understand how the color tools in Final Cut work.
At a technical level, looks are a color grading preset which was created by Apple and included with Final Cut. You could get the same effect using the color tools in Final Cut – if you had the color grading skills and sufficient time.
On a practical level, though, selecting a specific Look gives you the same result without investing the time or requiring the skills.
Looks are located in: Effects Browser > Looks.
To apply a look, drag it from the Effects Browser and drop it on the clip you want to adjust. (Or, select a group of clips you want to apply that look, then double-click the effect.)
To remove a look, select the clip(s) that contain it, go to the Video Inspector and delete it.
EXTRA CREDIT
Adjusting the color of a clip using the color tools gives you great precision and control.
Adjusting the color of a clip using Looks lets you pick a specific look in much less time.
Please rate the helpfulness of this tip.
Click on a star to rate it!
https://www.theinsidetips.com/wp-content/uploads/2019/09/Tips-Logo-700x150.jpg00Larry Jordanhttps://www.theinsidetips.com/wp-content/uploads/2019/09/Tips-Logo-700x150.jpgLarry Jordan2020-10-19 01:30:002020-10-19 01:30:00Tip #1091: What are Color Looks?
Press “Z” then drag in the timeline to zoom into an area.
Drag to select an area in the timeline to zoom into.
This tip was suggested by Warren Nelson.
An even faster way to zoom into the timeline is to press the letter “Z” while dragging the mouse over the area you want to zoom into.
As soon as you let go of the mouse, the area you selected now fills the timeline.
Poof!
NOTE: The benefit to this approach is that you can quickly move precisely into the area you want to see, without dragging window controls around.
EXTRA CREDIT
To reset the timeline so the entire edit fits into the visible timeline, type Shift + Z.
Please rate the helpfulness of this tip.
Click on a star to rate it!
https://www.theinsidetips.com/wp-content/uploads/2019/09/Tips-Logo-700x150.jpg00Larry Jordanhttps://www.theinsidetips.com/wp-content/uploads/2019/09/Tips-Logo-700x150.jpgLarry Jordan2020-10-19 01:30:002020-10-18 16:44:42Tip #1090: An Even FASTER Way to Zoom
These five videos illustrate different ways to handle blocking a scene.
(Image courtesy of PremiumBeat.com.)
This article, written by Jourdan Aldredge, first appeared in PremiumBeat.com. This is a summary.
When watching amazing cinema, there are many aspects you’ll notice right away and often remember forever — great lines of dialogue, breathtaking action sequences, and beautiful cinematography. However, one film element that often gets ignored, but is still crucially important, is blocking.
Before we go into learning from the masters, let’s go over some of the basics of scene blocking. Scene blocking covers everything that has to do with placement and movement between characters, props, and camera(s) for every shot and scene. Unless you’re shooting a documentary or a certain type of improvised action, most film scenes are tightly controlled, blocked, and rehearsed so that every movement and action is accounted for.
Finally, the most important part of any scene blocking is the camera. In many ways, the camera — which represents your audience and POV — is the primary character in your scene. Consider your camera placement, its framing, and any (or all) movements that you might employ, from simple pans to complex tracking shots, when working on your scene blocking.
In this article, Jourdan provides videos illustrating:
How to block a scene
How Hitchcock blocks a scene in “Vertigo”
How Scorsese blocked a scene in “The Wolf of Wall Street”
How Akira Kurosawa using blocking
How Kubrick, Spielberg and Inarritu blocked scenes
SUMMARY
When you’re finally shooting your scenes with your carefully defined blocking in action, it’s helpful to treat each shot and scene as its own mini-movie. You have your actors ready to go in their starting positions, you have your lights set and queued up for any adjustments, and your camera is rehearsed and ready to move. Once you call action, you’re really just recreating the stage play that you’ve blocked and mapped out — now it’s your job to shoot it to the best of your ability.
Increasing YouTube subscribers comes down to leveraging your marketing.
(Image courtesy of Pexels.com.)
This article first appeared in MotionArray.com. This is a summary.
If you’ve been hustling away on YouTube for a while now, chances are you’re already well up to speed on all the major tips for growing your subscriber base. (Publishing videos on the regular, cross-promoting on social media, making primo content, etcetera, etcetera).
But what if you’ve tried all of those things and you’re still flailing around in sub-1000 subscriber territory? And now you’re asking yourself “how do I get YouTube subscribers and push the needle forward?”
Here are the seven steps they recommend:
Enable YouTube’s Automated Pop-Up Subscription Link
Collaborate With Other YouTubers
Use Playlists To Retain Viewers
Make Your Thumbnails Simply Irresistible
Self-Promote in Facebook Groups, Subreddits, and Amazon Reviews
Fill Your Titles With Super Relevant Keyword Phrases
Make Video Intros a Standard Practice
Visit the article, linked at the top, for more details.
Please rate the helpfulness of this tip.
Click on a star to rate it!
https://www.theinsidetips.com/wp-content/uploads/2019/09/Tips-Logo-700x150.jpg00Larry Jordanhttps://www.theinsidetips.com/wp-content/uploads/2019/09/Tips-Logo-700x150.jpgLarry Jordan2020-10-16 01:30:002020-10-16 01:30:00Tip #1079: How to Get More YouTube Subscribers
If you haven’t explored the PostPerspective.com website, you are missing a treat.
Editor-in-Chief Randi Altman has a multi-decade career covering our industry. A few years ago, she founded PostPerspective.com to provide online, in-depth coverage of our industry.
Typical stories include interviews with the folks behind the camera, analysis of production and post-production techniques, equipment reviews, and tracking personnel as we move about the industry.
We may request cookies to be set on your device. We use cookies to let us know when you visit our websites, how you interact with us, to enrich your user experience, and to customize your relationship with our website.
Click on the different category headings to find out more. You can also change some of your preferences. Note that blocking some types of cookies may impact your experience on our websites and the services we are able to offer.
Essential Website Cookies
These cookies are strictly necessary to provide you with services available through our website and to use some of its features.
Because these cookies are strictly necessary to deliver the website, refuseing them will have impact how our site functions. You always can block or delete cookies by changing your browser settings and force blocking all cookies on this website. But this will always prompt you to accept/refuse cookies when revisiting our site.
We fully respect if you want to refuse cookies but to avoid asking you again and again kindly allow us to store a cookie for that. You are free to opt out any time or opt in for other cookies to get a better experience. If you refuse cookies we will remove all set cookies in our domain.
We provide you with a list of stored cookies on your computer in our domain so you can check what we stored. Due to security reasons we are not able to show or modify cookies from other domains. You can check these in your browser security settings.
Google Analytics Cookies
These cookies collect information that is used either in aggregate form to help us understand how our website is being used or how effective our marketing campaigns are, or to help us customize our website and application for you in order to enhance your experience.
If you do not want that we track your visit to our site you can disable tracking in your browser here:
Other external services
We also use different external services like Google Webfonts, Google Maps, and external Video providers. Since these providers may collect personal data like your IP address we allow you to block them here. Please be aware that this might heavily reduce the functionality and appearance of our site. Changes will take effect once you reload the page.
Google Webfont Settings:
Google Map Settings:
Google reCaptcha Settings:
Vimeo and Youtube video embeds:
Other cookies
The following cookies are also needed - You can choose if you want to allow them:
Privacy Policy
You can read about our cookies and privacy settings in detail on our Privacy Policy Page.