… for Codecs & Media

Tip #1597: MicroSD Storage Growth

Larry Jordan – LarryJordan.com

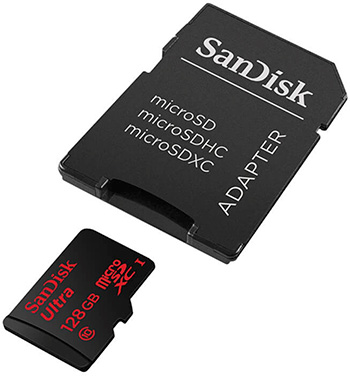
The MicroSD card family has continuously evolved since 1999.

SanDisk Ultra 128GB microSDXC Memory Card

Topic $TipTopic

For some reason, this morning I found myself thinking about storage; especially portable storage for cameras. And that brought me to MicroSD cards.

The technology behind MicroSD cards (the “SD” stands for “Secure Digital”) was introduced in August, 1999 as a joint effort between SanDisk, Panasonic and Toshiba.

MicroSD cards first appeared in 2005, with a capacity of up to 128 MB and read/write speeds of 2.2 MB/second.

SDHC appeared in 2006 with a 32 GB capacity and mandatory support for the FAT32 file system.

SDXC appeared in 2009, with a 64 GB capacity and read/write speeds topping out at 300 MB/second.

In 2018, the SDUC cards appeared supporting up to 128 TB with read/write speeds maxing out at 9865 MB/second. While these speeds are in the spec, no currently shipping cards match the spec.

Here’s an interesting Wikipedia article that covers these cards in more detail.


Please rate the helpfulness of this tip.

Click on a star to rate it!

… for Codecs & Media

Tip #1596: SxS Card Data Transfer Speeds

Larry Jordan – LarryJordan.com

SxS cards now offer transfer speeds up to 10 Gbps!

The relatively new SxS Pro X card from Sony.

Topic $TipTopic

Sometimes, my brain puzzles over very unusual things. I found myself wondering about the data transfer rate of SxS cards, which a variety of cameras use for recording media.

According to NewsShooter.com

SxS cards were announced way back in 2007 and they have been used on a variety of cameras over the years.

The original SxS flash memory cards had transfer rates of 800 Mbit/s and burst transfer rate of up to 2.5 Gbit/s over the ExpressCard’s PCI Express interface. Sony first used these cards as the storage medium for their XDCAM EX line of professional video cameras.

Then in 2011 came SxS Pro cards. These cards could read and write data at up to 1.2Gb/s through an ExpressCard slot without the need for an adapter.

A 64GB capacity SxS Pro card enabled you to capture 120 minutes of HD422 50Mb/s recording in the MXF mode.

SxS Pro+ cards appeared along with the Sony F5 and F55. They are a faster version of SxS Pro designed for the recording of 4K resolution video. SxS Pro+ has a guaranteed minimum recording speed of 1.3 Gbit/s and an interface with a theoretical maximum speed of 8 Gbit/s.

In 2019, Sony announced new SxS Pro X cards. SxS Pro X is the next step up from SxS Pro+ and it offers transfer speeds of up to 10Gbps (1250MB/s). This is significantly faster than the SxS Pro+’s 3.5 Gbps max read speed, and 2.8 Gbps max write speed.

Here’s a link to learn more.


Please rate the helpfulness of this tip.

Click on a star to rate it!

… for Adobe Premiere Pro CC

Tip #1588: Stitching Clips in Adobe Media Encoder

Larry Jordan – LarryJordan.com

Stitching is a fast way to add an open, ad or close to a program.

The Stitching option in Adobe Media Encoder.

Topic $TipTopic

[ The following tip is from the AME User Guide. ]

When using Adobe Media Encoder to compress clips, you can combine multiple media files into a single file when adding them to the queue. To stitch media files together, do the following:

  • Select File > Add Source or click the Add Source button from the Queue panel in Adobe Media Encoder. The File Explorer opens.
  • Select the assets you want to stitch together.
  • Click the Options button (lower red arrow)
  • Check the Stitch clips together check box (upper red arrow).
  • Click Open to add the stitched clip to the queue.

NOTE: Alternately, select the clips you want to stitch. Drag them to the Queue panel and release on top of the option Drop here to stitch clips together.

The stitched clips are loaded in the queue in the order they were clicked. To view the individual clips, click Show sources. By default, the clips are sorted alphabetically. You can rearrange them according to your preference.

The name of the stitched clips is automatically set to the first clip in the series. To change the name of a clip, click the name.

NOTE: Stitched clips adhere to In and Out Points set in media browser. However, you cannot edit the duration of sources once they have been added to a stitched clip.


Please rate the helpfulness of this tip.

Click on a star to rate it!

… for Adobe Premiere Pro CC

Tip #1587: When to Use Render at Maximum Depth

Larry Jordan – LarryJordan.com

Basically, turn this off.

Most of the time, with modern computers, leave this unchecked.

Topic $TipTopic

There are new render settings for video export. These affect the Render at Maximum Depth option. Here’s what they mean and which to choose.

This setting is a hold-over from the days when all rendering was done by the CPU. Now that Premiere has shifted to GPU rendering, these settings are no longer necessary.

  • Leave Render at Maximum Depth unchecked unless you don’t have a dedicated GPU.
  • If you check this, and you are doing color grading, set the depth to 16-bpc for the most accurate color rendering.
  • 8-bpc will render faster, but subtle color shade may get lost.
  • Only check + alpha if you need transparency included with your export.

EXTRA CREDIT

To reassure yourself, render a test image with this turned on and then with it turned off. See if you can see a difference.


Please rate the helpfulness of this tip.

Click on a star to rate it!

… for Adobe Premiere Pro CC

Tip #1570: Video Scope Settings

Larry Jordan – LarryJordan.com

Float provides the most accurate video scope readings.

The Video Scope bit-depth menu.

Topic $TipTopic

At the bottom right corner of the Lumetri Scopes is a small menu called “float.” This controls the detail visible in the video scopes. Here’s how to set it.

  • 8 Bit. Displays all values on a 0 – 256 scale on the right, IRE on the left.
  • 10 Bit. Displays all values on a 0 – 1024 scale on the right, IRE on the left. Video values remain the same, what’s different is the amount of precision in the values.
  • Float. Displays all values on a 32-bit scale (±2.14 million values).
  • HDR. Displays all values on a scale from 0 – 10,000 (10K). (HD media uses a scale of 0 – 100.

While the scales are different, the display is essentially the same. For non-HDR work, use float. For HDR HLG or PQ use HDR.

NOTE: This setting does not affect your video clips or output.


Please rate the helpfulness of this tip.

Click on a star to rate it!

… for Apple Final Cut Pro X

Tip #1591: The Hidden Metadata of Final Cut Pro

Larry Jordan – LarryJordan.com

The default Basic setting displays the least metadata.

Click the Basic menu to reveal extensive metadata tracking for each clip in FCP.

Topic $TipTopic

There is a ton of metadata that Final Cut Pro tracks for each audio or video clip — all deeply hidden in the Info Inspector. Here’s how to unlock it.

  • Open the Info Inspector and scroll down to the bottom.
  • There, on the left, you’ll find a menu labeled Basic.
  • Click it and eleven different metadata displays are already configured. The one with the most data is Extended.
  • Select different options to see what they contain.
  • To configure your own metadata menu, select Edit Metadata View.

Please rate the helpfulness of this tip.

Click on a star to rate it!

… for Apple Final Cut Pro X

Tip #1590: An Easy Way to See Interlaced Video

Larry Jordan – LarryJordan.com

Interlacing is automatically converted to progressive when a clip is scaled.

Interlacing artifact (top image), the Video Field Dominance setting in the Info Inspector.

Topic $TipTopic

We have lived with interlaced video since the beginning of television. On TV sets, interlacing looks lovely. But, oh my! On the web, it looks atrocious!

Fortunately, Final Cut has two ways to quickly determine if a video clip is interlaced:

From the View menu in the top right corner of the Viewer, enable Show Both Fields. When the Viewer is set to 100%, you’ll see the thin, black, horizontal lines emanating from moving objects (top screen shot).

NOTE: If an interlaced image is scaled, interlacing lines will be removed, but their general motion blur will remain.

Or, go to the Info Inspector. Set the Basic menu in the lower left corner to Extended, then scroll down to see the Video Field Dominance setting. Anything other than Progressive means the clip is interlaced (bottom screen shot).

Scaling a clip, or editing it into a progressive project, will automatically convert it from interlaced to progressive.


Please rate the helpfulness of this tip.

Click on a star to rate it!

… for Apple Final Cut Pro X

Tip #1589: New Use for Custom Overlays

Larry Jordan – LarryJordan.com

Overlays appear in the Viewer, but never export.

The Overlay portion of the View menu in the top right corner of the Viewer.

Topic $TipTopic

In Tip #980, I showcased a new Final Cut feature: Custom Overlays. But, recently, I discovered a new use for this feature that saves time during editing.

All the videos I post to social media have my website burned in as a watermark. For a variety of reasons, it is far easier to add watermarks during compression than to try to add it during the edit.

The problem is that I don’t always remember that the watermark will be added later and create text, titles or other visuals which are blocked by the watermark.

So, I created a custom overlay that displays my watermark during editing, but never outputs it.

This gives me the best of both worlds: a constant reminder of the size and position of the watermark, with no risk it will export as part of the master file.

Cool.

EXTRA CREDIT

Here’s a tutorial from my website that describes how to create and apply overlays in more detail.

If you want an overlay to burn in during export, either create it as a caption or a title. Overlays can not be included in the final export.


Please rate the helpfulness of this tip.

Click on a star to rate it!

… for Random Weirdness

Tip #1583: The Basics of Live Multi-cam Streaming

Larry Jordan – LarryJordan.com

This video focuses more on digitizing and streaming.

Host, John Hess.

Topic $TipTopic

Filmmaker IQ created a 25 minute video describing “The Basics of Setting Up a Multi-camera Live Stream.” Hosted by John Hess.

It’s a rundown of all the elements you have to plan and pull together to create a successful multi-camera live stream, with a focus on the capture card and digitizing the image.

Here’s the link


Please rate the helpfulness of this tip.

Click on a star to rate it!

… for Random Weirdness

Tip #1582: Four Approaches to Translating Films

Larry Jordan – LarryJordan.com

Translation is an art, not a science.

Image courtesy of “Trope Talk.”

Topic $TipTopic

This article, written by Meg Shields, first appeared in FilmSchoolRejects.com. This is a summary.

Translation is an art, not a science. Sometimes the phraseology of one culture has no equivalent in another’s. And sometimes capturing the spirit of an evocative turn of phrase involves transforming things entirely.

The same, of course, holds true for movie title translations. In addition to properly describing a film and managing the expectations of a foreign audience, translated titles must also navigate a minefield that runs the gamut from cultural sensitivities to market preferences.

The core of this article is a link to a 12 minute video – called “Trope Talk” – that illustrates four different approaches to movie title translations, as seen in Chinese cinema. The methods are, briefly: (1) to translate literally; (2) to reinterpret; (3) to be poetic, and (4) to fudge the title to make it sell better.

Link.


Please rate the helpfulness of this tip.

Click on a star to rate it!