… for Adobe Premiere Pro CC

Tip #1724: What Do These Icons Do?

Larry Jordan – LarryJordan.com

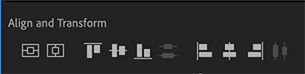
These six icons control how media files are displayed in the Project panel or bins.

These icons are located in the lower-left corner of the Premiere interface.

Topic $TipTopic

These six icons, tucked into the lower-left corner of the Premiere Pro interface, can help you better find and organize the media in your project. Here’s what they do, from left to right.

  • Green pen. This marks a project as writable. For solo editors, this will always be green. But, for team projects, a red pen indicates a project you can view, but not change.
  • Two stacked lines. This displays the contents of the Project panel or a bin as lines of text.
  • Blue square. This displays the contents of the Project panel or a bin as thumbnails.
  • Stacked rectangles. This displays the contents of the Project panel or a bin as “freeform thumbnails” you can resize and move around – like images on a light table. The purpose of this is to help you organize your media visually.
  • Open circle. This slider determines how large to display thumbnails. (Not available when media is displayed as a list.)
  • Three stacked lines. This determines the sort order for thumbnails. (This option is only available when thumbnails, not freeform images, are displayed.

NOTE: Sort order when a line list is displayed is determined by most recent column header you clicked.


Please rate the helpfulness of this tip.

Click on a star to rate it!

… for Adobe Premiere Pro CC

Tip #1697: The Secrets in Clip Properties

Larry Jordan – LarryJordan.com

The Clip Properties displays tons of technical details about a clip.

The Clip Properties window in Premiere Pro.

Topic $TipTopic

Most of the time, you don’t need to know all the technical details of the clips you are editing. But, when you do, Premiere has a hidden menu that can tell you a LOT!

To display it:

  • Control-click a clip in the Timeline, Project or Bin panel.
  • From the popup menu that appears, select Properties.
  • The Clip Properties window appears (see screen shot).

NOTE: The contents of this window will change, depending upon what type of clip is selected.

I enjoy exploring this window from time to time simply to admire how much technical data Premiere needs to track and process for each clip.

EXTRA CREDIT

The Data Rate Analysis window shows the file size of each frame in a video clip. Codecs that use variable bit rate encoding will vary in size per frame.


Please rate the helpfulness of this tip.

Click on a star to rate it!

… for Adobe Premiere Pro CC

Tip #1699: The Secret Nest Switch

Larry Jordan – LarryJordan.com

Edit sequences you don’t want to change as a single element.

This switch determines if a nest is added to the timeline as a single “clip,” or a group of clips.

Topic $TipTopic

Hidden in plain sight in the top left corner of the timeline is the “Nest Switch.”

A nest is a sequence contained in another sequence. There are a wide variety of uses:

  • Reusing an open between programs
  • Cleaning up a timeline
  • Preventing accidental changes to a completed section
  • And many others

An easy way to add one sequence into another is to drag it from the Project panel into the timeline.

NOTE: You can also use the traditional keyboard shortcuts of comma and period.

When the switch, indicated by the red arrow in the screen shot, is blue, the sequence edits into the timeline as a single element. This makes it harder to make changes to the contents of the sequence.

When the switch is white, the sequence is edited into the timeline as individual clips. This simplifies making changes.

EXTRA CREDIT

To see the contents of a nest, simply double-click it. That opens it into its own timeline for editing.


Please rate the helpfulness of this tip.

Click on a star to rate it!

… for Adobe Premiere Pro CC

Tip #1700: What the Linked Selection Button Does

Larry Jordan – LarryJordan.com

Most of the time, leaving Linked Selection on prevents surprises during editing.

Linked Selection on (blue): Top. Linked Selection off (white): Bottom

Topic $TipTopic

Normally, when you click a linked clip (where the audio and video are synced together), both are selected. But there’s a switch that can change that.

In the top left corner of the timeline (see screen shot) is the Linked Selection switch.

  • When this is blue (top image), clicking a synced audio/video clip selects the entire clip.
  • When this switch is white (bottom image), clicking a synced clip only selects that part of the clip you clicked on.

NOTE: This separation is useful when you want to delete the audio or video portion of a clip, or move the audio separately from the video.

EXTRA CREDIT

Toggling this switch does not change the selection state of any currently-selected clips.

You can temporarily achieve the same result by pressing the Option key when you click a clip. This performs the opposite of the current setting of this switch.


Please rate the helpfulness of this tip.

Click on a star to rate it!

… for Adobe Premiere Pro CC

Tip #1679: What is Adaptive Audio?

Larry Jordan – LarryJordan.com

Premiere provides flexibility in assigning audio formats and channels.

Audio channel format options inside Adobe Premiere.

Topic $TipTopic

Most of the time, Adobe Premiere Pro guesses the audio format and channel assignments correctly when you import a clip. But, sometimes, you need to make changes.

To do so:

  • Control-click the audio clip you want to adjust in the Project or Bin panel.
  • Select Modify > Audio Channels.
  • In the popup window, set Clip Channel Format to Mono, Stereo, 5.1 or Adaptive.
  • Finally, using the checkboxes at the bottom, you can remap which channel in the audio clip plays on which channel in Premiere.

One of the Format options is “Adaptive.” Adobe describes Adaptive as: “The adaptive track can contain mono, stereo, and adaptive clips. With adaptive tracks, you can map source audio to output audio channels in the way that works best for your workflow. This track type is useful for working with audio from cameras that record multiple audio tracks. Adaptive tracks can also be used when working with merged clips, or multicam sequences.”


Please rate the helpfulness of this tip.

Click on a star to rate it!

… for Adobe Premiere Pro CC

Tip #1680: The Option Makes the Difference

Larry Jordan – LarryJordan.com

The simplest shortcuts often make the biggest difference.

Press Option to click and select just one track in a linked clip.

Topic $TipTopic

Sometimes, the simplest shortcuts make the biggest difference. Here’s one option I can’t live without.

Normally, when you click a synced clip in the Timeline, the entire clip is selected. And, most of the time, that’s exactly what you want.

Sometimes, though, you want to select just the audio or just the video portion of a synced clip. Perhaps you want to delete it, or move it into sync, or apply an audio filter to one channel and not another.

You could click the Link Selection button at the top left of the Timeline, but, frankly, it’s just easier to press Option, then click the portion of the clip you want to select.

When Option is not pressed, clicking selects the entire clip. When Option is pressed, clicking selects only the track you click on.

I’ve used this trick for years – it has saved me countless hours because it’s so simple… and effective.


Please rate the helpfulness of this tip.

Click on a star to rate it!

… for Adobe Premiere Pro CC

Tip #1681: A Cool – But Useless – Feature

Larry Jordan – LarryJordan.com

This used to work great. Now, ah, not so much.

Adding keyframes in the timeline, using this menu, no longer works reliably.

Topic $TipTopic

There’s a long-time feature in Premiere that used to be really useful. Well, at the least, it was useful. But, now, it’s essentially useless.

Most of the time, when we want to create effects, we select the clip in the timeline, then go to Effect Controls and make our adjustments.

But, there’s a hidden feature in Premiere that, theoretically, saves a step.

Control-click a clip in the Timeline (see screen shot) and a hidden menu appears. Here, you can select a setting, say “Scale,” and a white keyframe line appears in the clip (see the red arrow).

Again, in theory, we can drag this line up or down, or double-click it to add keyframes, to adjust and animate the scale of the clip.

The problem is that line, there, at the bottom, is positioned for 100% scale. We can drag it to 0, or to a minimum setting of 119%; but nothing in-between. It’s positioned too low to be useful because we can’t drag it marginally lower; except to 0. Useless.

We rarely, if ever, scale clips larger than 100%. But we CONSTANTLY need to scale clips smaller than 100%. At least for scaling, this hidden menu option totally fails.

So, experiment on your own to see which of these features work. But, for now, you are better off ignoring this menu and continue to use Effect Controls.


Please rate the helpfulness of this tip.

Click on a star to rate it!

… for Adobe Premiere Pro CC

Tip #1664: Add & Trim Captions

Larry Jordan – LarryJordan.com

The latest version of Premiere now treats captions like clips.

To trim a caption, drag an edge.

Topic $TipTopic

One of the new features in Premiere Pro is the ability to trim captions like clips.

One you add a caption track (Sequence > Captions > Add New Caption Track), you can add captions into the track similar to how you add clips into the timeline. (Sequence > Captions > Add Caption at Playhead)

NOTE: The Caption Track is simply a container that holds captions. The captions themselves are treated similar to video clips.

To trim a caption, grab an edge and drag. Just as with clips, ripple trimming a caption (the yellow trim tool) pulls up or pushes down all following captions. While roll trimming a caption (the red trim tool) adjusts the start or end of a caption without affecting the position of any other captions.

To change the text in a caption, select it, then change the text in the Caption panel.

NOTE: If the Captions panel is not showing, double-click a caption to display it; it is not included in the list of panels in the Windows menu.


Please rate the helpfulness of this tip.

Click on a star to rate it!

… for Adobe Premiere Pro CC

Tip #1665: Align Titles in Premiere Pro

Larry Jordan – LarryJordan.com

Select just one text clip in the timeline to use these.

The text alignment tools in the Essential Graphics panel.

Topic $TipTopic

Here are some intriguing icons in the Essential Graphics panel that can simplify aligning text (even though two of them are wrong).

  • After creating a text clip in the Timeline using the Text tool, select the clip.
  • If you haven’t already, switch to the Graphics workspace.
  • Click Edit in the Essential Graphics panel. The icons illustrated in the screen shot appear about 1/3 the way down.
  • Click the left icon to center a clip vertically (even though the icon indicates it centers horizontally).
  • Click the second-from-left icon to center a clip horizontally (even though the icon indicates it centers vertically)
  • The next three icons move a clip to the top, center or bottom of the frame. The problem with using these is that they don’t take Safe Zones into consideration, which means you would need to manually move the text inside Action Safe, at a minimum.

NOTE: The center option in this group is the same as clicking the far left icon.

  • The three icons on the right move a clip to left, center or right side of the frame. Also, like the middle three icons, these icons do not take Safe Zones into consideration, which means you need to move the text inside Action Safe manually.

NOTE: The center option in this group is the same as clicking the second-from-the-left icon.

EXTRA CREDIT

These icons are nice, but because they don’t allow for Safe Zones, I find myself not using them very often.

Also, these won’t work if multiple text clips are selected; which means that you can’t use these to quickly align several clips at once.


Please rate the helpfulness of this tip.

Click on a star to rate it!

… for Adobe Premiere Pro CC

Tip #1666: Customize the Audio Mixer Meters

Larry Jordan – LarryJordan.com

Customizing audio meters makes sure they show you want to need to see.

Audio meter options: Clip Mixer (left) Track Mixer (right)

Topic $TipTopic

Premiere Pro supports customizing the audio meter display in the timeline, as well as the Audio Clip and Track Mixers. Here’s what’s possible.

Open the Audio Clip Mixer (you can find it in the Windows menu, if it isn’t part of your current workspace). Control-click inside the area where the audio levels are displayed (i.e. the black stripe, not the numbers).

  • Show Valleys. This displays the lowest level of your audio during the last two seconds.
  • Show Color Gradient. This displays a smoother color ramp from green to yellow to red.
  • Dynamic Peaks. This displays the loudest level of your audio during the last two seconds.
  • Static Peaks. This displays the loudest level of your audio until something louder comes along. This is a good way to determine if any part of your mix exceeds 0 dB.
  • Show Peaks. This enables either Dynamic or Static peak display.
  • Show Channel Volume. This displays the current level of the audio clip in numbers.

Open the Track Mixer, control click in the same area and the options change. (These options are the same as Control-clicking in the timeline audio meters.) The one new choice is:

  • dB Range. This only displays audio levels that exceed the level selected here. This is a good way to focus on the louder portions of your mix.

Please rate the helpfulness of this tip.

Click on a star to rate it!