… for Apple Final Cut Pro X

Tip #074: Automatic Keywords Using Finder Tags

Larry Jordan – https://LarryJordan.com

A Fast Way to Organize Media Before You Import
Tip Screen Shot

Topic $TipTopic

Finder tags are the next step beyond changing the color of a file or folder: They allow a greater amount of customization and can be used, when importing media into Final Cut Pro, to create keywords automatically.

Right-click (Control-click) any file in the Finder and choose Tags.

The Finder ships with seven color tags. You can use these or create your own; for example, Interviews, B-roll, Scene 23, etc.).

Once a tag has been created, you can assign it to as many other clips as you want. Tags allow you to organize clips using the Finder before importing them into Final Cut.

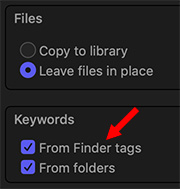
In the Finder you can find files using tags. In Final Cut, when you import a file and select From Finder Tags in the Media Import window, FCP X will assign a keyword to match each Finder tag. These, then, work the same as any other keyword.

Think of it as automatic file organization.

Cool.


Please rate the helpfulness of this tip.

Click on a star to rate it!

… for Adobe Premiere Pro CC

Tip #114: Optimize Your Content with Auto-Frame

Larry Jordan – https://LarryJordan.com

New Feature in Fall 2019 Release

Tip Screen Shot

Topic $TipTopic

New in the Fall, 2019, release of Adobe Premiere, Auto Reframe “can be applied to individual clips as an effect or to whole sequences. Auto Reframe identifies the action in your video to ensure that what’s important stays within the output frame. When you are applying Auto Reframe, you can adjust the sensitivity of the algorithm, depending on the amount of motion within your footage. You can further refine the results by adjusting the keyframes after Auto Reframe has worked its magic.” (Adobe blog)

We’ll have more on this feature in coming weeks.


Please rate the helpfulness of this tip.

Click on a star to rate it!

… for Adobe Premiere Pro CC

Tip #115: Finally! Gain Worth Talking About.

Larry Jordan – https://LarryJordan.com

New Feature in Fall 2019 Release

Tip Screen Shot

Topic $TipTopic

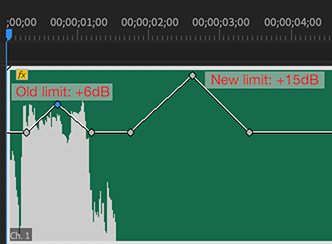
The range for audio gain for clips in Premiere has expanded to +15 dB.

With higher bit rates for digital audio captured by modern cameras and recorders, signal levels can have more variation, without the problems inherent to analog media like tape.

Increasing maximum audio gain from +6 dB to +15 dB means you can increase clip volume without additional amplification effects, making the workflow simpler, more precise, and bringing Premiere Pro in line with audio levels in Adobe Audition.

Gain can be adjusted by dragging the volume line in an audio clip, or by adjusting levels in Effect Controls.


Please rate the helpfulness of this tip.

Click on a star to rate it!

… for Adobe Premiere Pro CC

Tip #116: Premiere Now Exports HDR-10 Media.

Larry Jordan – https://LarryJordan.com

New Feature in Fall 2019 Release

Tip Screen Shot

Topic $TipTopic

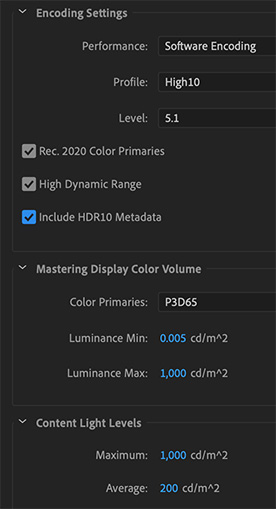
Editors can now export HDR content with HDR10 metadata to ensure projects look their best on HDR-enabled displays. Adjusting variables, such as display color primaries and luminance in a the HDR10 export dialog, allows you to deliver content that adapts your images for the display device.

Output settings are controlled in the Export dialog. (These also apply to Adobe Media Encoder.)

We’ll cover this feature more in future weeks.


Please rate the helpfulness of this tip.

Click on a star to rate it!

… for Apple Final Cut Pro X

Tip #085: Narrow Your Search (Part 3)

Larry Jordan – https://LarryJordan.com

Boolean selection simplify finding that needle in a haystack.

Tip Screen Shot

Topic $TipTopic

A “Boolean Selection” is a search based upon logical criteria. Specifically, “any,” “and,” and “not.” These are most often applied to searches using keywords, but you can find these options in a variety of places in Final Cut.

Here’s how these work. Let’s say you are searching the media in your project. These clips have some combination of the following keywords applied to each clip: “Red,” “Green,” and “Blue.”

  • Any. This will find clips that contain even one (“any”) of the keywords you are searching for. If a clip contains Red – or – Green – or – Blue, it will appear in the results of your search.
  • All. This will find clips that contain all of the keywords you are searching for. Only clips that contain Red – and – Green – and – Blue will appear.
  • Does Not Include Any. This lists only those clips that do not hold any of the keywords you are searching for. For example, searching for Red and Blue and enabling this option means only clips that do not contain either Red or Blue will appear.
  • Does Not Include All. This lists only those clips that do not hold all of the keywords you are searching on. For example, searching for Red and Blue and enabling this option, will show clips with Red – or – Blue, but not both.

I like keywords a lot. What I like even more is how, using Boolean selection, we can really narrow our searches to find exactly the media we need next for our project.


Please rate the helpfulness of this tip.

Click on a star to rate it!

… for Apple Final Cut Pro X

Tip #102: Change the “Shape” of an Audio Fade

Larry Jordan – https://LarryJordan.com

Audio fades are optimized for cross-dissolves.

Tip Screen Shot

Topic $TipTopic

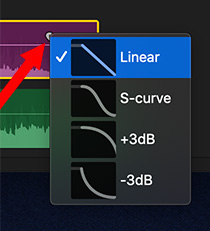
Hidden inside the audio fade dot is the ability to change the “shape” of a fade. The shape controls how the audio fades and there’s a reason for each shape. To see the choices, Control-click the dot itself.

Here are the choices:

  • Linear. This is a straight-line fade from full-volume to dead quiet, or dead quiet to full-volume depending upon whether you are at the end or beginning of a clip. This is the best choice when fading to or from black because it sounds the smoothest.
  • S-Curve. This fades quickly, then lingers. I don’t use this often, truthfully.
  • +3 dB. This is the default fade and is best used when cross-fading from one “steady-state” audio clip to another; for example, from one piece of music to another. (See Tip #104 for the reason why.)
  • -3 dB. This is best used when you want something to fade really quickly, then linger longer than an S-curve. I use this most often at the beginning of a clip when I want to minimize a breath, but be at full-volume for the start of a sound-bite.

Each of these sounds different and has a different use in an audio mix. I vary these from one clip to the next, depending upon the sound I need. The one you should use is the one that sounds the best to you.


Please rate the helpfulness of this tip.

Click on a star to rate it!

… for Adobe Premiere Pro CC

Tip #049: Customize Monitor Buttons

Larry Jordan – https://LarryJordan.com

Missing your favorite button. It isn’t gone – it’s hiding.

Tip Screen Shot

Topic $TipTopic

One of the goals for the Premiere development team over the last couple of years was cleaning up the interface to make it less cluttered. This meant making buttons disappear.

However, if one of those missing buttons was your favorite, don’t despair – they aren’t lost, just moved to a hidden part of the interface.

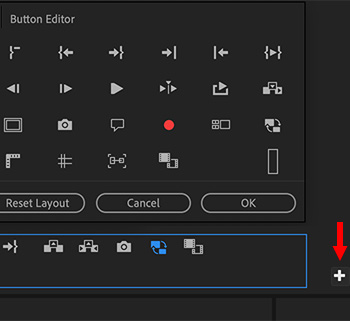
To unlock it, click the Plus icon in the lower right corner of either the Program or Source monitor (they each have an icon). This displays the Button Editor.

Hover over a button to see a description of what it does.

If you want it, drag it from the Button Editor into the button bar below it. (You can shuffle buttons in the button bar however you want.)

When you are done dragging:

  • Click OK to save your new button layout.
  • Click Cancel to remove your changes.
  • Click Reset Layout to restore the layout to its original setting.

EXTRA CREDIT

The Source and Program monitors can each have their own custom button layouts.


Please rate the helpfulness of this tip.

Click on a star to rate it!

… for Apple Final Cut Pro X

Tip #069: Create a Default Effect

Larry Jordan – https://LarryJordan.com

Your favorite effect is only one (unassigned) keyboard shortcut away.

Tip Screen Shot

Topic $TipTopic

Let’s say that your favorite video effects is a Gaussian Blur. You use it so much that it would save you a lot of time if you could apply that effect with a single keyboard shortcut.

You can and it’s easy.

  • Right-click (or Control-click) the effect you want to make the default and select Make Default Video Effect.
  • Next, select the clip, or clips, to which you want to apply the effect and type Option + E.

Your favorite effect is now exactly one keyboard shortcut away!

EXTRA CREDIT

You can also do the same with any audio effect:

  • Right-click and select Make Default Audio Effect

Now, when you type Option + Cmd + E, the default audio effect is applied to all selected clips.

Cool.


Please rate the helpfulness of this tip.

Click on a star to rate it!

… for Apple Final Cut Pro X

Tip #084: Find What You Need (Part 2)

Larry Jordan – https://LarryJordan.com

Final Cut supports searches on far more than text.

Tip Screen Shot

Topic $TipTopic

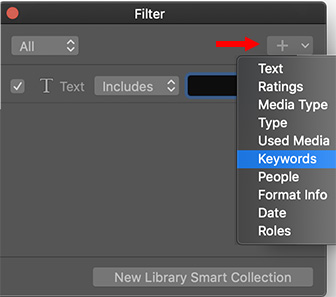
After you open the Search Filter window (see Tip #75) click the Plus icon in the top right corner.

This displays ten different categories you can use to search for specific media, as illustrated in this screen shot.

While all of these are useful, the two that I use the most are:

  • Text
  • Keywords

Text searches on file names, of course. But it also searches for all text entered in the Notes field as well as other metadata fields entered using the Info > Inspector.

NOTE: Metadata entered into clips in the Browser is searchable. Metadata entered into clips in the Timeline is not. So be sure to enter any metadata you want to search for later by applying it to clips in the Browser.

You can combine multiple categories in the same search. For example, Text AND Keywords AND Not used.

Keywords allow us to search for clips which contain, or don’t contain, keywords. Since FCP X now supports an almost unlimited number of keywords, I find myself using this feature frequently.

However, Tip #85 covers an equally important search feature – Boolean selection.


Please rate the helpfulness of this tip.

Click on a star to rate it!

… for Adobe Premiere Pro CC

Tip #060: Set vs Scale to Timeline

Larry Jordan – https://LarryJordan.com

This setting has a major impact on imported still image scaling and quality.

Tip Screen Shot

Topic $TipTopic

If all your still images precisely match the frame size of your project, all is good. But, when they don’t, this preference makes a big difference.

First, some background. All digital images are bitmapped. This means that, while you can make them smaller with no problem, you can’t scale them larger than 100%. If you do, the image gets increasingly blurry.

So, if you want to preserve image quality, it is critical for you to know when an image exceeds 100% size. The problem is that a default preference setting for Premiere makes this impossible.

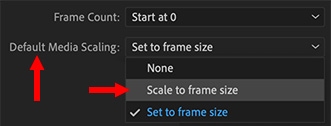
Here’s the setting to watch in Preferences > Media: Default Media Scaling.

  • Set to Frame Size. This is the default setting. It automatically scales the imported image to fit in the frame AND sets Effect Controls > Motion > Scale to 100%, regardless of the original size of the image.
  • Scale to Frame Size. This automatically scales the imported image AND adjusts Motion > Scale to reflect the amount of the change.

The second option, which is not the default, allows you to see how much an image was resized and, if you scale it larger, it is easy to see when scaling exceeds 100%. This prevents you from unknowingly damaging image quality.


Please rate the helpfulness of this tip.

Click on a star to rate it!