… for Apple Final Cut Pro X

Tip #196: Library Properties Give You Control

Larry Jordan – https://LarryJordan.com

Library Properties allow you to determine where all essential library elements are stored.

The Library Properties window in Apple Final Cut Pro X.
A typical Library Properties window in Final Cut Pro X.

Topic $TipTopic

Library Properties, in Final Cut Pro X, allow you to control where almost all media and work files are stored for each library. Best of all, these settings can vary by library.

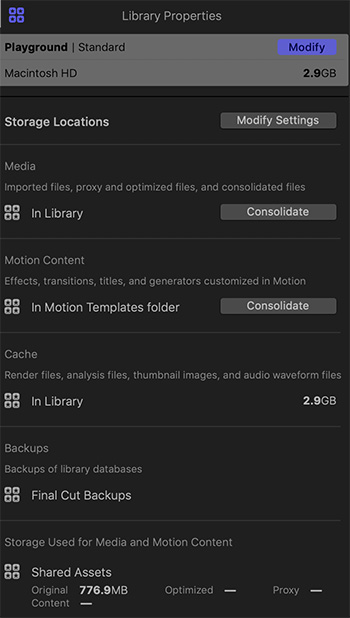
To display these, select an open Library in the Browser, then, open the Inspector. You’ll see a screen shot similar to this one.

  • Storage Locations. Allows you to determine where media, customized motion content, work and cache files and library backups are stored.

NOTE: Backups are only for the databases that FCP uses, media needs to be backed up separately.

  • Media. This allows you to consolidate media from external locations into the library. This can be effective when moving libraries between editors, however, it will make the library file potentially very large.
  • Motion Content. This allows you to consolidate customize Motion files stored in multiple locations into a single location. This does not move any of the original Apple Motion templates.
  • Cache. This displays where cache files are currently stored and how much space they take.
  • Backups. This displays where library backups are currently stored.

NOTE: Backups are saved with the time and date in the filename. To open a backup from a specific time and date and add it to the Libraries sidebar in Final Cut Pro, choose File > Open Library > From Backup.

  • Storage Used. This displays on which volume media is currently stored and how much space is used for camera native (original), optimized, proxy and content files. (This is media that was previously imported or generated for the selected library.)

NOTE: Existing source media and backup files remain in their original locations. If you changed the cache storage location, you’re asked if you want to move your existing active render files to the new location.


Please rate the helpfulness of this tip.

Click on a star to rate it!

… for Adobe Premiere Pro CC

Tip #137: Why Use Handles in the Project Manager?

Larry Jordan – https://LarryJordan.com

Handles allow you to make changes later.

Tip Screen Shot

Topic $TipTopic

We mark clips by setting an In and an Out. “Handles” are the extra media before the In and after the Out.

When we add a dissolve to a clip, we are using those handles because half of the the dissolve starts before the In on the incoming clip and half after the Out on the outgoing clip. So, also, with trimming. When we move an In earlier or an Out later, we are moving the edit point into the handles of a clip.

Audio, even more than video, uses handles to establish a sound even before we see the video.

For all these reasons, when you are transcoding clips, or archiving media for the future, be sure to include handles. The default setting in Premiere is 30 frames. In most cases, this is not enough. My recommendation is to save 5 seconds of extra media at the beginning and end of the clip.

Yes, it takes more storage space. But nothing is worse than needing an extra 1/2 second of a shot and not having it.


Please rate the helpfulness of this tip.

Click on a star to rate it!

… for Adobe Premiere Pro CC

Tip #139: Customize the Project Panel

Larry Jordan – https://LarryJordan.com

Freeform View is a new feature hidden in the Project panel.

Tip Screen Shot

Topic $TipTopic

The Project panel provides multiple ways for us to view and organize our clips. What you may not know are the three icons in the lower left that allow you to alter the display of clips and projects:

  • List view (2nd from left). This displays additional information about each asset in a table form. Control-click a column header to customize the information it displays. Drag a column header to change its location in the table.
  • Icon view (3rd from left). This view is great to view the contents of a clip in the Project panel. Press the spacebar to play a clip. Hover your cursor over an icon and the clip plays backwards or forwards as you drag your mouse.
  • Freeform view (4th from left). This view allows you to visually organize your assets and create storyboards with your media. You can use the Freeform view to arrange clips freely into a custom layout, unrestricted by any kind of grid and sort order.

The Freeform view is especially useful when you want to think spatially, stack or group media files, or arrange clips as storyboards and assembly edits. You can also save different layouts for the same project and switch between them.

BONUS

To learn more about Freeform view, see Tip #146.


Please rate the helpfulness of this tip.

Click on a star to rate it!

… for Apple Motion

Tip #154: 3D Transform Tool Adds Perspective

Larry Jordan – https://LarryJordan.com

On-screen controls allow faster element manipulation.

Tip Screen Shot

Topic $TipTopic

There are two ways to add perspective to any element in Motion: The Inspector and the 3D Transform tool. To enable the 3D Transform tool, click the icon to the immediate right of the Arrow tool that looks like a wire globe.

When you select an element in the Layers panel, a white wireframe box appears around it. Inside are three circles and three color arrows. The secret code is R – G – B.

  • R (Red) – Makes adjustments on the horizontal axis
  • G (Green) – Makes adjustments on the vertical axis
  • B (Blue) – Makes adjustments to and from the viewer (camera); the Z-axis.

For example, dragging the green arrow slides the shape vertically.

But, the real secret is in the three white circles. These create rotation.

  • Left circle. Rotates on the vertical axis. (It displays a green line.)
  • Top circle. Rotates on the Z-axis. (It displays a blue line.)
  • Right circle. Rotates on the horizontal axis. (It displays a red line.)

By selecting the 3D Transform tool and dragging these six controls, you can quickly and intuitively adjust the position and rotation of any selected element.


Please rate the helpfulness of this tip.

Click on a star to rate it!

… for Apple Motion

Tip #189: A REALLY Fast Way to Copy Settings

Larry Jordan – https://LarryJordan.com

Dragging is fast, easy and precise.

Tip Screen Shot

Topic $TipTopic

As projects get more complex, matching settings becomes increasingly tricky. Here’s a fast way to copy one or more settings from one element to another.

  • Select the layer that has the settings you want to copy.
  • Then, from the Inspector, select the settings you want to copy.
  • Once selected, drag them from the Inspector to the element you want to apply them to.

NOTE: All the settings you want to copy must be visible in the Inspector. To copy settings hidden in other menus, simply make those settings visible and repeat the process.

EXTRA CREDIT

  • To select a single setting: click-and-drag it.
  • To select multiple settings that are next to each other: Shift-click
  • To select multiple settings that are not next to each other: Cmd-click.

Please rate the helpfulness of this tip.

Click on a star to rate it!

… for Apple Final Cut Pro X

Tip #192: Faster Ways to Show the Audio Meters

Larry Jordan – https://LarryJordan.com

One click to greater audio accuracy.

Miniature audio meters are displayed next to timecode in FCP X.

Topic $TipTopic

The audio meters in Final Cut are the only accurate way to measure the audio levels in your project. And, you probably display them using Window > Show in Workspace > Audio Meters. Or, um, you may just leave them open all the time.

NOTE: Or, you may be a shortcut lover like me and memorize the keyboard shortcut: Shift + Cmd + 8.

BUT… there’s an even cooler way to display the audio meters:

  • Click the small audio meter icon immediately to the right of the timecode display.
  • Click once to display the meters, click a second time to put them away.

Truthfully, I use this last option all the time.


Please rate the helpfulness of this tip.

Click on a star to rate it!

… for Apple Final Cut Pro X

Tip #195: What is an Audio Component?

Larry Jordan – https://LarryJordan.com

Audio components allow manipulating audio channels separately.

View a clip's audio channels in the Audio Inspector.

Topic $TipTopic

An audio component is a channel in an audio file. For example, a stereo file has two channels – left and right. By default, Final Cut blends all the different channels in a clip into a single output. But, you can easily see each channel for clips located in either the Timeline or the Inspector. Here’s how.

  • Select a clip in either the Browser or the Timeline.
  • Go to the bottom of the Audio Inspector and change the menu in the top right corner to Mono. This displays each audio channel in the clip.
  • Drag across each channel to preview it.

NOTE: As you drag across a channel the source timecode is displayed in the Viewer.

  • Uncheck a channel to disable its audio.

NOTE: If you disable a channel in the Browser, it will remain disabled when you edit that clip into the Timeline.

EXTRA CREDIT

To display the audio components of a clip in the Timeline, choose Clip > Expand Audio Components. (Shortcut: Control + Cmd + S).

Displaying audio components in the Timeline also allows you to trim and modify audio levels for each channel separately.


Please rate the helpfulness of this tip.

Click on a star to rate it!

… for Codecs & Media

Tip #014: Optimize Audio Levels for MP3 Compression

Larry Jordan – https://LarryJordan.com

MP3 compression sounds best when audio levels are not excessive.

Tip Screen Shot

Topic $TipTopic

The MP3 audio compression standard was invented back in the days of analog audio. Because of this, the compression standard was optimized for audio levels lower than 0 dB to prevent problems with high-energy transient audio peaks, which an analog system often didn’t catch.

Specifically, MP3 audio files sound the best if average peak levels are around -6 dB.

AAC (MPEG-4) audio files, however, being newer and taking advantage of digital technology, are optimized for audio levels that peak right at 0 dB.


Please rate the helpfulness of this tip.

Click on a star to rate it!

… for Adobe Premiere Pro CC

Tip #141: How to Set a Poster Frame in the Project Panel

Larry Jordan – https://LarryJordan.com

Poster Frames are displayed in the Program Panel when no In or Out is set.

Tip Screen Shot

Topic $TipTopic

A Poster frame is a still image displayed in a clip when you are in thumbnail view in the Project panel. Poster frames are displayed when no In or Out is set. By default, the poster frame is the first frame in a clip, unless you change it.

Here’s how to create a new poster frame.

  • To set a poster frame for the media clip, drag the playhead or hover scrub to the desired frame, and then press Command + P (macOS) or Shift + P (Windows).
  • To clear the poster frame, press Option + P (macOS) or Ctrl + Shift + P (Windows).

Please rate the helpfulness of this tip.

Click on a star to rate it!

… for Apple Final Cut Pro X

Tip #186: Download Your Free Stuff!

Larry Jordan – https://LarryJordan.com

All content is free and availably for any project without royalties.

Tip Screen Shot

Topic $TipTopic

You may not know that Final Cut Pro X ships with a ton… well, at least a big bunch, of free media and other files. However, these are not installed with Final Cut itself.

To access these free files, choose Final Cut Pro > Download Additional Content.

This opens System Preferences > Software Update where you can easily download and install these files. All files shipped with Final Cut can be used royalty-free on any project.


Please rate the helpfulness of this tip.

Click on a star to rate it!