… for Random Weirdness

Tip #951: 5 Easy Hacks for a Solo Shoot

Larry Jordan – LarryJordan.com

These five tips will help improve your next shoot.

(Image courtesy of Pexels.com.)

Topic $TipTopic

This article, written by Tanner Shinnick, first appeared in PremiumBeat.com. This is an excerpt.

Work smarter, not harder! Tips, tricks, hacks — whatever you call them — these five easy moves will make your next solo video shoot better.

Clients are looking for every opportunity to cut costs and save money. Yet, with customers spending more time online looking at screens, they need more video than ever. And that means there’s money to be made by videographers and filmmakers with the right gear, attitude, and hustle to offer end-to-end, turnkey production capabilities.

  1. Use Camera and Equipment Carts. When you’re working alone, minimizing the amount of equipment you need to carry is absolutely key. As such, gear and camera carts are total game-changers.
  2. Don’t Sleep on B-Roll. When you’re on a solo shoot, the stress may begin to set in and you might think you’re saving time and energy by sacrificing B-roll. Don’t believe it. You’re filming solo, sure, but that doesn’t mean it has to look like you filmed alone.
  3. Choose Zooms Over Primes. Most of the time, I love a solid prime over a zoom. However, man, they sure do slow you down. For solo operators, choosing a zoom over a prime is an absolute must.
  4. Bring Extra Media. Whenever I’m working a solo shoot, I bring enough media to last me the entire day.
  5. Embrace Stock Footage. Stock footage is a smart choice when you need shots that scheduling, headcount, and gear limitations don’t allow for. It’s an even smarter choice when you make the clips part of your plan right from the start of your project.

The article link at the top has more tips, links and a video on solo shooting.


Please rate the helpfulness of this tip.

Click on a star to rate it!

… for Adobe Premiere Pro CC

Tip #943: What is a Stacked Panel Group?

Larry Jordan – LarryJordan.com

Stacked menus are often better when working on a smaller monitor.

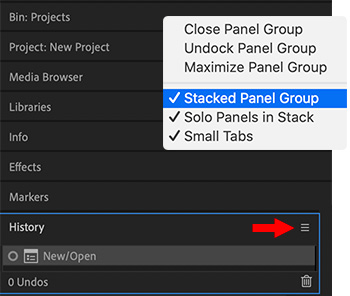
Premiere panels displayed stacked, and the menu that activates them (inset).

Topic $TipTopic

In the fly-out menu for most panels, there’s an option for “Stacked Panel Groups.” Ever wonder what this does? Here’s the answer.

When you click the fly-out menu (pancakes) next to most panel names, one of the options is Panel Group Settings.

Click it and the menu shown in the screen shot appears.

The default setting has both Stacked Panel Groups and Solo Panels in Stack unchecked.

When you check Stacked Panel Groups, all panels in that group are listed vertically (see screen shot).

When Solo Panels in Stack is checked, only the contents of the currently active panel are displayed. Otherwise, the contents of all open panels are visible.

NOTE: The Solo option only applies when panels are stacked. The benefit to using Solo is that it keeps the interface cleaner on smaller monitors.


Please rate the helpfulness of this tip.

Click on a star to rate it!

… for Apple Final Cut Pro X

Tip #871: A Faster Way to Change Durations

Larry Jordan – LarryJordan.com

I use this technique in virtually every project – especially for transitions.

Setting a duration in the timecode display.

Topic $TipTopic

I illustrated this tip while presenting a recent webinar covering the basics of editing in Final Cut Pro X.

We all know that we can change the duration of a clip, title or transition by grabbing an edge and dragging. But, there is a faster way – using timecode.

To use this technique:

  • Select a clip, group of clips, transition, title or other timeline element.
  • Type Control + D. This automatically opens and selects the Duration field in the Timecode window.
  • Type the duration you want to enter, without entering any punctuation.

Final Cut will automatically calculate the correct time based upon the frame rate of the project. For example, if you have a 30 fps project and type:

  • 30 – Final Cut enters: 1:00
  • 120 – Final Cut enters: 1:20
  • 45 – Final Cut enters: 1:15
  • 325 – Final Cut enters 3;25
  • 1234567 – Final Cut enters: 1:23:47:07 (Um, that one I had to check…)

Please rate the helpfulness of this tip.

Click on a star to rate it!

… for Codecs & Media

Tip #829: Why Are Some Codecs “Inefficient?”

Larry Jordan – LarryJordan.com

GOP compression yields smaller files, but those files are much harder to edit.

Topic $TipTopic

One of the key reasons for transcoding highly-compressed camera masters into an intermediate (or mezzanine) format is to make the media more “efficient.” But, what makes some codecs efficient and others not?

In general, there are two ways that media can be compressed:

  • I-frame
  • GOP

In I-frame compression, each frame in a sequence is compressed individually. The entire contents of the frame are contained in that compressed image. This means that to display that image, all the computer needs to do is uncompress that one frame.

In GOP compression images are compressed in groups; generally containing either 7 or 15 frames. The first image is compressed in its totality. However, for each remaining image in the group, only those pixels that are different in each frame from the preceding frame are compressed and stored in the file.

NOTE: GOP (pronounced “gop”) is an acronym for “Group of Pictures.”

GOP compression creates far smaller files because only portions of each frame are getting compressed.

However, in order to display a GOP-compressed frame, the computer needs first to find the first frame in the group and decompress it. Then, it needs to add all the changes stored in all the frames after the first frame and up to the frame the playhead is parked on.

While GOP compression creates very small files, the computer has to work VERY hard to display each frame as you jump randomly around in the timeline. This is especially true as multiple clips are stacked above each other. Each group needs to be decompressed separately.

GOP compression is perfect for playback, because the changes in each frame can easily be added to the currently displayed frame. However, video editing means that we are randomly jumping from one frame and clip to another. In those situations, I-frame compression is much more efficient because only one frame needs to be decompressed, not an entire string.


Please rate the helpfulness of this tip.

Click on a star to rate it!

… for Codecs & Media

Tip #828: What is Hardware Acceleration?

Larry Jordan – LarryJordan.com

Hardware is faster because it doesn’t have the latency and overhead of software.

Image courtesy of Pexels.com.

Topic $TipTopic

As media compression codecs get more complex, compression starts taking longer and longer. Hardware acceleration comes to the rescue, but… what, exactly, is it doing?

In computing, hardware acceleration is the use of computer hardware specially made to perform some functions more efficiently than is possible in software running on a general-purpose central processing unit (CPU).

Hardware is far faster, but software is far more flexible when it comes to handling change. Hardware is superior when performing the same task over and over and over again. This is because software has a processing overhead due to loading and interpreting instructions as well as data. Hardware, provided it is designed for that purpose, doesn’t have the overhead and delay associated with software. But, it is much more difficult changing hardware when the task it needs to perform changes.

An operation can be computed faster in application-specific hardware designed or programmed to compute the operation than specified in software and performed on a general-purpose computer processor.

Hardware acceleration is advantageous for performance, and practical when the functions are fixed so updates are not as needed as in software solutions. However, the invention of reprogrammable hardware (FPGSs) has allowed hardware to be more flexible because it can be reprogrammed as necessary.


Please rate the helpfulness of this tip.

Click on a star to rate it!

… for Adobe Premiere Pro CC

Tip #766: Faster Ways to Import Media

Larry Jordan – LarryJordan.com

I knew these tips – once – but over the years I forgot them. Here they are, again.

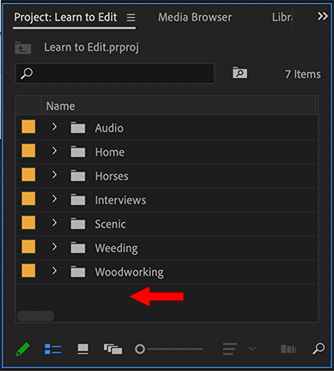
Double-click in an empty area of the Project panel to open the Import dialog.

Topic $TipTopic

As I was researching last week’s webinar on Adobe Premiere, I re-discovered two tips for faster imports and easier clip organization. It was good to relearn these, because both can save you time.

TIP #1

I’m a keyboard junkie, so I long ago developed the habit of typing Cmd + I to import media.

But, sometimes, the mouse is even faster: Double-click anywhere in the dark gray area of the Project panel (red arrow) to open the Import dialog.

TIP #2

I’m a fan of organizing media as much as possible on my hard disk before starting a project. Specifically, I create a single master folder for project media, then create subfolders. This could be subfolders for each camera card or stills or audio or whatever grouping makes sense to you.

Then, when it’s time to import, I select all the subfolders and Premiere imports each folder into its own bin; as you can see in the screen shot.

EXTRA CREDIT

These folders are not dynamic. That means that if you add clips to a Finder folder after importing, Premiere does not automatically update the bin with the new media.


Please rate the helpfulness of this tip.

Click on a star to rate it!

… for Random Weirdness

Tip #761: 5 Tips to Make Your Deadlines

Larry Jordan – LarryJordan.com

No time like the present to get yourself organized.

(Image courtesy of pexels.com)

Topic $TipTopic

This article first appeared in MotionArray.com. This is an excerpt.

Deadlines are the bane of every video creator’s existence — but often the only way we can get our work done. But the worst feeling an artist or producer can have is when they miss a deadline. Often it’s not even their fault, but various circumstances cause deadlines to be missed every day.

Here are five ways to avoid missing those deadlines and having angry clients breathing down your neck.

  1. Make Fake Deadlines. Work expands to fill the time. If you know you have a deadline coming up in five days, you’ll likely take five days to get the work done. Instead, set false deadlines a few days before the actual deadline. This will alleviate the feeling of impending doom that surrounds deadlines because you’ll always be ahead of schedule and you’ll always have time to fix issues.
  2. Hold Clients Accountable. Many times deadlines are missed because of clients. To eliminate this problem, set up a detailed timeline for your projects that includes dates and times for client feedback. Get them to sign off on the feedback calendar ahead of time.
  3. Get Organized. The easiest way to miss a deadline is to forget to make a change until the last minute or altogether. Clients can sometimes be unclear with notes. They may give you some notes on a call, and others in an email (or several). With information coming from all directions, it’s easy to miss something. Figure out an organization method for changes that work for you.
  4. Make Friends. Sometimes we miss deadlines because we take on more than we can handle. Network with other professionals who can make up for your weaknesses. When possible, hire them to help you out so that you deliver above your client’s expectations and on time. Templates are another great way to get things done quickly and to help you cover for certain skills you may lack.
  5. Learn to Say No. One thing is for sure, if you start missing deadlines, your clients won’t come back. Taking on a job that you don’t have time for, or is above your skill set can do more damage than good. Let the client know that you’d love to help them, but you just won’t be able to get it done as proposed. They’ll thank you for it.

EXTRA CREDIT

The article linked above has more details, along with links to software, templates and other tools that can help you stay on track.


Please rate the helpfulness of this tip.

Click on a star to rate it!

… for Adobe Premiere Pro CC

Tip #754: Set Grayscale Values FAST!

Larry Jordan – LarryJordan.com

One Button Access to Better Grayscale

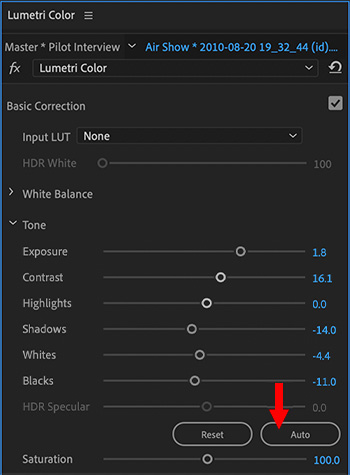
At the bottom of Basic Correction, click Auto to set overall grayscale tonal values.

Topic $TipTopic

The most frequent color adjustment we need to make to a clip isn’t color at all, but grayscale. Here’s a one-button trick to set grayscale values faster and better in Premiere Pro.

  • Open the Lumetri Color panel, then click Basic Correction.
  • At the bottom of that section is Auto.
  • When you click Auto, Premiere Pro sets the sliders to maximize the tonal scale and minimize highlight and shadow clipping.

Clicking this sets all the parameters in Tone automatically. You can then tweak each of them to get precisely the look you want. All changed settings are adjustable.


Please rate the helpfulness of this tip.

Click on a star to rate it!

… for Adobe Premiere Pro CC

Tip #699: A Fast Way To Color Balance

Larry Jordan – LarryJordan.com

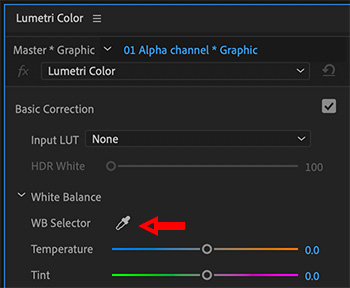
Click the WB Selector on something that’s supposed to be gray to remove color casts.

Click the WB Selector eyedropper on something gray in an image.

Topic $TipTopic

Deep inside the Lumetri Color panel is a tool that makes removing color casts a snap… well, ah, actually, a click. Here’s how it works.

  • Select the clip you want to color correct.
  • Switch to the Color workspace and open Lumetri > Basic Correction.
  • Click the WB Selector eyedropper. It won’t change color when you select it, which is distracting.
  • Click the eyedropped on something in the currently selected image that is supposed to be mid-tone gray or white.

Instantly, the image is corrected so that the color cast disappears.

EXTRA CREDIT

What this tool does is adjust temperature and tint settings to color correct the image. If you don’t like the results, you can manually adjust both sliders to improve the results.

Additionally, once the color correction is to your liking, click the Auto button at the bottom of this section to automatically set grayscale levels for the clip.


Please rate the helpfulness of this tip.

Click on a star to rate it!

… for Codecs & Media

Tip #691: Compare Post-Production Codecs

Larry Jordan – LarryJordan.com

Compare Cineform, DNx, ProRes, DPX and Uncompressed; all in one table.

Topic $TipTopic

This tip, written by David Kong, first appeared in Frame.io Insider. This is a summary.

The team at Frame.io pulled together a list of more than 50 of the most common intermediate codecs used in video post-production, so that you can compare codecs against each other.

This covers intermediate codecs, not camera codecs. Each company publishes their own specifications in different formats, but they scoured the Internet and brought them all into a single page. If you want to compare ProRes vs DNxHD, ProRes vs Cineform, DNxHD vs. DPX, or any other combination, this table can help you choose the right codec for your next project.

Click the link above to view the comparison table.


Please rate the helpfulness of this tip.

Click on a star to rate it!