… for Apple Final Cut Pro X

Tip #028: A Faster Way to Export – Part 2

Larry Jordan – https://LarryJordan.com

Exporting isn’t just for single files anymore.
Tip Screen Shot

Topic $TipTopic

There are two ways you can export faster:

  • Use keyboard shortcuts
  • Take advantage of background processing and export multiple clips or projects at the same time

This tip covers the second option. Tip #27 covered the first.

THE OLD WAY

In the Olde Days, we needed to wait for a project to finish exporting before we could do anything else. Then, Final Cut Pro X was released.

Final Cut was designed to both render and export in the “background.” This means that anytime you are not playing a clip in the Browser or the timeline, FCP X will render or export whatever needs to be rendered or exported.

There’s nothing you need to do to “enable” this – but you can take advantage of it.

THE NEW WAY

Let’s say you want to export four projects that the client just approved.

  • Select them in the Browser.
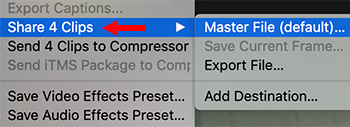
  • Choose File > Share. Notice that this menu now says: Share 4 Clips [ or Projects]

In the Export > Settings window, you will need to apply the same export settings to all the selected items, but the good news is that with one menu choice – or keyboard shortcut – you can export multiple files at the same time.


Please rate the helpfulness of this tip.

Click on a star to rate it!

… for Apple Final Cut Pro X

Tip #027: A Faster Way to Export – Part 1

Larry Jordan – https://LarryJordan.com

One simple keystroke is all it takes – except, it doesn’t exist.

Tip Screen Shot

Topic $TipTopic

When you’ve finished a project and it is time to create a master file, there are two ways you can export faster: you could create a keyboard shortcut or take advantage of background processing and export multiple clips or projects at the same time

This tip covers the first option. Tip #28 covers the second.

THE OLD WAY

Normally, you select what you want to export in either the timeline or Browser, then choose File > Share > Master file. (Or the export option of your choice.)

THE NEW WAY

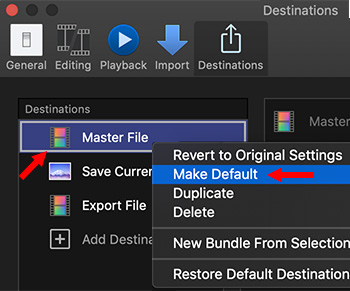
However, in Final Cut Pro X > Preferences > Destinations, you have the option to assign a keyboard shortcut (Cmd + E) to the export/share option of your choice.

Because I tend to create multiple versions of my projects for various different distribution channels, I always export a Master file from FCP X. However, this process works for any Destination.

Right-click (Cntrl – click) the Destination to which you want to assign this shortcut and choose Make Default.

NOTE: A keyboard shortcut can be assigned to only one destination.

Close the Preferences window and you’re done.

The next time you want to export, type Cmd + E and – Poof! – the Export Settings window appears.

Faster than a mouse!


Please rate the helpfulness of this tip.

Click on a star to rate it!

… for Apple Final Cut Pro X

Tip #006: One Click to Better Color!

Larry Jordan – https://LarryJordan.com

One click and – poof! – a color cast is gone.

Tip Screen Shot

Topic Icon

With the 10.4 update to Final Cut Pro X, Apple made one small change to the Balance Color feature that converted it from useless to magical.

  • Put the playhead in the clip you want to color correct in the Timeline.
  • Select Modify > Balance Color.
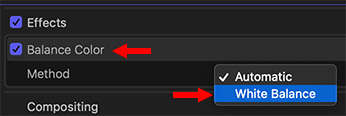
  • In the Video Inspector, enable Balance Color and change it from Automatic to White Balance.
  • Using the resulting eye-dropper, click something in the image that’s supposed to be gray.

Poof! FCP X removes the errant color cast and your image looks great!

You can do more with the color wheels to create a look, but nothing is faster at fixing a color cast than this.


Please rate the helpfulness of this tip.

Click on a star to rate it!

… for Adobe Premiere Pro CC

Tip #036: Changing Monitor Resolution Means Faster Previews

Larry Jordan – https://LarryJordan.com

Changing display resolution does not fix dropped frame problems.

Tip Screen Shot

Topic Icon

You probably know that changing the screen resolution in either the Program or Source Monitors from Full (highest quality) to 1/2 or 1/4 reduces the amount of time that you spend rendering because Premiere only needs to display 50 or 25 present of the total pixels in each frame of video.

While this decreases the load on the CPU and allows it to play more effects in real-time without rendering, it does not decrease the amount of data that’s required between your storage and your computer.

For example, this won’t fix dropped frame errors – which are almost always caused by storage that’s too slow to support the video format being played. Regardless of the display resolution, Premiere still needs to transfer the complete media file in real-time or faster.

Setting the screen playback resolution to 1/2 effectively quarters the number of pixels that need to be computed for each frame. This will reduce dropped frames caused by a slow CPU, but not by slow storage.


Please rate the helpfulness of this tip.

Click on a star to rate it!