… for Apple Motion

Tip #1683: Change a Motion Project Duration

Larry Jordan – LarryJordan.com

Changing durations is possible, but it requires a lot of manual clean-up.

Project duration is changed in Inspector > Properties.

Topic $TipTopic

It’s possible to change the duration of a Motion project – but it isn’t always wise. Learn more.

The absolutely best place to change the duration of a Motion project is in the Project Browser before you add any elements into the project. At that point, you can create whatever duration you want.

You can still change it after you’ve started editing, but you probably won’t like the results.

To change the duration:

  • Select the Project name in the Layers panel.
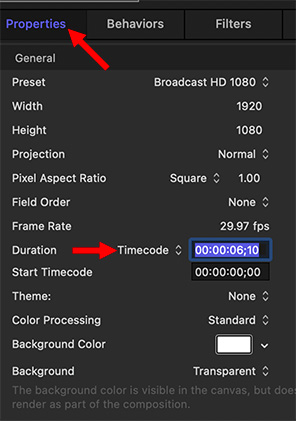
  • Open Inspector > Properties.
  • Half-way down the Duration of the currently selected project is displayed (see screen shot).

However – if media is edited into the project:

  • You can’t make it shorter than the existing media placed into the Layers panel (though there’s a work-around I’ll discuss in a minute).
  • You can make it longer, but none of your media or effects are adjusted for the new length.

WORK-AROUND. If you first make a project longer than its current duration, you can then make it shorter than its current duration, except that, again, none of your media or effects are adjusted.

This means that changing duration after media is added into a project requires you to change all media and effects locations and durations manually to conform them to the new timing.


Please rate the helpfulness of this tip.

Click on a star to rate it!

… for Apple Motion

Tip #1675: View Control Icons in Motion

Larry Jordan – LarryJordan.com

These icons control the view, not the image you are creating.

These four icons move your view, without affecting your project.

Topic $TipTopic

When you add a camera or light to create a 3D group, three or four icons appear in the top right corner of the Viewer. Here’s what they mean.

Looking at the screen shot, the camera icon only appears when you add a camera into a project. This icon appears when you are looking at the camera view. If you view the scene from the top or side, this icon disappears. This icon reminds you when you are seeing the view the audience will see, or, more importantly, when you are NOT seeing it.

Dragging the four-arrow icon moves the view in the Viewer – NOT the image you are creating – left / right or up / down. The actual direction you move is dependent upon your view. Looking at the scene from the front, left/right is actually left and right. Looking at the scene from the side, left / right actually means front and back.

The rotating arrow rotates the view on whatever axis is perpendicular to your monitor – which, again, depends upon your view.

The far right arrow moves you forward or back in depth.

EXTRA CREDIT

Some of these options will be grayed out when you add a light without adding a camera. And, to stress, this changes your view, but not your project.


Please rate the helpfulness of this tip.

Click on a star to rate it!

… for Visual Effects

Tip #1662: Dissecting “Jisei” – An Animated Short

Larry Jordan – LarryJordan.com

Animation requires tools, techniques, creativity and imagination. And lots of time.

Image courtesy of Motionographer.com.

Topic $TipTopic

Jisei is an animated short that turns reality on its head in fascinating ways, based on the poem: “Do Not Stand at My Grave and Weep.” Directed by Tom Teller and Julian Conner, it is currently featured on Motionographer.com.

In this article – link – they interview the two directors about the creative process for the work.

Tom describes Jisei is “an experimental short film that follows the recollection of one’s memories as they experience death. It was something we had wanted to make for a while. For better or for worse, we’re both fascinated with death; I’ve had a few close brushes with it between a pretty bad motorcycle crash and a plane landing gear failure. For me, this film was an effort to express some thoughts and feelings that crossed my mind in those moments.”

Julian continues: “After countless hours discussing the topic, we finally landed on the premise that the choices we make every single day of our lives compound on themselves, resulting in our impact on the world after we’re gone. It’s all connected, the places you’ve lived, the people you’ve met, the ideas you’ve had – and in Jisei, we chose to connect them quite literally with an astronaut’s tether.”

Tom: We started with Miro, an online whiteboard application, where we wrote down all of our initial concepts and ideas, pulled references from other pieces and drew mock-up scenes. We spent quite a bit of time iterating on the core concept and the message we were trying to send. After the narrative structure, we moved on to look-dev and animation. All of the CG was done in 3DS Max and rendered with V-Ray on GPU. For compositing, we used After Effects and Nuke.”

Julian: “We both have backgrounds in Photoshop and relied heavily on it during the initial concept stages. I would mock-up a frame and express my motivation behind the composition, and he would do the same. Before we began previs, I would be working with these boards in Adobe Premiere and automating some test animation that Tom would take much further in 3DS Max.”

The entire interview, along with production stills and the short film itself is covered here.


Please rate the helpfulness of this tip.

Click on a star to rate it!

… for Visual Effects

Tip #1663: VFX in “The Falcon and the Winter Soldier.”

Larry Jordan – LarryJordan.com

“The Falcon…” made extensive use of digital doubles.

To create the impression that the stationary trucks were going 120kms, Rodeo FX moved the road at the required speed while adding bits of rocks, dirt and dust being kicked up.

Topic $TipTopic

This article, written by Trevor Hogg, first appeared in VFXVoice.com. This is a summary.

Initially meant to be the first small-screen venture for Marvel Studios on Disney+, the coronavirus pandemic and subsequent production lockdown caused The Falcon and the Winter Soldier to follow after WandaVision.

In this interview with showrunner Malcolm Spellman, director Kari Skogland and VFX Supervisor Eric Leven, VFXVoice explores how the effects for this multimillion dollar series were created.

Eric Leven: “It wasn’t like we had to figure out a new look for an energy beam or something like that. It was to make this photographically real. … Just trying to figure out if you were shooting something for real, how would you photograph it? Where would the camera be? How fast would the camera be moving? We orchestrated two aerial units. We had a helicopter plate shoot in New York to capture plates for Episode 106 and then we had the skydiving unit for Episode 101. Stunt guys actually had a day when they went out on real trucks, drove down and pretended to fight just to see what that would look like.”

Key collaborators were Special Effects Supervisor Daniel Sudick and Supervising Stunt Coordinator Hank Amos. “The special effects department has done every Marvel movie, so they know how to do everything,” states Leven. “I remember talking to Hank Amos, the stunt coordinator, about a scene in the Hot Potato where it is scripted that there is a guy strapped to a skydiver and they’re going to jump out of the plane together. I asked him, ‘Do we need to put in a digital double on another guy’s back?’ He was like, ‘We can do that for real.’ The wingsuit pilots were phenomenal to watch. Not only are they making these incredible maneuvers in the air but also photographing themselves doing it with just the right camera angles and action, and doing multiple takes during the freefall.” Falcon (Anthony Mackie) flies through a helicopter to grab his intended target. “There are two parts to that,” Leven explains. “There is a wide shot where it is all digital. Then there is a closeup. We had the stuntman playing Captain Vassant sitting on a chair with a wire pull. He was pulled out and then we added a digital Falcon on top of that. Somewhere when he gets pulled out, we transition to a digital Captain Vassant. So easy!”

EXTRA CREDIT

The interview – linked above – contains extensive production stills, plus lots more detail on the VFX process for the film.


Please rate the helpfulness of this tip.

Click on a star to rate it!

… for Adobe Premiere Pro CC

Tip #1644: How to Create a Fit-to-Fill Edit

Larry Jordan – LarryJordan.com

Fit-to-Fill edits are uncommon – but easy to create when needed.

A marked duration in the Timeline (note the In and Out marks).

Topic $TipTopic

I re-discovered this technique while researching my recent webinar: Clip Speed Effects in Adobe Premiere Pro.

A Fit-to-Fill edit changes the speed of a source clip to match a specific duration in the Timeline. While specialized, they are often used when editing clips to music and you can’t change the timing of the music, but need the action to finish in the duration available.

Here’s how to create one in Premiere Pro:

  • Set an In and Out (Shortcuts: I and O) for the clip you want to use in the Source Monitor.
  • Set an In and Out in the Timeline setting the duration you want that clip to fill.
  • Type [period].

Premiere edits the clip into the Timeline and changes its speed so that the entire duration specified by the In and Out in the Browser is squeezed into the defined space in the Timeline.

EXTRA CREDIT

Fit-to-Fill edits always change the speed of the inserted clip.


Please rate the helpfulness of this tip.

Click on a star to rate it!

… for Adobe Premiere Pro CC

Tip #1645: Create High-Quality Slow Motion

Larry Jordan – LarryJordan.com

High-frame-rate video creates beautiful slow motion. The trick is calculating the playback speed.

The Properties window for a specific clip, with its frame rate highlighted.

Topic $TipTopic

I re-discovered this technique while researching my recent webinar: Clip Speed Effects in Adobe Premiere Pro.

One of the exciting features in mobile phones these days is the easy ability to shoot high-frame rate videos. (The film world calls this “over-cranking.”) This creates extremely high-quality, extremely slow motion videos.

Here’s how to display that glorious slow motion in Adobe Premiere Pro.

  • Go to Sequence > Sequence Settings and verify your Timebase. This is the frame rate of your sequence.
  • Control-click the clip you want to slow in the Files panel and select Properties.
  • In Properties, verify the frame rate of the clip. (See screen shot.)
  • Then, divide the Timebase rate by the clip frame rate to determine the percentage you need to change the clip speed to get every frame to play.

NOTE: As an example, a timebase of 30 fps divided by a clip frame rate of 240 fps equals 0.125, which converts to a percentage of 12.5%. (Multiply the division result by 100. Round 23.98, 29.97 and 59.94 frame rates up to the next whole number.)

  • Select the timeline clip and type Cmd + R to display the Clip Speed / Duration window.
  • Change the Speed setting to match the percentage you just calculated.

Now, when you play the clip, you’ll see liquid slow motion, without artifacts or jerkiness, while playing every frame your camera shot.


Please rate the helpfulness of this tip.

Click on a star to rate it!

… for Apple Final Cut Pro X

Tip #1641: How to Create a Fit-to-Fill Edit

Larry Jordan – LarryJordan.com

A Fit-to-Fill edit is uncommon – but easy to do when you need one.

The Replace clip options menu.

Topic $TipTopic

I re-discovered this technique while researching my recent webinar: Clip Speed Effects in Apple Final Cut Pro.

A Fit-to-Fill edit automatically alters the speed of a clip in the Browser to fit a specific duration in the Timeline. While specialized, they are often used when editing clips to music and you can’t change the timing of the music, but need the action to finish in the duration available.

To create it:

  • Add a gap, placeholder or other clip into the timeline with the duration you need. (For simplicity, I’ll call this the “gap.”)
  • In the Browser, mark an In and Out for the clip you want to insert into the gap.
  • Drag the clip from the Browser on top of the gap in the Timeline.
  • In the pop-up window, select Replace with Retime to Fit.

Because the Browser clip has both an In and an Out, Final Cut can change the speed of the Browser clip so it exactly fills the gap you created in the Timeline.

EXTRA CREDIT

A Fit-to-Fill edit always changes the speed of the Browser clip, unlike any other replace edit.


Please rate the helpfulness of this tip.

Click on a star to rate it!

… for Adobe Premiere Pro CC

Tip #1634: New! Loudness Meter in Premiere

Larry Jordan – LarryJordan.com

The new Loudness Meter provides very granular details on audio levels.

The new Loudness Meter in Premiere & Audition, using the YouTube setting.

Topic $TipTopic New with the May, 2021, update to both Audition and Premiere Pro is the Loudness Meter; separate from the long-standing Loudness Radar. Here’s how the Meter works.

  • Apply the Loudness Meter (Effects > Audio Effects > Special > Loudness Meter) the same as any other effect.
  • In Effect Controls, scroll down until you see Loudness Meter, then click the Edit button.

The Loudness Meter is displayed (see screen shot).

NOTE: This measures audio levels, it does not adjust them.

  • From the Presets menu, choose the monitoring settings you want to use for your audio.

NOTE: You can adjust these settings using the Settings tab in this panel.

For example, the YouTube setting has a target of -14 LUFS, with a maximum true peak of -1 dBTP.

NOTE: There are four different options for measurement scale: LUFS, LKFS, LU/LUFS and LU/LKFS. My general preference is LKFS.

I like the Radar because it shows audio levels over time. I like the new Loudness Meter because it shows more granular detail about my audio on an instant-by-instant basis.


Please rate the helpfulness of this tip.

Click on a star to rate it!

… for Apple Motion

Tip #1611: Remove Keyframes in Motion

Larry Jordan – LarryJordan.com

Here’s how to get rid of keyframes you no longer want.

The small white arrow allows removing keyframes by resetting a parameter.

Topic $TipTopic

Sometimes, Motion creates keyframes when you don’t expect them. Here’s why and how to get rid of them.

There’s a keyboard shortcut in Motion that’s the culprit: A. Yup, one letter. And it is also the shortcut for the Arrow tool in Final Cut – one we use ALL the time! When you think you’re selecting the Arrow tool in Motion, you’re actually creating keyframes.

Sigh… Really. Dumb.

To turn off this setting, type A again.

If you see parameter values in red, that means that they are set using keyframes. (That’s the give-away.)

To remove keyframes that you don’t want, click the small arrow on the right of a parameter name (red arrow in screen shot) or setting and choose Reset Parameter.

EXTRA CREDIT

You can change this keyboard shortcut using Motion > Commands > Customize. Or use the Final Cut Pro command set.


Please rate the helpfulness of this tip.

Click on a star to rate it!

… for Apple Final Cut Pro X

Tip #1605: How to Reset a Slomo Clip to Normal

Larry Jordan – LarryJordan.com

Shift + N is the shortcut to reset clips to 100% speed.

The Retiming menu under the Viewer.

Topic $TipTopic

When you need to reset a slow motion clip back to 100% speed, the easiest way to do this is to choose Modify > Retiming > Normal (100%).

This matches the speed of the clip to the frame rate of your project.

EXTRA CREDIT

You can also use the Retiming menu underneath the Viewer (see screen shot) or the shortcut: Shift + N.


Please rate the helpfulness of this tip.

Click on a star to rate it!