Media Apple FCP X

… for Codecs & Media

Tip #954: VP9 Refresher

Larry Jordan – LarryJordan.com

YouTube uses the VP9 codec exclusively for 4K HDR media.

Topic $TipTopic

Apple introduced support for the VP9 codec in the fourth beta of macOS Big Sur, specifically for Safari. Here’s a quick refresher.

According to Wikipedia:

VP9 is an open and royalty-free video coding format developed by Google. It is supported in Windows, Android and Linux, but not Mac or iOS.

VP9 is the successor to VP8 and competes mainly with MPEG’s High Efficiency Video Coding (HEVC/H.265).

In contrast to HEVC, VP9 support is common among modern web browsers with the exception of Apple’s Safari (both desktop and mobile versions). Android has supported VP9 since version 4.4 KitKat.

An offline encoder comparison between libvpx, two HEVC encoders and x264 in May 2017 by Jan Ozer of Streaming Media Magazine, with encoding parameters supplied or reviewed by each encoder vendor (Google, MulticoreWare and MainConcept respectively), and using Netflix’s VMAF objective metric, concluded that “VP9 and both HEVC codecs produce very similar performance” and “Particularly at lower bitrates, both HEVC codecs and VP9 deliver substantially better performance than H.264”.

Here’s a link for more information.


Please rate the helpfulness of this tip.

Click on a star to rate it!

… for Codecs & Media

Tip #957: Apple Supports VP9 in macOS Big Sur

Larry Jordan – LarryJordan.com

VP9 codec support is coming to macOS Big Sur – specifically Safari.

The Safari icon in macOS Big Sur.

Topic $TipTopic

Last week, Apple introduced support for the VP9 codec in Safari (Mac version) in the fourth beta of macOS Big Sur. Learn more.

Apple’s release notes state: “Support for 4K HDR playback of YouTube videos.” However, 4k HDR video on YouTube only uses the VP9 codec.

According to AppleInsider.com, “this means users will be able to natively stream 4K YouTube clips in Safari on iOS 14, tvOS 14, and macOS Big Sur.

“While 4K videos can be seen in their full resolution on Macs and Apple TV devices with the appropriate displays, the resolution of even the latest iPhones and iPads top out below 4K quality.

“Safari is getting other new additions in macOS Big Sur and Apple’s other software updates, including native support for HDR videos and WebP images.

“The lack of VP9 support has been a sticking point for users since Google introduced the codec, particularly since the Mountain View company has refused to encode clips in other Apple-friendly codecs. Since the introduction of VP9, users have been stuck with viewing YouTube in 1080p or 720p.”


Please rate the helpfulness of this tip.

Click on a star to rate it!

… for Codecs & Media

Tip #958: How Do Audio Cables Prevent Hum?

Larry Jordan – LarryJordan.com

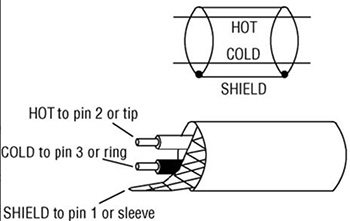
All cables pick up hum. Shielded, balanced cables cancel that hum in the mixer.

A 2-conductor shielded, balanced line.
Each conductor has equal impedance to ground, and they are twisted together so they occupy about the same position in space on the average. (Image courtesy of ProSoundWeb.com)

Topic $TipTopic

OK, so this is a bit off topic, but… I’ve known for years and years that audio cables with XLR connectors don’t have hum, while cables with RCA connector so. Today, I wondered: why?

Here’s what I learned at
ProSoundWeb.com.

“One cause of hum is audio cables picking up magnetic and electrostatic hum fields radiated by power wiring in the walls of a room. Magnetic hum fields can couple by magnetic induction to audio cables, and electrostatic hum fields can couple capacitively to audio cables. Magnetic hum fields are directional and electrostatic hum fields are not.

“Most audio cables are made of one or two insulated conductors (wires) surrounded by a fine-wire mesh shield that reduces electrostatically induced hum. The shield drains induced hum signals to ground when the cable is plugged in. Outside the shield is a plastic or rubber insulating jacket.

“Cables are either balanced or unbalanced. A balanced line is a cable that uses two conductors to carry the signal, surrounded by a shield (Figure 1). On each end of the cable is an XLR (3-pin pro audio) connector or TRS (tip-ring-sleeve) phone plug.

“Hum fields from power wiring radiate into each conductor equally, generating equal hum signals on the two conductors (more so if they are a twisted pair). Those two hum signals cancel out at the input of your mixer, because it senses the difference in voltage between those two conductors—which is zero volts if the two hum signals are equal. That’s why balanced cables tend to pick up little or no hum.”

XLR cables (called “balanced”) use two wires and shielding. RCA-type cables (called “unbalanced”) do not.


Please rate the helpfulness of this tip.

Click on a star to rate it!

… for Apple Final Cut Pro X

Tip #945: Consolidate Your Media

Larry Jordan – LarryJordan.com

Consolidation can be done at any time – no need to wait to get organized.

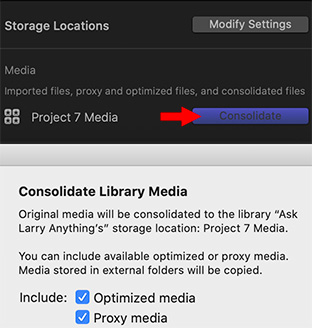
The Consolidate button and resulting panel (below).

Topic $TipTopic

You’ve been editing like a mad fiend and the project is done. Now, you need to gather everything together for final backup and archiving. But, with media and files scattered across your system, just how are you going to do this? Easy, watch.

You may not know where all your files are, but Final Cut does. So, as I illustrated in Tip #944, we will create a custom media storage location, then consolidate all our media files into it.

  • First, open the Library you want to consolidate and select it’s name in the Library List.
  • Go to Inspector > Library Properties and click Modify Settings for Storage Locations.
  • Create a new location for the Media menu option.
  • Next, click Consolidate in the Media section.

The Consolidate command follows these rules:

  • When you consolidate files from a library into an external folder, the files are moved.
  • When you consolidate files into a library from an external folder, or from an external folder to another external folder, the files are copied.
  • These rules prevent broken links from other libraries.

NOTE: If the media is already external, and no other libraries are using it, you can manually delete the original media after consolidating to save storage space.

EXTRA CREDIT

  • If you are in mid-project, DO include Optimized and Proxy media.
  • If you are archiving a project, DO NOT include Optimized or Proxy media.

If FCP X needs either of these files and they are missing, it will automatically rebuild them.


Please rate the helpfulness of this tip.

Click on a star to rate it!

… for Adobe Premiere Pro CC

Tip #929: Create & Remove Proxies FAST!

Larry Jordan – LarryJordan.com

Proxies are becoming increasingly easy to manage in Premiere.

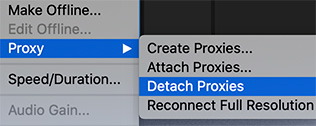
The options in the Proxy menu for the Premiere July, 2020, update.

Topic $TipTopic

A new feature in the July, 2020, update to Premiere is the ability to remove proxies from your clips. Here’s how this works.

CREATE PROXIES

If you don’t create proxies during import, you can easily create them once files are in the Project Panel.

  • Right-click one or more selected clips in the Proxy panel and choose Proxy > Create Proxies.

DELETE PROXIES

  • When you are done with your edit and want to save storage space, right-click one or more deleted clips in the Project panel and choose Proxy > Delete Proxies.

This delete feature is new with the latest update to Premiere.


Please rate the helpfulness of this tip.

Click on a star to rate it!

… for Codecs & Media

Tip #907: Why Can’t I Subclip H.264 Media?

Larry Jordan – LarryJordan.com

Extracting media from compressed files almost always requires recompression.

I-frame (top) vs. GOP compression. Edits can only be made on the green I-frames.

Topic $TipTopic

I got an email recently from a reader asking for a way to export subclips from an H.264 video without recompressing it, because he didn’t want to lose any image quality.

The problem is that this can’t be done. Here’s why.

In an ideal world, each frame in a video should be self-contained. This is called I-frame compression and is illustrated by the top line in the screen shot.

The benefit to I-frame compression is that each frame is fully self-contained, high-quality and very efficient to edit. The disadvantage is that the media files are very large. ProRes, GoPro Cineform and DNx are all I-frame formats.

However, many cameras, to save storage space and stay within the technical bandwidth of MicroSD camera cards, compress the media using GOP (pronounced “gop”) compression (the bottom line in the screen shot). H.264 and HEVC, use this format.

NOTE: Not all GOP groups are 15 frames, some use 7 frames or other frame counts. However, the overall concept is the same.

What a GOP group does is store a complete image on the first frame of the group, then only record the changes for each group of pixels, essentially as a text file, for each frame that follows in the group.

The benefit to GOP compression is that the media files are very small. But, in order to display an image the computer needs to find the I-frame at the start of the group, then calculate the changes for each succeeding frame until it gets to the frame you want to display. This additional calculation is why we describe this format as “inefficient.”

Every GOP clip MUST start with an I-frame. If I wanted to extract a portion of a GOP-compressed clip, say starting at frame 10, I would need to first, recreate an I-frame for frame 10, then rebuild the entire GOP structure during export for the rest of the clip. That means re-compressing the entire clip to rebuild the GOP structure.

This is why recompressing already compressed GOP media tends to look bad; the computer needs to rebuild and recompress every frame to recreate the GOP structure.

This is also the reason that working with I-frame media is faster with overall higher image quality, because the CPU needs to work far less to calculate and display images.


Please rate the helpfulness of this tip.

Click on a star to rate it!

… for Codecs & Media

Tip #919: What is a Macroblock?

Larry Jordan – LarryJordan.com

H.264 compression tracks macroblocks rather than pixels to create smaller files.

Topic $TipTopic

Macroblocks are at the heart of MPEG and H.264 video compression. But, what is a Macroblock?

In order to get the smallest possible files when compressing into H.264, the image is divided into “macroblocks.” (HEVC uses something similar, called a “coding tree unit.”)

Wikipedia describes a macroblock as typically consisting of 16×16 pixels, which forms a processing unit in image and video compression formats based on linear block transforms, typically the discrete cosine transform (DCT). (DCT is used in JPEG, MPEG and H.264 compression.)

A macroblock is divided further into transform blocks. Transform blocks have a fixed size of 8×8 samples. In the YCbCr color space with 4:2:0 chroma subsampling, a 16×16 macroblock consists of 16×16 luma (Y) samples and 8×8 chroma (Cb and Cr) samples. These samples are split into four Y blocks, one Cb block and one Cr block.

The reason macroblocks are important is that when media is encoded, the compression tracks the location of each macroblock from one frame to the next, rather than the full pixel data. This reduces the size of the file significantly, but at the cost of a loss of color information.


Please rate the helpfulness of this tip.

Click on a star to rate it!

… for Codecs & Media

Tip #903: A Caution About Frame Rate Conversions

Larry Jordan – LarryJordan.com

The highest image quality occurs when media is played at its source frame rate.

Topic $TipTopic

During this last week, I’ve gotten more emails than usual about frame rate conversions. Some of the concerns are software related; for example, there may be a problem with Compressor converting 24 fps material to 25 fps.

However, the bulk of my email centered on jitter caused by the conversion.

It is important to stress two key points:

  1. The web does not care about the frame rate of your media. The web plays anything. There’s no benefit to changing rates.
  2. The best image quality is ALWAYS when media is played back at the frame rate it was shot. As much as possible, shoot the frame rate you need to deliver.

Converting from 24 to 48, 59.94 to 29.97 or 60 to 30 is smooth and easy; every other frame is dropped or each frame is doubled. But converting 24 to 25, or 30 to 25 or 29.97 to 24 is a recipe for stutter and jitter.

To decrease your stress, before you start shooting, carefully think about the frame rate you need to deliver – or potentially might need to deliver – then shoot that rate. (And, remember, again, that the web doesn’t care about frame rates. So don’t convert media for the web.)


Please rate the helpfulness of this tip.

Click on a star to rate it!

… for Codecs & Media

Tip #904: Why You Should Avoid HDV

Larry Jordan – LarryJordan.com

Where possible, avoid using HDV to maximize image quality.

Topic $TipTopic

HDV was one of the first, if not THE first, consumer-grade HD video format. As such, it was an eye-opening opportunity to discover the benefits of HD.

However, compared to media formats today, HDV has three serious limitations:

  • First, most HDV material is interlaced. While this plays acceptably on TV monitors, it looks awful on the web. This is because TVs are designed to display interlaced media, while the web is designed for progressive.
  • Second, unlike all digital media today, HDV uses rectangular pixels which are stretched to fill the frame, rather than square pixels. This means that an HDV image won’t look as sharp as digital images today.
  • Third, HDV records half the color information compared to most modern cameras. (And one-quarter the color of high-end cameras.)

NOTE: The only way to get rid of interlacing is to remove every other line of video, thus cutting vertical image resolution in half. Then, existing lines are either duplicated or guessed at using various methods of image interpolation.

So, if you are given the option to shoot or convert media into HDV, be very cautious before you agree. There are very few situations today where this makes sense.

EXTRA CREDIT

If you have existing HDV material, consider getting it transcoded to ProRes 422. While not required, you do need to start thinking about how to preserve and convert your older media assets, especially if you plan to edit them in the future.


Please rate the helpfulness of this tip.

Click on a star to rate it!

… for Codecs & Media

Tip #905: What’s a Media “Container?”

Larry Jordan – LarryJordan.com

Containers simplify storing different media types in one place.

Topic $TipTopic

QuickTime, MXF, WAV and MPEG-4 are all media containers. But, what’s a container and why is it used?

Wikipedia: “A container format (informally, sometimes called a wrapper) belongs to a class of computer files that exist to allow multiple data streams to be embedded into a single file, usually along with metadata for identifying and further detailing those streams.”

Because a media file can have different attributes based on whether it holds audio, video, timecode, captions or other media information, it becomes easier to store each of these elements in its own file, then store all these different components in a single container.

An analogy is a file folder holding different sheets of paper. Each paper could be written in a different language, but unified by being contained in that single folder.

Wikipedia: “Container format parts have various names: “chunks” as in RIFF and PNG, “atoms” in QuickTime/MP4, “packets” in MPEG-TS (from the communications term), and “segments” in JPEG. The main content of a chunk is called the “data” or “payload”. Most container formats have chunks in sequence, each with a header, while TIFF instead stores offsets. Modular chunks make it easy to recover other chunks in case of file corruption or dropped frames or bit slip, while offsets result in framing errors in cases of bit slip.”

Here are two links to learn more: Wikipedia and Mozilla


Please rate the helpfulness of this tip.

Click on a star to rate it!