… for Apple Final Cut Pro X

Tip #285: Tips for Library Management

Larry Jordan – LarryJordan.com

The Library is the master container for all Final Cut projects.

Final Cut Pro X Project Properties settings displayed in the Inspector.

Topic $TipTopic

The Library in Final Cut is the master container that holds everything related to a specific set of projects. However, what you may not know is that you have a lot of control over where FCP X actually stores files for that library – and many of them don’t even need to be in the Library!

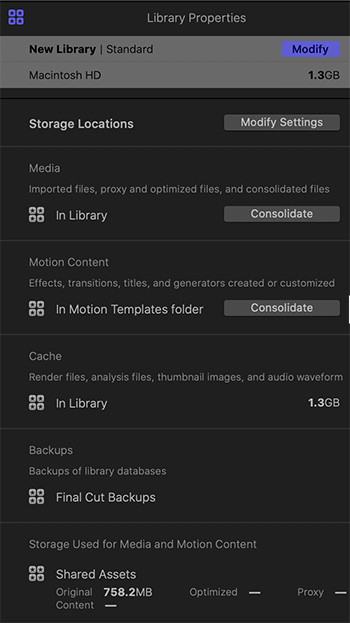
To see your options, select a Library in the Library list on the left side of the interface. The Inspector then displays the image shown on this screen shot.

These options include:

  • Media Storage Locations. This allows you to specify where media, Motion templates, work files and Library backups are stored. All but backups can be stored in the Library, however, you can choose to store them wherever you want.
  • Motion Content. If you have Motion templates scattered across different locations, this allows you to consolidate them into the location specified in the Media Storage Location, above.

The next three segments are display only:

  • Cache files. The amount of space occupied by render, analysis and other work files.
  • Backups. Displays the location of Library backups.
  • Storage used. Displays the volumes where media for this project is stored and how much space is involved.

Overall, Library Properties provides you the control you need to know how much space your project takes, where files are stored and the ability to move them if needed.


Please rate the helpfulness of this tip.

Click on a star to rate it!

… for Apple Final Cut Pro X

Tip #309: Export Multi-Channel Audio

Larry Jordan – LarryJordan.com

FCP X supports exporting multi-channel audio, provided you use Roles.

Topic $TipTopic

Normally, when we export a project from Final Cut Pro X, we are creating a master file, ready for distribution. But, sometimes, you need to export multiple channels of audio – either for an upcoming audio mix or to deliver stems to the distributor.

FCP X supports multichannel export, but it requires Roles.

The steps necessary are more complex than will fit in a tip, but I wanted to share a link with you if this is something you need to do. Here’s the link.

EXTRA CREDIT

If you need to export files for ProTools, you’ll need to export an XML file. Then, use an excellent utility called X2Pro to convert this into the AAF format that ProTools can read. Here’s the link.


Please rate the helpfulness of this tip.

Click on a star to rate it!

… for Apple Final Cut Pro X

Tip #312: New Export Options

Larry Jordan – LarryJordan.com

Exporting is both faster and easier.

Detail from the Share Settings screen in Apple Final Cut Pro X.
The options in File > Share > Settings have changed … and simplified.

Topic $TipTopic

New with the 10.4.8 update to Final Cut Pro X are new, and simplified, export options. In the past, we had a confusing set to choose from, especially when all we wanted to do was save a master file.

Now, as indicated by the screen shot, the default option is to save the file at the location you specify. Other options, such as automatically sending a file to YouTube or Facebook, still exist as part of the Share menu, but creating a master file is now much more straight-forward.

Also, after a file is exported, you can have it automatically open in QuickTime Player, Compressor, or the application of your choice.

Even, if you want, store it in the new Apple TV application.

EXTRA CREDIT

The keyboard shortcut to export a master file remains the same: Cmd + E.


Please rate the helpfulness of this tip.

Click on a star to rate it!

… for Apple Final Cut Pro X

Tip #294: Automate Stills Using FCP X Image Exporter

Larry Jordan – LarryJordan.com

This 3rd-party utility simplifies creating stills from an FCP X project.

The main screen from FCP X Image Exporter.

Topic $TipTopic

Do you need to export a lot of images from your Final Cut Pro X timelines but aren’t excited about sitting there and manually doing it?

There’s a very cool 3rd-party utility that can help: FCP X Image Exporter, created by Adam Teale. This provides a blindingly-fast way to create a whole bunch of stills in a hurry.

Simply place markers in your FCP X timeline for each still you want to export, export an FCPXML file, and fcpxImageExporter will do the rest. It accesses your source media, then exports still images at either the source media, project or a custom resolutions.

Learn more here.

CAUTION!

This program works well, however, if you’ve added color grading or effects to your clips, this program won’t apply them to the stills it creates, as it only accesses your source media.

BONUS

Here’s a video tutorial that shows the application in action.


Please rate the helpfulness of this tip.

Click on a star to rate it!

… for Apple Final Cut Pro X

Tip #302: How to Reset a Color Wheel

Larry Jordan – LarryJordan.com

A simple trick to reset any color wheel setting.

A color wheel for color correction in Apple Final Cut Pro X.
To reset any color wheel control to its default, double-click it.

Topic $TipTopic

I’d been using Final Cut Pro X for years before I discovered this tip.

To reset any setting in a color wheel back to its default, double-click it.

So simple! And it took me so long to discover.

Sigh…


Please rate the helpfulness of this tip.

Click on a star to rate it!

… for Apple Final Cut Pro X

Tip #305: What’s the “Skin Tone Line?”

Larry Jordan – LarryJordan.com

Color is more than skin-deep.

The Vectorscope in Apple Final Cut Pro X.
The skin tone line indicates the color of red blood under skin.

Topic $TipTopic

An interesting quirk about color is that the dominant factor giving our skin its color is not the skin, but the red blood under it. From a colorist’s point of view, blood provides color, while skin provides gray-scale.

NOTE: Yes, individuals are different. And, yes, you can apply whatever color you want to achieve a specific look. However, these general guidelines can help you get your actors to look believable and natural when you need to fix a color cast or bad lighting.

This line – see the screen shot – in the Vectorscope is called the “skin tone” line because it represents the color of red blood under skin. Whether an actor is caucasian, asian, hispanic or black, we all have the same color blood.

While there are individual variations, if you want an actor to look “normal,” make sure the color of their skin is plus or minus 2° of this line. Asians are slightly below the line, everyone else is on or slightly above the line.

Here’s a table that illustrates different ethnic groups, along with the saturation and gray-scale levels for normally-lit skin. (Think lighting for a studio talk show.)

Ethnic Group Saturation Gray-Scale
Caucasian 40% 50-70%
Asian 35% 40-60%
Hispanic 30% 35-50%
Black 20% 15-35%

Men are, generally, 5% darker and 5% less saturated than women.


Please rate the helpfulness of this tip.

Click on a star to rate it!

… for Apple Final Cut Pro X

Tip #267: Improving Green-screen keys

Larry Jordan – LarryJordan.com

The Keyer is good – this can make it better.

The Keyer green-screen effect in Final Cut Pro X.
Shades of gray in the keyed image create very poor keys. Aim for pure black & white.

Topic $TipTopic

Explaining how to use the Keyer effect in Final Cut is more than a tip, it’s an entire article. But, here are three things to keep in mind when you use it.

Normally, when you add the Keyer effect to a key, it correctly guesses what background color it needs to remove. In fact, this filter is pretty darn good at keying.

But, for those situations where the lighting is poor, or the background color is not well saturated, display the effect in the Video Inspector and go down to Color Selection.

  • Set the Graph to Manual.
  • Then, tweak the colors so that which you want to see (i.e. the foreground) is solid white, without any shades of gray. White means an object is fully opaque.
  • Next, tweak the background so it is solid black. Black means a background is fully transparent. (In all cases, shades of gray are to be avoided at all costs.)
  • Finally, to blend colors from the background into the edges of the foreground image, go down to Light Wrap and increase Amount to between 10 – 20%. This blends colors between the two layers to make them look more organically blended.

Please rate the helpfulness of this tip.

Click on a star to rate it!

… for Apple Final Cut Pro X

Tip #293: Export Still Images

Larry Jordan – LarryJordan.com

Video resolutions are high enough to create great stills.

The Save Current Frame dialog from Apple Final Cut Pro X.
JPEG images are small, PNGs and TIFFs are higher quality. I like PNGs, personally.

Topic $TipTopic Apple Final Cut Pro X allows you to export six different image formats (see the screen shot). JPEGs are the smallest files, but PNG and TIFF are higher quality.

Exporting a JPEG is fine if you are in a hurry, but exporting a PNG provides higher quality. You can then bring those stills into Photoshop, or the image editing application of your choice, for further processing then create as many compressed versions as you need.

Here’s how.

  • Put your playhead on the frame you want to export.
  • Choose File > Share > Save Current Frame.

NOTE: If this option doesn’t exist, choose File > Share > Add Destination then drag Save Current Frame from the icons on the right into the sidebar on the left.

  • Select the setting option you need, then click Next to give it a name and location.

Done.

BONUS

Consider duplicating your project, then use markers to flag stills that want to export. First, this speeds finding the stills you want to export and, second, it allows you to quickly find the source image, if you ever need to re-export.


Please rate the helpfulness of this tip.

Click on a star to rate it!

… for Apple Final Cut Pro X

Tip #299: Set Custom Audio Roles During Import

Larry Jordan – LarryJordan.com

Roles can speed timeline organization and audio mixing.

The Audio Roles section of the Media Import window in Final Cut Pro X.
Final Cut assumes all natural sound is dialog. Many times, that is the wrong choice.

Topic $TipTopic

Here’s a tip from Apple Support.

By default, when you import media clips (video, audio, or still images), Final Cut Pro analyzes existing clip metadata to assign one of five default roles to the video and audio components of each clip: Video, Titles, Dialogue, Music, or Effects. (Specifically, Final Cut Pro assigns a subrole of one of the default roles to each video or audio component.)

You can adjust the assignment of audio roles on import in two ways: by setting the role assignment manually or by having Final Cut Pro create custom roles automatically while importing media files with iXML metadata.

NOTE: iXML metadata is applied to clips by some high-end audio recording gear. For example, during production, a sound recordist might enter “Boom mic” and “Jessie lav mic” on the recording device to identify the audio channels of a recording. During import, Final Cut Pro can use the iXML names to create subroles named “Boom mic” and “Jessie lav mic” and assign them to the corresponding audio components in the imported clips.

For any given import session, you can override the automatic role assignment process so that every imported audio component is assigned a role of your choosing. You can specify one of the three default audio roles or a custom role that you create. When you import with this setting enabled, Final Cut Pro assigns a unique subrole (from the role you specify) to every component in each clip.

For example, imagine that you’ve recorded several hundred natural sound files for use as Foley sound effects in your video project. By default, Final Cut Pro assigns the Dialogue role to natural sound recordings (with no additional metadata). Instead, you could assign the more appropriate Effects role to every clip in the import session.

  1. To open the Import pane of Final Cut Pro preferences, choose Final Cut Pro > Preferences (or press Command-Comma), then click Import.
  2. In the Audio Roles section, click the Assign Role pop-up menu and choose a role.

    NOTE: The Assign Role pop-up menu also appears in the Audio Roles section on the right side of the Media Import window. All default and custom audio roles appear in this pop-up menu.

  3. Import the files.
    The role you chose is assigned to the imported clips. (More precisely, components in the imported clips are assigned subroles of the role you chose.)
    You can change this and any other import preferences using the settings in the Media Import window or the Import pane of Final Cut Pro > Preferences. To revert to the default setting, so that roles are assigned automatically when you import clips, click the Assign Role pop-up menu and choose Automatically.

Please rate the helpfulness of this tip.

Click on a star to rate it!

… for Apple Final Cut Pro X

Tip #235: Faster YouTube Compression

Larry Jordan – LarryJordan.com

Faster is actually better.

Compression settings for YouTube in Apple Final Cut Pro X
Compression settings for YouTube.

Topic $TipTopic

Your project is done and you need to get it to YouTube, Facebook or Vimeo. While I normally recommend always exporting a high-quality master file – both for archiving and future compression – sometimes, you just don’t have the time.

So, you are looking at this screen and debating between Faster Encode and Better Quality. You spent a LOT of time on this project – which should you pick?

Faster Quality.

In the past, before hardware acceleration, Better Quality created smaller files and higher image quality. Today, that’s no longer the case. Tests I recently made with Apple Compressor show that Faster Enocde – which uses hardware acceleration is:

  • Much faster
  • Creates smaller files more than 1/2 the time
  • Creates image quality equal to or better then Better Quality

BONUS

The compression engine used by Compressor is the same engine used by Final Cut. The only difference is the interface each has to prep a file for compression.


Please rate the helpfulness of this tip.

Click on a star to rate it!