A render file is a media file calculated based on the effects applied to a source clip.
(Image courtesy of Pexels.com.)
Since all NLEs are non-destructive editors (leaving original media intact), render files are created when you alter an original clip, create a clip via a generator or use a still image in the Timeline. Those alterations need to be turned into media. That process is called “rendering.”
Essentially render files are new media files that match your project/sequence settings that your NLE uses instead of the original clips. They effectively ‘replace’ the original media and the NLE will refer to them instead of the original media once they’ve been rendered.
If you make additional changes to a rendered clip, the NLE will delete the old render file and it will be replaced by a new render file.
Generally, render files are retained by the NLE if you delete a clip from the timeline, which saves time in case you put it back in.
To pick up storage space, you can delete render files. If that file is needed again, the NLE will re-render it.
Once a project is complete, render files can be deleted. If they are needed in the future, the NLE will re-render them, as well.
Please rate the helpfulness of this tip.
Click on a star to rate it!
https://www.theinsidetips.com/wp-content/uploads/2019/09/Tips-Logo-700x150.jpg00Larry Jordanhttps://www.theinsidetips.com/wp-content/uploads/2019/09/Tips-Logo-700x150.jpgLarry Jordan2020-10-20 01:30:002020-10-16 19:02:08Tip #1102: What is a Render File?
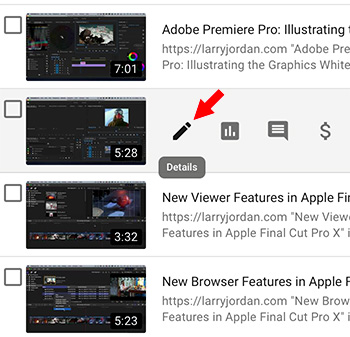
The Details section for each video in YouTube Studio for entering metadata.
I was reading a blog recently by Richard Tiland about posting videos to YouTube. In it, he wrote: “Uploading your video to YouTube isn’t enough. You need to include metadata so that the site understands what your video is all about.”
His points included:
Optimize the title with keywords. Keep it short, but searchable.
Add a detailed and accurate description. Length is less important here.
Include a transcript to help viewers take in your content without turning up the sound.
Organize content using playlists. This helps both viewers and YouTube’s search algorithms.
Create a cohesive look to improve branding. Make your videos look like they are coming from the same creative source.
Finally, don’t forget the Call to Action. This is the explicit behavior you want the audience to take after watching your video.
Metadata always seems intimidating somehow. But, really, all we are doing is enabling viewers to find our media faster and easier. And that is always a good thing.
Please rate the helpfulness of this tip.
Click on a star to rate it!
https://www.theinsidetips.com/wp-content/uploads/2019/09/Tips-Logo-700x150.jpg00Larry Jordanhttps://www.theinsidetips.com/wp-content/uploads/2019/09/Tips-Logo-700x150.jpgLarry Jordan2020-10-20 01:30:002020-10-20 01:30:00Tip #1104: Generate More Viewers on YouTube
Sharpening means enhancing the contrast of edges in an image.
Original file (left), blurred image, the subtracted image, the final result (right).
This article, written by Henry Guiness, first appeared in Photography.Tutsplus.com. This is a summary.
We have all heard the term “sharpening.” But what is it and how do we apply it? There are three main reasons to sharpen your image: to overcome blurring introduced by camera equipment, to draw attention to certain areas and to increase legibility.
Before I explain how to sharpen, we need to understand that sharpness is subjective.
Sharpness is a combination of two factors: resolution and acutance. Resolution is straightforward and not subjective. It’s just the size, in pixels, of the image file. All other factors equal, the higher the resolution of the image—the more pixels it has—the sharper it can be. Acutance is a little more complicated. It’s a subjective measure of the contrast at an edge. There’s no unit for acutance—you either think an edge has contrast or think it doesn’t. Edges that have more contrast appear to have a more defined edge to the human visual system.
Sharpening then, is a technique for increasing the apparent sharpness of an image. Once an image is captured, Photoshop can’t magically add more details: the actual resolution remains fixed. Yes, you can increase the file’s size but the algorithms any image editor uses to do so will decrease the sharpness of the details.
In the image in the screen shot, the author mimicked the Unsharp Mask effect in Photoshop. The first image is the original file, the second is a blurred copy, the third is the one subtracted from the other so as to detect the edges, and the fourth is the original image sharpened using the edge layer. Unsharp masking is the oldest sharpening technique. It subtracts a blurred (unsharp) copy from the original image to detect any edges. A mask is made with this edge detail. Contrast is then increased at the edges and the effect is applied to the original image. While unsharp masking was originally a film technique, it’s now the basis of digital sharpening.
The article continues with sharpening settings and illustrations of both good and bad sharpening, along with links to learn more.
Please rate the helpfulness of this tip.
Click on a star to rate it!
https://www.theinsidetips.com/wp-content/uploads/2019/09/Tips-Logo-700x150.jpg00Larry Jordanhttps://www.theinsidetips.com/wp-content/uploads/2019/09/Tips-Logo-700x150.jpgLarry Jordan2020-10-20 01:30:002020-10-20 01:30:00Tip #1105: What is Sharpening?
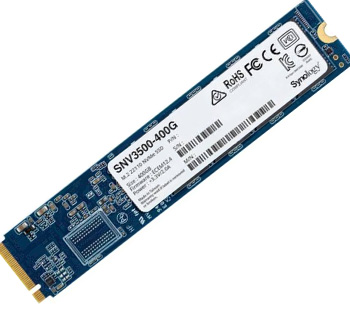
An NVMe SSD cache card can speed file directory operations and make a server more responsive.
The Synology SNV3500-400G NVMe SSD.
I’ve spent a lot of time this week thinking about how to improve the speed and responsiveness of my storage. Here’s a relatively inexpensive way to improve the responsiveness of a server, especially for smaller workgroups. When it comes to storage there are three elements we can adjust:
Storage capacity – measured in gigabytes – is how much the device holds
Bandwidth – the speed it transfers data to and from the computer
Responsiveness – how fast it responds to requests for data
Looking at these in more detail:
Capacity – measured in terabytes – we are all familiar with. From experience, we know that we can’t have too much capacity. It seems that hard disks are either empty or full.
Bandwidth – measured in MB/second – is how fast we can move data from one device to another.
Responsiveness – measured in milliseconds – is how fast a storage device responds to a request for data.
Most older people celebrate a birthday with a nice dinner. Me? I upgraded my server. I have a Synology DS 1517+ that’s around 3 years old. I connect to it using 1 Gb Ethernet from a variety of different computers.
One of the problems with my storage is that, because my network only consists of 2-3 users, the server is not heavily used. Which means that a lot of the time the drives stop spinning, or spin slower, to save energy because there’s nothing happening across the network.
This means that when I access a server volume from my Mac, it takes several seconds for it to wake up and display a file directory or open a file.
Most of the time, while annoying, this isn’t a big problem. But, all my media is stored on the server, when I’m doing a live webinar this delay drives me nuts.
So, I finally decided to do something about it: I added an SSD card as a cache to the server. SSDs are marketed to database users as a way to improve the responsiveness of I/O operations. And I’m sure it does that. But there are also benefits to media creators in terms of making the server feel much more responsive.
NOTE: The specific hardware that I added were a Synology E10M20-1 Ethernet Adapter, which also holds a Synology SNV3500-400G 400 GB NVMe SSD to accelerate the storage cache. (The card uses an m.2 form factor.)
I was amazed at the difference. Folders pop open almost instantly, even though the disks are not yet up to speed. Navigating is almost as fast as the internal SSD on my computer. While I haven’t, yet, connected the 10 Gbps Ethernet port – though that’s coming – just adding SSD makes a big difference. I don’t feel like I’m waiting on my storage anymore.
NOTE: The SSD does not speed file transfers, but it does make moving around and finding things inside the server much faster.
If you feel that your server is a bit “laggy,” look into adding an SSD card as a cache. It will make your system feel much peppier, even if your server, like mine, still uses spinning disks for storage.
Please rate the helpfulness of this tip.
Click on a star to rate it!
https://www.theinsidetips.com/wp-content/uploads/2019/09/Tips-Logo-700x150.jpg00Larry Jordanhttps://www.theinsidetips.com/wp-content/uploads/2019/09/Tips-Logo-700x150.jpgLarry Jordan2020-10-13 01:30:002020-10-10 11:29:06Tip #1081: Improve the Responsiveness of a Server
Thunderbolt 4 won’t be any faster, but it will be a lot more flexible.
The Thunderbolt logo.
When Thunderbolt first came out in 2011, it was a niche interface specifically designed for media creators. Why? Because Thunderbolt is optimized for large files, while USB is optimized for smaller files. Since most people using computers are more likely to be browsing the web, word processing or creating spreadsheets, USB was the perfect protocol for them. Plus, it was cheap.
However, Intel and Apple, the two co-creators of Thunderbolt, were not standing still. Currently, all Macs come bundled with Thunderbolt 3. In July, Intel revealed more of what will be in Thunderbolt 4.
As a reminder, Thunderbolt is considered a “universal” solution because it’s capable of delivering fast transfer speeds, charging and video output over a single connection. Thunderbolt 4 is compliant with USB4, DisplayPort and PCIe Express standards, and is compatible with previous-gen Thunderbolt and USB products.
According to LaptopMag.com, “Thunderbolt 4 isn’t any faster than Thunderbolt 3 when it comes to maximum transfer speeds but it brings additional capabilities. Among those is the ability to connect to two 4K monitors or a single 8K monitor as a minimum requirement, an upgrade from the single 4K output offered by Thunderbolt 3.
“Maximum data transfer speeds remain at 40 GBps but can now be achieved using a 2-meter universal cable. For comparison, USB4 matches Thunderbolt at 40 GBps but has a minimum requirement of 20 GBps. Additionally, Thunderbolt 4 will introduce accessories with up to four Thunderbolt ports.
“As well, Intel is requiring one Thunderbolt 4 port to drive power to thin and lightweight laptops that need less than 100 watts to charge. PCs will also need to let you wake them from sleep by touching a mouse or keyboard when they are connected to a Thunderbolt dock.”
Thunderbolt 4 devices should be released before the end of 2020.
EXTRA CREDIT
Sections of this article were taken from LaptopMag.com, written by Philip Tracy.
Please rate the helpfulness of this tip.
Click on a star to rate it!
https://www.theinsidetips.com/wp-content/uploads/2019/09/Tips-Logo-700x150.jpg00Larry Jordanhttps://www.theinsidetips.com/wp-content/uploads/2019/09/Tips-Logo-700x150.jpgLarry Jordan2020-10-13 01:30:002020-10-13 01:30:00Tip #1082: Thunderbolt 4 is Coming!
ProRes provides lots of choices – all supporting 10-bit, high-quality images.
The Apple ProRes logo.
Apple ProRes comes in a variety of formats. Which one should you pick for your projects? Here’s some advice.
NOTE: Much this tip is taken from the Apple ProRes White Paper (Jan. 2020). (Link)
Apple ProRes is one of the most popular codecs in professional post-production and, as of Oct. 2020, it also won an Engineering Emmy Award for its quality, licensing and innovation. The ProRes family of video codecs has made it both possible and affordable to edit full-frame, 10-bit, 4:2:2 and 4:4:4:4 high-definition (HD), 2K, 4K, 5K, and larger video sources.
ProRes codecs take full advantage of multicore processing and feature fast, reduced-resolution decoding modes. All ProRes codecs support any frame size (including SD, HD, 2K, 4K, 5K, and larger) at full resolution. The data rates vary based on codec type, image content, frame size, and frame rate.
Here are the current formats:
Apple ProRes RAW. Captures data from the camera sensor. Existing media can’t be converted into ProRes RAW.
Apple ProRes 4444 XQ. The highest-quality version of ProRes for 4:4:4:4 image sources (including alpha channels), with a very high data rate to preserve the detail in high-dynamic-range imagery generated by today’s highest-quality digital image sensors.
Apple ProRes 4444. An extremely high-quality version of ProRes for 4:4:4:4 image sources (including alpha channels). This codec features full-resolution, mastering-quality 4:4:4:4 RGBA color and visual
fidelity that is perceptually indistinguishable from the original material.
NOTE: Apple ProRes 4444 XQ and Apple ProRes 4444 are ideal for the exchange of motion graphics media because they are virtually lossless, and are the only ProRes codecs that support alpha channels.
Apple ProRes 422 HQ. A higher-data-rate version of Apple ProRes 422 that preserves visual quality at the same high level as Apple ProRes 4444, but for 4:2:2 image sources.
Apple ProRes 422. A high-quality compressed codec offering nearly all the benefits of Apple ProRes 422 HQ, but at 66 percent of the data rate for even better multistream, real-time editing performance.
Apple ProRes 422 LT. A more highly compressed codec than Apple ProRes 422, with roughly 70 percent of the data rate and 30 percent smaller file sizes. This codec is perfect for environments where storage capacity and data rate are at a premium.
Apple ProRes 422 Proxy. An even more highly compressed codec than Apple ProRes 422 LT, intended for use in offline workflows that require low data rates but full-resolution video.
WHICH TO PICK?
Use ProRes RAW if your camera or external storage can record it from the sensor.
Use ProRes 4444 for images recorded using HDR values, or for media created on the computer. (For example using Motion or After Effects.)
Use ProRes 422 for images recorded using a camera for Rec. 709 (HD) media.
Use ProRes Proxy where image quality is less important than small file size; for example in screening and rough cuts.
Please rate the helpfulness of this tip.
Click on a star to rate it!
https://www.theinsidetips.com/wp-content/uploads/2019/09/Tips-Logo-700x150.jpg00Larry Jordanhttps://www.theinsidetips.com/wp-content/uploads/2019/09/Tips-Logo-700x150.jpgLarry Jordan2020-10-13 01:30:002020-10-09 15:33:12Tip #1083: Pick the Right Version of ProRes
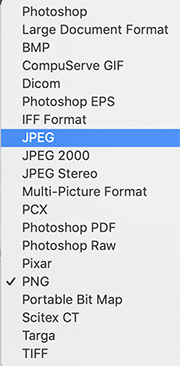
A codec is the mathematical formula that determines how to convert light, or sound, into binary digits for the computer to store or display. While there are a LOT of still image codecs, there are only four that you’ll need to choose between for most of your video projects:
PSD
JPG
PNG
TIFF
So, which should you choose? Here are some tips.
PSD
This is the native Photoshop format.
Use this when you need to retain the ability to edit the elements of an image or when you want to enable, or disable, specific layers within the image.
NOTE: For best results, always embed media into the Photoshop file.
JPG or JPEG
This is a highly-compressed file best used for final distribution. Good image quality in a very small file size.
Part of compressing a JPEG file involves throwing away color data and reducing some of the image quality. While this is almost always OK for images destined for the web, it is not a good idea for any image that you want to edit.
NOTE: Compressing an already compressed file will materially damage quality.
PNG
This is a modestly compressed image format. Excellent image quality with a large file size.
This is a more modern format than TIFF and is the best choice for outputting finished images at high quality. While you can’t reedit a PNG image the way you can a PSD, this provides excellent image quality. PNGs, unlike JPEG, supports an alpha channel for transparent image elements.
The only limit of PNG is that it is only supports 8-bit color.
TIFF
This is a lightly compressed image format, providing excellent image and color quality with a large file size.
TIFF is my go-to still image format. Supporting up to 10-bit color, alpha channels and essentially lossless images, it has been around for a long, long time.
The only limitation of TIFF is that, unlike PSD, you can’t edit elements within the image.
Please rate the helpfulness of this tip.
Click on a star to rate it!
https://www.theinsidetips.com/wp-content/uploads/2019/09/Tips-Logo-700x150.jpg00Larry Jordanhttps://www.theinsidetips.com/wp-content/uploads/2019/09/Tips-Logo-700x150.jpgLarry Jordan2020-10-06 01:30:002020-10-03 14:17:06Tip #1068: When to Choose JPEG, PNG or TIFF
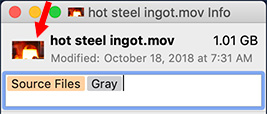
Copy a new poster frame image into the image well in the Finder > Get Info window.
Ian Brown suggested this tip.
There’s a very fast way to create a poster frame for a QuickTime movie. (Poster frames appear in the Finder, and other locations, to illustrate the contents of a clip.)
Open the video in QuickTime Player
Move the playhead to the frame you want to use as a poster frame
Choose Edit > Copy (shortcut: Cmd + C)
Close the video
Select the file icon in the Finder
Choose File > Get Info (shortcut: Cmd + I)
Select the small icon in the top left corner
Choose Edit > Paste (shortcut: Cmd + V)
Done.
EXTRA CREDIT
Actually, anything you paste into that top left box will become the poster frame. It doesn’t need to be an image, it could also be a graphic.
The performance of a hard drive is most effectively measured by how fast data can be transferred from the spinning media (platters) through the read/write head and passed to a host computer. This is commonly referred to as data throughput and typically measured in gigabytes (or gigabits) per second. In either case, data throughput is directly related to how densely data is packed on the hard drive platters and how fast these platters spin.
Higher revolutions per minute represent a faster hard drive, but the rate of media transfer is just as important for data storage solutions.
For the areal density specification, we can measure data density on a hard drive in two ways: bits per inch (BPI) and tracks per inch (TPI). As tracks are placed closer together, TPI increases. Similarly, as data bits are placed closer and closer to each other along a track, BPI increases. Together, these represent areal density.
As a rule, when areal density increases on a hard drive, so does data throughput performance. This is because the data bits pass by the read/write head of the hard drive faster, which leads to faster data rates.
For the RPM specification, platters need to spin faster to increase performance in a hard drive. This results in moving the data bits past the read/write head faster, which results in higher data rates. Hard drives have been engineered with spin rates as low as 1200 RPM and as high as 15K RPM. But today’s most common RPM rates, in both laptop and desktop PCs, are between 5400 and 7200 RPM.
Given two identically designed hard drives with the same areal densities, a 7200 RPM drive will deliver data about 33% faster than the 5400 RPM drive. Consequently, this specification is important when evaluating the expected performance of a hard drive or when comparing different HDD models.
However, when moving to a solid state hybrid drive (SSHD), RPM is largely irrelevant. Why?
SSHD design is based on identifying frequently used data and placing it in the solid state drive (SSD) or NAND flash portion of the drive. NAND flash media is very fast, partly because there are no moving parts—since it’s made of solid state circuitry. Therefore, when data is requested by host computers there is typically not a dependence on pulling this data directly from the spinning media in the hard drive portion.
Sometimes, however, data will be requested that is not in the NAND flash, and only during these instances does the hard drive portion of the device become a bottleneck. Since the technology is so effective at identifying and storing frequently used data in the NAND area, SSHD technology is much more efficient in delivering data to a host computer quickly.
In tests conducted by Seagate to illustrate this article, the fastest performance for an SSHD drive came from one where the platters only spun at 5400 RPM.
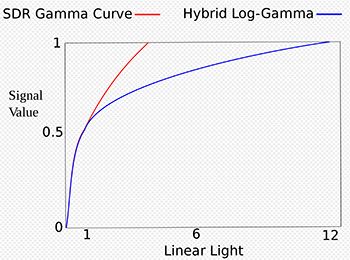
HDR HLG matches SDR shadows and midtones, but adds more highlights.
This chart compares grayscale values between SDR and HDR HLG media.
As I was researching my recent webinar on “New Features in Adobe Premiere Pro,” I came across an interesting graph that compares HDR HLG grayscale values with SDR.
We are all familiar with the grayscale values in SDR (Standard Dynamic Range) media. It’s the Rec. 709 HD footage we work with on a daily basis.
While HDR consists of more than simply brighter pixels, grayscale is the relevant concept here. HDR has two formats: HLG and PQ. HLG (Hybrid Log Gamma) is optimized for broadcast, while PQ is optimized for digital display. Both Final Cut and Premiere support HLG media. But, what does it mean to say “optimized for broadcast?” That’s where this chart comes in.
SDR grayscale values are essentially linear, a “straight line” from 0 IRE (pure black) to 100 IRE (pure white). This range of 100 IRE values is what the entire broadcast signal path is designed to support.
HDR HLG mirrors the linear SDR grayscale values from 0 to 75 IRE – though there is some variation between standards in different countries – then expresses highlights as log values, rather than linear for the top 25% of highlights.
This allows HDR HLG to pack much brighter highlights than SDR, yet still fit within a 100 IRE range. However, there’s a trade-off. While HDR HLG is compatible with broadcast, HDR PQ has more highlight detail. Both HDR formats are much brighter than SDR.
EXTRA CREDIT
If you are creating an HDR project, it is important to know what format your distributor supports BEFORE you do the color grade, because grading HLG and PQ is not the same and you can not switch between them.
We may request cookies to be set on your device. We use cookies to let us know when you visit our websites, how you interact with us, to enrich your user experience, and to customize your relationship with our website.
Click on the different category headings to find out more. You can also change some of your preferences. Note that blocking some types of cookies may impact your experience on our websites and the services we are able to offer.
Essential Website Cookies
These cookies are strictly necessary to provide you with services available through our website and to use some of its features.
Because these cookies are strictly necessary to deliver the website, refuseing them will have impact how our site functions. You always can block or delete cookies by changing your browser settings and force blocking all cookies on this website. But this will always prompt you to accept/refuse cookies when revisiting our site.
We fully respect if you want to refuse cookies but to avoid asking you again and again kindly allow us to store a cookie for that. You are free to opt out any time or opt in for other cookies to get a better experience. If you refuse cookies we will remove all set cookies in our domain.
We provide you with a list of stored cookies on your computer in our domain so you can check what we stored. Due to security reasons we are not able to show or modify cookies from other domains. You can check these in your browser security settings.
Google Analytics Cookies
These cookies collect information that is used either in aggregate form to help us understand how our website is being used or how effective our marketing campaigns are, or to help us customize our website and application for you in order to enhance your experience.
If you do not want that we track your visit to our site you can disable tracking in your browser here:
Other external services
We also use different external services like Google Webfonts, Google Maps, and external Video providers. Since these providers may collect personal data like your IP address we allow you to block them here. Please be aware that this might heavily reduce the functionality and appearance of our site. Changes will take effect once you reload the page.
Google Webfont Settings:
Google Map Settings:
Google reCaptcha Settings:
Vimeo and Youtube video embeds:
Other cookies
The following cookies are also needed - You can choose if you want to allow them:
Privacy Policy
You can read about our cookies and privacy settings in detail on our Privacy Policy Page.