… for Codecs & Media
Tip #1046: For HDR, Shadows are More Important
Larry Jordan – LarryJordan.com
Shadow detail is important to perception that highlights – as both SDR and HDR reflect.

In earlier tips (#1043 and #1049) we compared differences in grayscale values between SDR and HDR. What I discovered during this research is how important shadow detail is for both SDR and HDR.
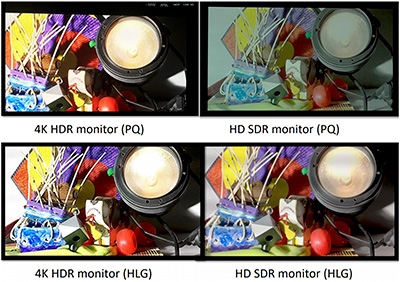
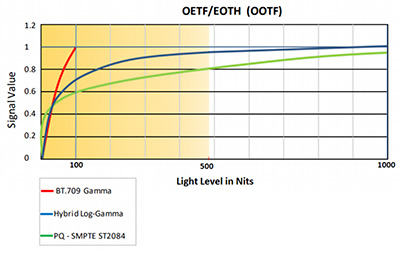
NOTE: The screen shot and the information in this article are taken from a Venera Technologies article.
Human beings are more sensitive to changes in darker regions compared to changes in brighter regions. This property is exploited in HDR systems providing more granularity (detail) in darker regions compared to brighter regions. The screenshot depicts that the light level range in darker regions are represented by a larger signal value range compared to the brighter regions – meaning more detail in the shadows.
While grayscale values are more evenly distributed for Rec. 709-based displays, they become less granular for HDR displays in the brighter regions. In the case of HLG, more than half of signal values are represented for light levels between 0-60 Nits while the remaining signal values span 60-1000 Nits. Similarly, in the case of PQ-based displays, approximately half of the signal values are represented for light levels between 0-40 Nits while the remaining half of the signal values are represented in a range of 40-1000 Nits.
In other words, for both HDR and SDR, half the total signal range is reserved for shadow values of less than 50 IRE; while, for HDR, the remaining highlight values are spread up to 10,000 IRE (Nits)!