… for Apple Final Cut Pro X

Tip #1474: Adjust the Anchor Point for Better Moves

Larry Jordan – LarryJordan.com

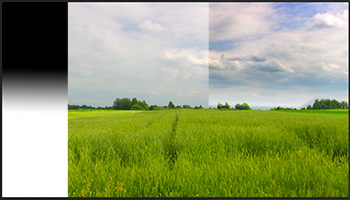
The anchor point determines where an image revolves or scales.

The anchor point was moved from center to the tree trunk.

Topic $TipTopic

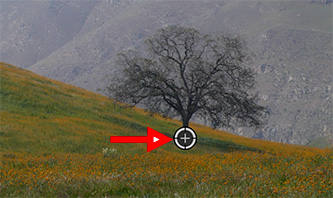
The Anchor Point is that position around which an image rotates or scales. It is indicated by a plus sign in a white circle – red arrow in the screen shot – whenever you activate the Transform controls for a clip in the Timeline.

NOTE: I find scaling or rotating an image looks MUCH more interesting when you move the Anchor Point to a corner, rather than the center. Or, to a central element in the frame, as shown in this screen shot.

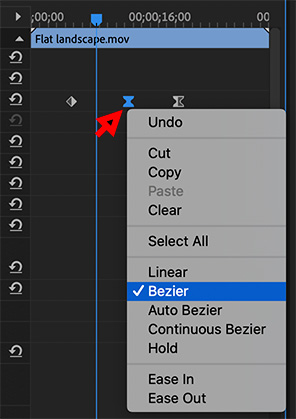
While it would be great to drag the Anchor Point, Final Cut does not support this, even if the Transport controls are active in the Viewer. Instead:

  • Select the clip in the Timeline.
  • Go to Inspector > Transform and adjust the Anchor point settings.

By default the anchor point is in the center of the frame. When you move the anchor point, you’ll also need to move the clip to get it back to the center of the frame.


Please rate the helpfulness of this tip.

Click on a star to rate it!

… for Apple Motion

Tip #1450: Simple 3D Text Lighting Tricks

Larry Jordan – LarryJordan.com

Be sure to turn Environmental lighting off to get the full effect.

Lighting Styles for 3D text: Dramatic Top Right (top), Below, Medium Right (bottom).

Topic $TipTopic

(I discovered this tip while researching a recent PowerUP webinar illustrating Cameras, Sets & Drop Zones in Apple Motion 5.5.)

The more I play with 3D text in Motion, the more fun I have. Here is a very quick way to dramatically change the look of your text.

  • Create some 3D text, give it enough depth that you can see the edges.
  • In Inspector > Text > Appearance, uncheck Lighting > Environment.
  • Then, change Lighting Style and watch what happens.

For this screen shot, I set:

  • Font: Optima
  • Size: 300 points
  • Depth: 60

Then, I applied three different Lighting Styles, from top to bottom in the screen shot:

  • Dramatic Top Right
  • Below
  • Medium Right

EXTRA CREDIT

Once environmental lighting is turned off, if you plan to use other elements you’ll need to add lights to see them,


Please rate the helpfulness of this tip.

Click on a star to rate it!

… for Visual Effects

Tip #1460: A Look Inside “Tenet’s” Effects

Larry Jordan – LarryJordan.com

In-camera effects are not the norm, but Christopher Nolan prefers them.

Where possible, director Christopher Nolan prefers in-camera effects.

Topic $TipTopic

This article, written by Kevin H. Martin, first appeared in VFXVoice.com. This is a summary.

“Even after reading the script four times, I was still working out the complexities of it,” Tenet Visual Effects Supervisor Andrew Jackson admits. “Tenet was a case of just when you think you’ve gotten things clear in your mind, then you catch yourself and realize, ‘Oh no!’ And so you’ve got to think a bit harder.”

Writer/Producer/Director Christopher Nolan’s return to technothriller territory a la Inception boasts James Bond-sized full-scale set pieces while not stinting on effects magic – though with the focus primarily on in-camera work. Editor Jennifer Lame estimates only 300 VFX shots in the whole picture, while director Nolan says the level of VFX – created at DNEG, which has worked on Nolan’s films since Batman Begins in 2005 – is less than what would be found in most romantic comedies.

Visual Effects Producer Mike Chambers began working with Nolan on Inception. “He’s very tech-savvy with all aspects of production, and sees VFX as just one tool in the toolbox. He has always been happy with DNEG and likes the idea of avoiding multiple vendors unless something unusual comes up. Organizing early on for a Nolan project starts with knowing the ideal is to get as much in-camera as possible, but then to plan alternate routes that can get us to where we need if in-camera approach doesn’t get us all the way.”

“When you break down a script for a Chris Nolan movie, it’s a different process than when you work on any other film,” he continues. “There are aspects that for anybody else, the default solution today would be to go CG, but that’s not necessarily the case with Chris – almost the opposite is true, which I find refreshing and exciting and really gives me and everyone in my crew a sense of challenge. In this day and age, there is so much effects being done as VFX is the go-to mindset, I couldn’t be in a better spot with a more willing boss than Chris when it comes to practicing my craft properly, getting the time to do all these tests and get things right for the camera.”

EXTRA CREDIT

The article includes much more detail, as well as production stills and links.


Please rate the helpfulness of this tip.

Click on a star to rate it!

… for Visual Effects

Tip #1462: Create 3D Voxel Art

Larry Jordan – LarryJordan.com

Voxel art is easy to learn, simple to create and very, very deep.

Image courtesy of PremiumBeat.com

Topic $TipTopic

This article, written by Charles Yeager, first appeared in PremiumBeat.com. This is a summary.

MagicaVoxel offers a GPU-based path-tracing renderer, which allows you to quickly create some beautiful renders.

The minimalistic beauty of voxel art is more popular than ever. It’s a fun medium between 2D pixel art and more realistic 3D creations. One of the most popular voxel art applications is MagicaVoxel, which is FREE for anyone to download and use.

The highlight of this article are several video tutorials illustrating how to install and use MagicaVoxel. This free utility for Mac and Windows allows you to create these stylized images.

The article also includes:

  • How to Download and Install MagicaVoxel
  • Voxel Art is Like Building With Legos
  • Render Options
  • Export Options
  • And a wide variety of tips, techniques and overall good ideas

Please rate the helpfulness of this tip.

Click on a star to rate it!

… for Adobe Premiere Pro CC

Tip #1457: Premiere’s Floating Timecode Panel

Larry Jordan – LarryJordan.com

The floating timecode panel provides real-time display of project durations.

This is the full-size floating timecode panel in Premiere.

Topic $TipTopic

Premiere has a floating timecode panel which simplifies tracking project durations and selections.

This panel displays the timecode for:

  • The current location for the playhead
  • The total duration for the active sequence
  • The duration between the current timeline In and Out

To display this panel, go to Window > Timecode.

EXTRA CREDIT

If you are tight on space, go to the small “pancake” menu in the top right corner and select Compact. Same information in less space.


Please rate the helpfulness of this tip.

Click on a star to rate it!

… for Adobe Premiere Pro CC

Tip #1458: Quick Sky Enhancement

Larry Jordan – LarryJordan.com

Gradients, combined with blend modes, can quickly create amazing looks.

The gradient (top), original image (center) and composite using Overlay blend mode.

Topic $TipTopic

Here’s a fast way to improve the look of a cloud-filled sky, using a simple gradient and a blend mode in Premiere.

Take a look at the middle image in the screen shot. It is an OK shot of the sky, but doesn’t have any “pop.”

  • Create a simple gradient in Photoshop, similar to the screen shot, that roughly corresponds to the position of the sky.
  • Stack the gradient above the clip with the sky in the timeline.
  • Apply Effect Controls > Opacity > Blend mode > Overlay to the gradient clip. This darkens the sky and brightens the foreground.

As you can see in the right side of the screen shot, the sky is a LOT more dramatic!

EXTRA CREDIT

If you don’t want the foreground brightened, either replace the white in the gradient with transparency, or use an Opacity mask to cut the gradient at the horizon line. (This was what we did here.)


Please rate the helpfulness of this tip.

Click on a star to rate it!

… for Adobe Premiere Pro CC

Tip #1459: A Hidden Keyframe Menu

Larry Jordan – LarryJordan.com

Control-click a keyframe to reveal the keyframe controls menu.

Control-click a keyframe to view the keyframe control menu in Effect Controls.

Topic $TipTopic

Most of the time, we add a keyframe and move on. But, hidden in the Effect Controls panel is a wide range of keyframe options that can add life to your visual effects.

After applying a keyframe to an effect, scroll to the right in the Effect Controls window and Control-click the keyframe you want to adjust.

The options in this menu support:

  • Copying and pasting keyframe settings
  • Adding curves to keyframes
  • Adding acceleration and deceleration to a keyframe

As you change settings the icon applied to the modified keyframe changes as well.


Please rate the helpfulness of this tip.

Click on a star to rate it!

… for Random Weirdness

Tip #1438: Another Way to Find the Right Guests

Larry Jordan – LarryJordan.com

MatchMaker is designed to make finding the right guest easier.

The MatchMaker.fm logo

Topic $TipTopic

MatchMaker.fm is a relatively new service that seeks to connect podcasters – or anyone doing an interview, actually – with guests.

There are two sides to the website: People who host podcasts and people who want to be on podcasts.

“Finding the right guest for your show can help you reach a new audience whilst also giving your listeners a fresh new perspective.” (Matchmaker.fm website)

This link provides a description of their service.

While this link provides a series of tutorials on how to find and pitch the right guests.


Please rate the helpfulness of this tip.

Click on a star to rate it!

… for Random Weirdness

Tip #1439: The Importance of Diversity

Larry Jordan – LarryJordan.com

A film set is a microcosm of the world. We need to make it better.

Image courtesy Bruno Massao, Pexels.com.

Topic $TipTopic

Tanya Jones is an executive producer, writer, director and creator. She is also Black. She’s written an excellent essay about the challenges of diversity on a film set that first appeared in PremiumBeat.com. This isn’t a summary – its a strong push for you to read her thoughts. There’s a lot each of us can do to make our industry better.

Tanya writes:

A film set is a microcosm of the world, in all its beauty and harshness. What I’ve learned the hard way about white males in production—the allies and co-conspirators.

I am a Black woman (sigh . . . my heart fills with pride when I type that), award-winning executive producer, writer, director, creator. My résumé spans over twenty years in production, and I’ve done well as a leader. Today, when I walk on set, I’m the one in charge. But, I could’ve done better, faster.

We all know the facts but here they are again, a hard slap in the face: “Among women who hold full-time, year-round jobs in the United States, Black women are typically paid 63 cents, Native American women 60 cents, and Latinas just 55 cents for every dollar paid to white, non-Hispanic men,” according to a September 2020 report from the National Partnership for Women and Families.

I could choose to stew in a simmering mess of resentment and anger but I’d never thrive there. I know myself well, and I know I do well in partnership, in co-creation. Some of my best relationships in this industry are with white men. Men who work with me, work for me, hire me, recommend me, inspire me, and see me for me. With these white men, I’ve co-produced a beautiful story where respect and a level playing field are the true starring roles.

Read the entire essay here – there’s room for growth… and hope.


Please rate the helpfulness of this tip.

Click on a star to rate it!

… for Apple Motion

Tip #1424: Lights Can Help 2D Video

Larry Jordan – LarryJordan.com

Motion lights can be colored and shaped to resemble actual lights, not simply colors.

A dark blue ambient glow combined with an amber spot light to create a night scene.

Topic $TipTopic

One of the most powerful, but little known, features in Apple Motion are its lights. These can benefit video clips in ways you might not expect.

For example, look at this shot from the film “Route 30, Too!”, directed by John Putch. The top image was the actual shot.

The bottom image applies a dark blue ambient light to change the time to late evening, while an amber spotlight creates the illusion of a porch light illuminating the hair and body of the actor.

The ability to use lights to create lighting shapes and colors that resemble bare bulbs, or spot lights, or lighting fixtures give us much more creative flexibility with key scenes than we could get with Final Cut alone.

Here’s a webinar that covers this in more detail.


Please rate the helpfulness of this tip.

Click on a star to rate it!