All lights can be animated with keyframes so colors and shadows move.
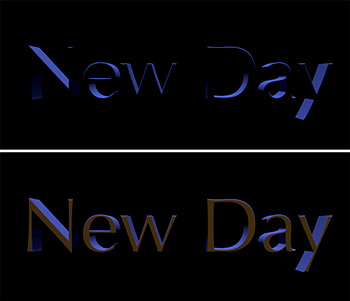
Text light with backlight only (top) and then adding a dim front light.
This tip started by asking: “What can I do with directional lighting in Apple Motion?” The answer is: “Quite a lot of very cool stuff!”
Create some 3D text. In the screen shot, I used Optima at 275 points. Enter the text for your title.
Select the text in the Layers pane.
Go to Inspector > Text and set Lighting Style to Off.
Uncheck Environment.
Everything should now go black because all lighting is turned off on the text.
Go to Object > New Light and add two new lights.
Select a light and, in Inspector > Light, set Light Type to Directional. Do this for both lights.
Point one light – using the 3D Transform tool – toward the text, with the other light pointed away from the text.
NOTE: Remember, with Directional lights, position is irrelevant. Only the rotation direction matters.
When the angles are set, adjust colors and intensity to suit. In my example, the front light (pointing to the text) is pale yellow with Intensity set to 10.
The back light is pointing down and toward the front. Intensity is 100 and the color is dark blue.
Please rate the helpfulness of this tip.
Click on a star to rate it!
https://www.theinsidetips.com/wp-content/uploads/2019/09/Tips-Logo-700x150.jpg00Larry Jordanhttps://www.theinsidetips.com/wp-content/uploads/2019/09/Tips-Logo-700x150.jpgLarry Jordan2021-02-25 01:30:002021-02-25 01:30:00Tip #1425: Cool 3D Text Lighting Tricks
The disabled “need to be five times more qualified” just to get work.
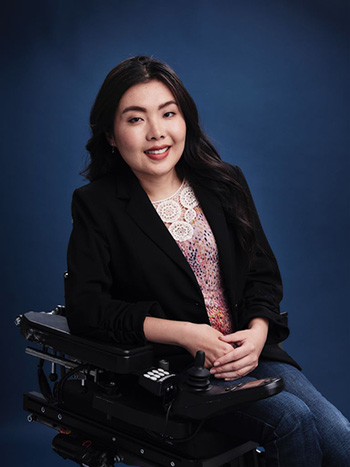
Kaitlyn Yang, Visual Effects Supervisor and Alpha Studios Founder
Visual effects supervisor Kaitlyn Yang was hooked on digital imaging when she was nine years old, upon discovering Photoshop and STAR WARS. She was recently interviewed by VFXVoice.com. This is a summary of her interview.
A graduate of USC Film School, Kaitlyn founded VFX postproduction company Alpha Studios when she was 25 and made the Forbes 30 Under 30 list for Hollywood and Entertainment, and has served on the Television Academy’s Awards Committee and as Co-Chair of the VES Los Angeles Section. An immigrant and wheelchair user, Kaitlyn overcame additional obstacles in her career and has used that experience to fuel her advocacy for diversity and inclusion, to further the representation of disabled artists in entertainment.
In her interview, she reflects on the biggest challenge she faced in the VFX industry: “being a woman.”
“Even to this day,” she writes, “when I show up to set as a VFX supervisor, the first question I’m asked is “who are you here visiting?” It’s an everyday thing that will change with time. The more women are seen and empowered in senior roles, the less these trivial questions will come up. I took a leap of faith in starting my own company, and I am committed to achieving greater equity and opportunity for everyone in VFX.”
“Early on, my mom said that because I have a visible disability, I need to be at least five times as qualified as a ‘regular’ person to be considered for a role …and going through my career, I agree with that. When I was starting out, I didn’t see people who looked like me on screen or behind the scenes. There are still negative connotations around people with disabilities or anything outside what people perceive as the norm, and that drove me to prove myself so that I would not be overlooked. I carry that drive forward to raise awareness of the untapped talent all around us and how those perspectives lend so much to storytelling and our business. Let’s all do our part to make it the norm to see diversity all the way down the end credits.”
Please rate the helpfulness of this tip.
Click on a star to rate it!
https://www.theinsidetips.com/wp-content/uploads/2019/09/Tips-Logo-700x150.jpg00Larry Jordanhttps://www.theinsidetips.com/wp-content/uploads/2019/09/Tips-Logo-700x150.jpgLarry Jordan2021-02-24 01:30:002021-02-24 01:30:00Tip #1441: Creativity is Always a Leap of Faith
There has never been a better time to develop an animated series.
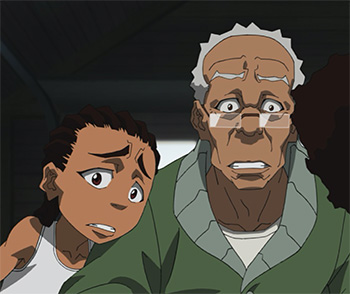
Detail from “The Boondocks,” credit: Cartoon Network
This article first appeared in NoFilmSchool.com. This is a summary.
The animation world used to be for kids, but adult animation is having a heyday right now. Adult animation is actually one of the most successful genres of entertainment today. Shows like Rick and Morty, Big Mouth, and Clone High dominate the conversation. We have Primal, Samurai Jack, and The Boondocks all coming back.
HBO Max paid $500 million for the exclusive rights to South Park, and they haven’t stopped there. They have a revival of Clone High (picked up for two seasons), the Scooby-Doo prequel Velma, a take on Gremlins, more Harley Quinn, plus an ongoing slate of additional animated content, including an adult-focused Game of Thrones animated series.
Netflix is constantly developing new animated series, and Amazon is not far behind. Think about Bojack Horseman and Undone. According to “The Hollywood Reporter”, Netflix has invested over one billion dollars in animated programming.
Recording voice lines is easy for actors and only takes a few days. Much of the animation can be done for cheap in foreign countries. And you can write and animate year-round.
Another shift in all of this is the COVID-19 pandemic. With live-action TV and films sidelined, the animation genre was able to continue. It was easier following COVID protocols when you just are sanitizing a room and a mic. And lots of lines could be done remotely, over Zoom, with a proper mic setup.
There has never been a better time to develop an animated series.
Please rate the helpfulness of this tip.
Click on a star to rate it!
https://www.theinsidetips.com/wp-content/uploads/2019/09/Tips-Logo-700x150.jpg00Larry Jordanhttps://www.theinsidetips.com/wp-content/uploads/2019/09/Tips-Logo-700x150.jpgLarry Jordan2021-02-24 01:30:002021-02-20 09:37:16Tip #1444: Adult Animation is in its Heyday
The default light for Apple Motion is “ambient.” This means that the light is white and illuminates everything in all directions equally.
However, we can add custom lighting to any Motion project from the Object menu. When we do, the default lighting is turned off and we can choose between four different lighting types:
Ambient. Just as the default setting, this illuminates everything equally in all directions. However, unlike the default, we can change the color and intensity of the light.
Directional. This shines the light in a specific direction (up, down, left, right). However, changing the position of the light has no impact. We can also change the color and intensity of this light.
Point. This is the default custom light. This light is like hanging a bare bulb from the ceiling, it has position, but the light flows evenly in all directions. We can change the color, intensity and falloff of this light.
Spot. This is the most flexible light. Similar to a Leko light in a theater, we can change the position, direction, color, intensity, light angle, edge softness and falloff of this light.
EXTRA CREDIT
We adjust light settings by selecting the light, then using the Inspector. There is no limit to the number of lights we can add to any Motion project.
Please rate the helpfulness of this tip.
Click on a star to rate it!
https://www.theinsidetips.com/wp-content/uploads/2019/09/Tips-Logo-700x150.jpg00Larry Jordanhttps://www.theinsidetips.com/wp-content/uploads/2019/09/Tips-Logo-700x150.jpgLarry Jordan2021-02-18 01:30:002021-02-13 09:57:04Tip #1405: Four Ways to Light in Motion
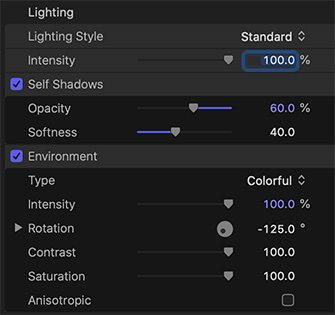
The way 3D text in Final Cut Pro looks is extremely flexible. Not just with fonts and sizes, or even surface materials. Nope. The most useful settings are buried in the Lighting section.
Lighting Style. This changes the angle of the light hitting the text. There are about a dozen options to play with; I especially enjoy using Above, Below and Backlit.
NOTE: To make this lighting more pronounced, uncheck Environment.
Self-Shadows. This feature is unique to 3D text. This enables the shape of a letter to cast a shadow on itself or another letter next to it. I generally decrease Opacity and increase Softness.
NOTE: This setting is off by default.
Environment. This illuminates characters based on the choice you make in the Type menu. Experiment with different settings to see which ones you like.
Try selecting Colorful, then adjust the colors by changing the Rotation setting.
NOTE: For greater impact, set Lighting Style to Off.
EXTRA CREDIT
Intensity varies the amount of light radiating off the letters. While dimming the lighting is always possible, you can also increase the intensity – especially for very saturated colors – up to 400%. Ignore the slider and type in a value.
Please rate the helpfulness of this tip.
Click on a star to rate it!
https://www.theinsidetips.com/wp-content/uploads/2019/09/Tips-Logo-700x150.jpg00Larry Jordanhttps://www.theinsidetips.com/wp-content/uploads/2019/09/Tips-Logo-700x150.jpgLarry Jordan2021-02-15 01:30:002021-02-15 01:30:00Tip #1418: What Do the 3D Text Lighting Controls Do?
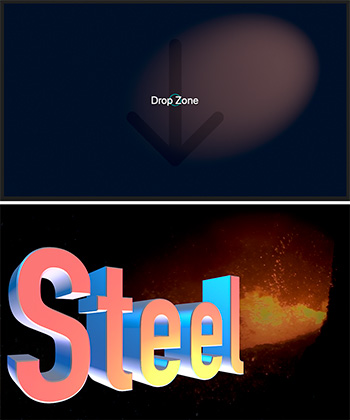
Final Cut doesn’t have the same lighting controls that Motion does – and the lights in Motion are pretty amazing! However, there’s a very cool workaround: create a lighting effect in Motion using Drop Zones for the video (top of screen shot).
Then, save them as a Final Cut Generator.
You can then add those lighting effects into a Final Cut Project (bottom of screen shot) and apply, say, 3D text from within Final Cut.
This provides the best of both worlds: lighting effects created in Motion with the ease of editing and integration of Final Cut.
Please rate the helpfulness of this tip.
Click on a star to rate it!
https://www.theinsidetips.com/wp-content/uploads/2019/09/Tips-Logo-700x150.jpg00Larry Jordanhttps://www.theinsidetips.com/wp-content/uploads/2019/09/Tips-Logo-700x150.jpgLarry Jordan2021-02-15 01:30:002021-02-15 01:30:00Tip #1419: Use Motion Drop Zones for Lighting Effects
All 93 Creativity Conference sessions are now online and free!
The Creativity Conference 2021 logo.
The first-ever Creativity Conference 2021 premiered last month with 93 presentations and panels covering a full range of the creative arts.
Produced by Maxim Jago, these sessions are now free and posted online. I had the pleasure of presenting a session, as well as hosting a panel. These conference sessions were described as “the finding of a family or, better yet a clan, that many did not know they were searching for but immediately recognized.”
These replays are rather basic but include the benefit of displaying a clickable transcription (click to move the video playhead to that section of the recording) and the chat window.
In time, conference organizers hope to migrate to a more beautifully presented version (probably) on Vimeo.com, which all attendees will be able to access as a library of content.
Please rate the helpfulness of this tip.
Click on a star to rate it!
https://www.theinsidetips.com/wp-content/uploads/2019/09/Tips-Logo-700x150.jpg00Larry Jordanhttps://www.theinsidetips.com/wp-content/uploads/2019/09/Tips-Logo-700x150.jpgLarry Jordan2021-02-12 01:30:002021-02-06 11:17:10Tip #1398: Creativity Conference Now Online
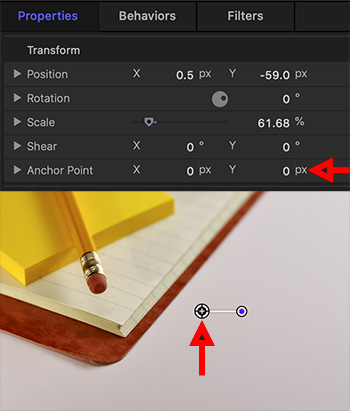
Scaling and rotation often look better when you move the Anchor Point.
The Anchor Point indicator (lower red arrow) and the Anchor Point Inspector settings.
I discovered this tip while researching a recent PowerUP webinar presenting “Advanced Techniques in Apple Motion 5.5.”
The Anchor Point is that position around which an image rotates or scales. (It is indicated by a plus sign – red arrow in the lower screen shot – whenever you select an image or video in the Layers pane.)
You adjust the position of the Anchor Point by selecting an element in the Layers pane, then modify Inspector > Properties > Anchor Point. (Red arrow in the top screen shot) Sadly, there’s no way to move the Anchor Point by dragging.
I find scaling or rotating an image looks MUCH more interesting when you move the Anchor Point to a corner, rather than the center.
Please rate the helpfulness of this tip.
Click on a star to rate it!
https://www.theinsidetips.com/wp-content/uploads/2019/09/Tips-Logo-700x150.jpg00Larry Jordanhttps://www.theinsidetips.com/wp-content/uploads/2019/09/Tips-Logo-700x150.jpgLarry Jordan2021-02-11 01:30:002021-02-06 13:24:24Tip #1389: Move the Anchor Point for Better Zooms
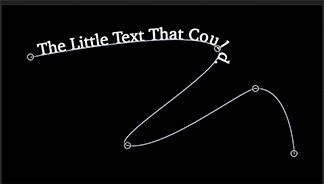
Text paths are built into each text clip. You just need to turn them on.
Text on a curve in Motion, using five control dots.
I discovered this tip while researching a recent PowerUP webinar presenting “Advanced Techniques in Apple Motion 5.5.”
All curves in Motion are created using paths. While there are a variety of tools we can use to draw paths – the paint brush, pen and shape tools, for example – there is no “Text-on-a-Curve” tool.
That’s because text paths are built into the text clip itself. To create text on a curve:
Select the text tool and type some text in the Viewer.
Leave the Text tool active in the text and go to Inspector > Text > Layout and change Layout Method (under Layout Controls) to Path.
Under the text a horizontal path line appears with three dots:
Left dot. End point of text animation
Middle dot. The opportunity to create a Curve
Right dot. Start point of text animation
Drag each dot to create the path you want the text to follow.
EXTRA CREDIT
Add more control dots by Option-clicking anywhere along the path.
Control-click a dot (control point) to delete a dot or reveal handles you can drag to change the shape of the curve.
Animate text to move along the curve by keyframing Path Offset, lower in the Layout pane.
Please rate the helpfulness of this tip.
Click on a star to rate it!
https://www.theinsidetips.com/wp-content/uploads/2019/09/Tips-Logo-700x150.jpg00Larry Jordanhttps://www.theinsidetips.com/wp-content/uploads/2019/09/Tips-Logo-700x150.jpgLarry Jordan2021-02-11 01:30:002021-02-11 01:30:00Tip #1390: Put Text on a Curve
An in-depth look at how effects for this black-and-white movie were created.
The “Mank” movie logo.
Mank co-producer and VFX Producer Peter Mavromates shares his thoughts on creating the visual effects in Mank. This is a summary of the article, written by Trevor Hogg, that first appeared in VFXVoice.
Visual effects and DI are done in-house. “When we’re doing tests during pre-production,” Mavromates says, “a lot of the time they are shot in the parking lot and we bring the files right into the DI in the building.
That’s also the advantage to having in-house visual effects. I can call David upstairs where our visual effects are and say, ‘I want you to look at these three shots.’ I can give feedback to the artist right there, and maybe the artist can immediately do his note and get him to sign off.
The PIX workflow came in handy when the COVID-19 pandemic caused the production that had finished principal photography on February 22, 2020 to work remotely in mid-March. “David has never wanted to spend the time and money to travel to post-production when he’s on location,” says Mavromates. “Once the flag came down, we were up and running in three days. A lot of times David likes stuff on PIX even if we’re in the same building. We were 80% trained already. It didn’t impact our schedule. We delivered at the beginning of September.”
About half of the job for Mavromates is selecting and dividing the work among the vendors. “When I decide what stays in-house, usually it’s the smaller stuff that I can put through quickly,” he says. “When stuff gets bigger, that’s when I want a facility that has more bandwidth in terms of bodies and rendering. Over time, I have a checklist of things that these vendors have done successfully, so a lot of the choices have become easier over time. David likes to add a lot of lens flaring to his stuff, and I know that I’m going to go to Savage for that because we’ve designed lens flares over so many projects with them. In the birthday scene, there are 65 fireplaces that had flames added. That’s the kind of throughput that Ollin can handle.” The CG animals were produced by ILM, driving sequences by Territory Studio, and Artemple did everything from digital water to a close-up of a neon sign.
In total there were 753 visual effects shots. “A lot of that is ‘body and fender work,’ which encompasses getting rid of actor’s marks, straightening out curtains, removing metallic reflections that were unintended,” remarks Mavromates.
EXTRA CREDIT
The article then details how different effects were created and, espeically, the challenges because the film was shot in black-and-white, which prevented green screen effects from being used. Instead, they relied on LED projection panels.
We may request cookies to be set on your device. We use cookies to let us know when you visit our websites, how you interact with us, to enrich your user experience, and to customize your relationship with our website.
Click on the different category headings to find out more. You can also change some of your preferences. Note that blocking some types of cookies may impact your experience on our websites and the services we are able to offer.
Essential Website Cookies
These cookies are strictly necessary to provide you with services available through our website and to use some of its features.
Because these cookies are strictly necessary to deliver the website, refuseing them will have impact how our site functions. You always can block or delete cookies by changing your browser settings and force blocking all cookies on this website. But this will always prompt you to accept/refuse cookies when revisiting our site.
We fully respect if you want to refuse cookies but to avoid asking you again and again kindly allow us to store a cookie for that. You are free to opt out any time or opt in for other cookies to get a better experience. If you refuse cookies we will remove all set cookies in our domain.
We provide you with a list of stored cookies on your computer in our domain so you can check what we stored. Due to security reasons we are not able to show or modify cookies from other domains. You can check these in your browser security settings.
Google Analytics Cookies
These cookies collect information that is used either in aggregate form to help us understand how our website is being used or how effective our marketing campaigns are, or to help us customize our website and application for you in order to enhance your experience.
If you do not want that we track your visit to our site you can disable tracking in your browser here:
Other external services
We also use different external services like Google Webfonts, Google Maps, and external Video providers. Since these providers may collect personal data like your IP address we allow you to block them here. Please be aware that this might heavily reduce the functionality and appearance of our site. Changes will take effect once you reload the page.
Google Webfont Settings:
Google Map Settings:
Google reCaptcha Settings:
Vimeo and Youtube video embeds:
Other cookies
The following cookies are also needed - You can choose if you want to allow them:
Privacy Policy
You can read about our cookies and privacy settings in detail on our Privacy Policy Page.