… for Visual Effects

Tip #1403: A VFX Workflow for “Mank”

Larry Jordan – LarryJordan.com

A system to streamline production and post workflows for Mank.

Cinematographer Erik Messerschmidt, ASC, on location with Mank.

Topic $TipTopic

Thinking about Tip #1402, the folks at X2X Media wrote a series of four detailed blog posts about the effects and remote workflow they created to support production and post for the film Mank. Here’s the link to start the series. This is a summary.

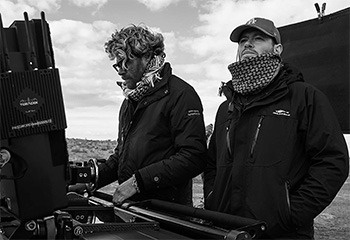
Making a movie during a pandemic requires a little innovation. During the production of Mank, David Fincher’s team needed to work remotely while retaining the ability to collaborate and also to consult with Fincher at a moment’s notice. In addition, they needed secure access to footage and associated metadata.

X2X engineered a bespoke solution to streamline the production and post-production workflow. Craig Mumma, Director of X2X LABS, summarized the requirements, “Our original remit was first and foremost to securely collect and store all data from pre-production through to the completed movie. Then, because of the pandemic, the Mank team needed to work remotely but still wanted to have super easy connections between themselves and with third-party contributors. The final piece of the puzzle was to upgrade an existing VFX turnover process and automate it.”

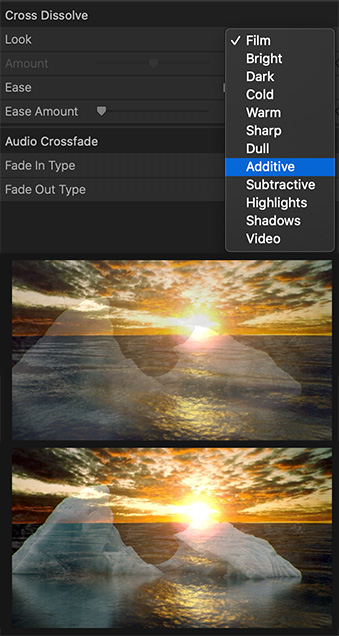
The workflow saw data from the RED RANGER cameras transferred on shuttle drives from production to post, where the near-set team used Fotokems’ nextLAB to manage the image QC, sound synchronization and metadata updates. They generated deliverables for the editor, who could then assemble the timelines in Adobe Premiere Pro.

Running alongside the main workflow and also feeding into the CODEX Media Vault, PIX software allowed contributors to upload information and share it with the team.

PIX RT (Real-Time) creates media that is immediately available to the director so that he or she can make annotations and notes on the image right after it has been captured. This media and metadata are synchronized to PIX to all the approved members of the production who can review them along with image files.

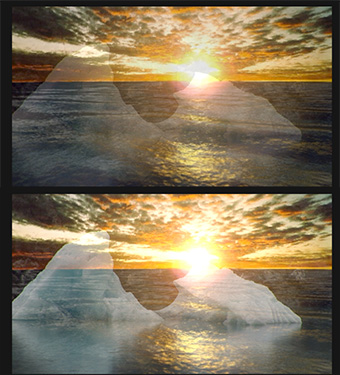
The article details the gear and workflow, then continues into a discussion of how they shot black-and-whate images with a RED RANGER camera brain equipped with a HELIUM 8K MONOCHROME sensor that can record 8192×4320 resolution at up to 60 fps.

“The monochrome was so spectacular and yielded such preferable results that it was absolutely the choice.”

EXTRA CREDIT

X2X wrote four detailed articles on the Mank VFX workflow:

  • Glimpse into Future Filmmaking
  • A sound choice with PIX
  • Making the Mank Workflow
  • Shooting B&W with RED

All of these can be accessed from this link.


Please rate the helpfulness of this tip.

Click on a star to rate it!

… for Adobe Premiere Pro CC

Tip #1395: Saturation vs. Vibrance

Larry Jordan – LarryJordan.com

Vibrance is a better choice for boosting color saturation for video clips.

The Vibrance setting in the Lumetri Color > Creative panel.

Topic $TipTopic

What’s the difference between Vibrance and Saturation? Something significant, actually. Both these settings are in the Lumetri Color > Creative panel.

The short answer is that when you need to adjust saturation, you may get better results by using Vibrance, than Saturation, especially if there are a lot of highlights or shadows in your image.

  • Saturation. Adjusts the saturation of all colors in the clip equally from 0 (monochrome) to 200 (double the saturation).
  • Vibrance. Adjusts the saturation so that color clipping is minimized as colors approach full saturation. This setting changes the saturation of all lower-saturated colors, while having less effect on the higher-saturated colors. Vibrance also prevents skin tones from becoming oversaturated.

Please rate the helpfulness of this tip.

Click on a star to rate it!

… for Adobe Premiere Pro CC

Tip #1396: Change a Specific Setting – FAST!

Larry Jordan – LarryJordan.com

Prevent accidents – select the setting you want to change first!

Motion settings in Effect Controls can be set on-screen by selecting the setting, then dragging the on-screen icon.

Topic $TipTopic

Normally, when we want to change the position, scale or rotation of a clip, we go to the Effect Controls panel and start tweaking numbers.

If, instead, you click the word “Motion” in the Effect Controls panel, several blue on-screen controls light up in the Program Monitor. These allow us to change position, scale or rotation depending upon the control you drag.

However, sometimes you don’t want all that choice. Specifically, you may want to change only one setting – say the Anchor Point – without changing anything else.

We can do that!

Simply click the name of the setting you want to change in the Effect Controls panel, then drag the appropriate icon in the Program Monitor.

For example, in the screen shot, I selected Anchor Point, then dragged the blue cross-hair in the Program Monitor. With only one setting selected, only one setting got changed.


Please rate the helpfulness of this tip.

Click on a star to rate it!

… for Apple Final Cut Pro X

Tip #1391: Interesting Facts About Audio Meters

Larry Jordan – LarryJordan.com

Excessive audio levels are only a problem when you export a project.

The audio meters in Final Cut Pro, with the right channel exceeding 0 dB.

Topic $TipTopic

Most of us know that the audio meters measure the volume of our sound. But here are some facts you may not know.

  • The green bars measure “peak” audio levels, the instant-by-instant volume (loudness) of each channel of audio.
  • The audio meters measure audio on a scale called “dBFS” (deciBels Full Scale)
  • The horizontal bar above the green is the peak hold indicator. This displays the loudest the audio has been for the last five seconds, or until the audio loudness exceeds the level it is currently displaying.
  • Because the green bars bounce so much, the peak hold indicator makes it easy to see exactly how loud your audio peaks are.
  • To avoid distortion, which is a scratchy, blatty noise in your audio, it is essential to keep all peaks below 0 dB.

NOTE: 0 dB is the loudest your audio can be without causing distortion.

  • If the audio goes over 0 dB, the red indicator glows (see the screen shot) indicating a distortion condition, the affected channel and how many dB too loud the audio is.
  • As long as you haven’t exported your file, no damage is done to your audio; just bring the audio levels down. If the audio is exported, the distortion is permanent. The only way to get rid of it is to adjust audio levels, then reexport the project.

EXTRA CREDIT

Know why audio meters are marked in 6 dB increments? The answer is that when levels change by ±6 dB, the perceived volume of the sound is doubled (+6 dB) or cut in half (-6 dB).

For this reason, all audio meters are marked in 6 dB increments.


Please rate the helpfulness of this tip.

Click on a star to rate it!

… for Apple Final Cut Pro X

Tip #1392: A Quick 3D Rotation

Larry Jordan – LarryJordan.com

Flipped supports rotating on either the X or Y axis in Final Cut.

The Flipped effect settings.

Topic $TipTopic

There is a hidden setting in the Flipped effect that makes it even more useful.

Apply Effects Browser > Distortion > Flipped to a clip.

This flips a clip either horizontally (the default), vertically or both.

However, the Amount slider rotates a clip from not flipped (Amount = 0) to fully flipped (Amount = 100).

What this means is that you can use the Flipped effect to rotate a clip on the X or Y axis in Final Cut, even though FCP does not directly support these rotations using the Transform settings in the Video Inspector.

Very cool.


Please rate the helpfulness of this tip.

Click on a star to rate it!

… for Visual Effects

Tip #1384: Add Punch to a Dissolve

Larry Jordan – LarryJordan.com

Additive dissolves add an extra visual “punch” in the middle of a dissolve.

Typical cross-fade dissolve (top) compared to an additive dissolve.

Topic $TipTopic

Normally, when we create a dissolve, in any NLE, the transition gradually moves from one clip to the next by cross-fading the opacity between the first clip and the next.

However, there is a lot of visual potential hidden in even the most mundane dissolve – if you know what to look for.

Most NLE’s include different dissolve settings – either as separate effects (Premiere) or settings within the dissolve (Final Cut).

An additive dissolve, for example, not only cross-fades using opacity, it also applies an additive blend mode during the dissolve which boosts the highlights in both clips as the transition progresses. (See the screen shot.)

NOTE: This works best when there are highlights in at least one of the shots. If both shots are dark, you won’t see much difference.

This has the effect of calling attention to the transition, rather than simply letting it slide past.


Please rate the helpfulness of this tip.

Click on a star to rate it!

… for Apple Final Cut Pro X

Tip #1385: Hidden Dissolve Options In Final Cut Pro

Larry Jordan – LarryJordan.com

Check out the creative dissolve options by looking in the Video Inspector.

Dissolve settings (top), default dissolve (middle), and Sharp dissolve (bottom).

Topic $TipTopic

Normally, when we need a dissolve in Final Cut, we select the edit point, type Cmd + T, adjust the timing and move on. However, there is a wealth of creative options if you know where to look. Specifically, in the Video Inspector.

Select a dissolve, then look in the Inspector. You’ll find a dozen different creative settings for a dissolve. The default is Video, but, surprisingly, that is also the most modest. (See the screen shot.)

Each of these settings uses different combinations of blend modes, vignettes and color settings to change the look of even the most ordinary of transitions.


Please rate the helpfulness of this tip.

Click on a star to rate it!

… for Apple Motion

Tip #1365: Change Reflection Settings

Larry Jordan – LarryJordan.com

Reflection settings allow reflections to more closely model reality.

Reflection settings and their results (bottom). Rectangle shows the reflecting object.

Topic $TipTopic

By default, Motion does not allow one object – such as text – to reflect off another object. Not only can you change this, you can also modify the reflections themselves.

First, to create a reflection, you need to create a source object – say some text – then a second object for that text to reflect from.

NOTE: This is identical to a mirror. Your face needs to reflect off something in order for you to see it.

It is beyond the scope of these tips to describe all the different ways we can create a reflection in Motion. However, once that reflection exists on the reflecting object – generally a black rectangle placed near the text – you have several formatting options.

In the screen shot, I colored some text blue and added a black rectangle under it to catch the reflection.

Then:

  • Select the background rectangle.
  • Check (enable) Inspector > Properties > Reflections.
  • Blur softens the edges of the reflection.
  • Falloff shades that part of the reflection that is farther from the source to provide the illusion of distance.

NOTE: Blend Mode can be left to Normal most of the time. I didn’t see a difference when using Screen.


Please rate the helpfulness of this tip.

Click on a star to rate it!

… for Visual Effects

Tip #1366: The New AI Frontier of VFX

Larry Jordan – LarryJordan.com

Machine learning is accelerating all sorts of slow processes in visual effects.

Arraiy’s A.I.-based tracking solution in action.

Topic $TipTopic

This article, written by Ian Failes, first appeared in PremiumBeat.com. This is a summary.

If there’s a buzz phrase right now in visual effects, it’s “machine learning.” In fact, there are three: machine learning, deep learning and artificial intelligence (A.I.). Each phrase tends to be used interchangeably to mean the new wave of smart software solutions in VFX, computer graphics and animation that lean on A.I. techniques.

VFX Voice asked several key players – from studios to software companies and researchers – about the areas of the industry that will likely be impacted by this new world of A.I.

What exactly is machine or deep learning? An authority on the subject is Hao Li, a researcher and the CEO and co-founder of Pinscreen, which is developing ‘instant’ 3D avatars via mobile applications with the help of machine learning techniques. He describes machine learning (of which deep learning is a subset) as the use of “computational frameworks that are based on artificial neural networks which can be trained to perform highly complex tasks when a lot of training data exists.”

Since many graphics-related challenges are directly connected to vision-related ones – such as motion capture, performance-driven 3D facial animation, 3D scanning and others – it has become obvious that many existing techniques would immediately benefit from deep learning-based techniques once sufficient training data can be obtained.

The use of machine and deep learning techniques in the creation of CG creatures and materials is still relatively new, but incredibly promising, which is why several companies have been dipping their toes in the area. Ziva Dynamics, which offers physically-based simulation software called Ziva VFX, has been exploring machine learning, particularly in relation to its real-time solver technology.

“This technology,” explains Ziva Dynamics co-CEO and co-founder James Jacobs, “makes it possible to convert high-quality offline simulations, crafted by technical directors using Ziva VFX, into performant real-time characters. We’ve deployed this tech in a few public demonstrations and engaged in confidential prototyping with several leading companies in different sectors to explore use cases and future product strategies.”

One of the promises of deep and machine learning is as an aid to artists with tasks that are presently labor-intensive. One of those tasks familiar to visual effects artists, of course, is rotoscoping. Kognat, a company started by Rising Sun Pictures pipeline software developer Sam Hodge, has made its Rotobot deep learning rotoscope and compositing tool available for use with NUKE.

Hodge’s adoption of deep learning techniques, and intense ‘training,’ enables Rotobot to isolate all of the pixels that belong to a certain class into a single mask, called segmentation. The effect is the isolation of portions of the image, just like rotoscoping. “Then there is instance segmentation,” adds Hodge, “which can isolate the pixels of a single instance of a class into its own layer. A class could be ‘person,’ so with segmentation you get all of the people on one layer. With instance segmentation you can isolate a single person from a crowd.

Digital Domain’s Darren Hendler summarizes that “machine learning is making big inroads in accelerating all sorts of slow processes in visual effects. …In the future, I really see all these machine learning capabilities as additional tools for VFX artists to refocus their talents on the nuances for even better end results.”

EXTRA CREDIT

The source article has lots more detail, illustrations and links.


Please rate the helpfulness of this tip.

Click on a star to rate it!

… for Visual Effects

Tip #1367: When to Use, or NOT Use, a LUT

Larry Jordan – LarryJordan.com

A LUT is a look-up table. Ideal for on-set use, more limited in post.

A LUT opened in TextEdit – just a table of numbers.

Topic $TipTopic

This article, written by Charles Haine, first appeared in NoFilmSchool.com. This is a summary.

A LUT is just a “lookup table.” That’s it. It’s a table of values. In fact, if you have a LUT of some sort, you can open that LUT in TextEdit or Notepad and read it. (See screen shot)

Every LUT format spells out what those numbers mean. So each number in the table refers to a specific color value in your image, and the numbers in the table tell the system how to change it. Make it brighter, make it darker, make it bluer, redder, greener.

You can think of a LUT as being a bit like a filter that changes what your footage looks like.

You’ll see a lot about 1D and 3D LUTs, and once you know the difference, it’s easy to remember.

A 1D LUT only covers one direction, brightness. So you’ll often see 1D LUTs used for converting log to linear footage, since that is a transformation of brightness.

A 3D LUT covers 3 dimensions, which are the red, green, and blue channels of color video. If you want to change the color of something, you’ll need a 3D LUT. Of course, brightness can be changed with a 3D LUT, but not as precisely and the files are bigger, so 1D LUTs remain popular for what they are used for.

Some might hear this and think, “Oh, a LUT is just a look!” And in some ways, a LUT and a “look” are somewhat similar. …A LUT can’t do sharpness. So it’s important to remember that a LUT and a look are different, with a LUT being a simple file designed for contrast, brightness, and color cast changes, while a “look” refers to all the things affecting the personality or vibe of an image.

First and foremost, it’s that a LUT affects your whole image the same way. You can’t apply any shape information on a LUT, so you can’t do a subtle vignette to point the eye or do anything else with shapes. A LUT affects every pixel in the frame the same way.

On top of that, LUTs have some technical issues that come from bit depth and banding. Because the file sizes of LUTs are small, you sometimes run into an issue where fine detail in a gradient comes in between steps in the table. This leads to an output that looks banded.

LUTs are best avoided as part of the final creative color grading process. When you get into your grading session, you might bring along your LUTs to show them to the colorist to help give them perspective on the looks you were using while shooting and editing, but it’s better for the colorist to recreate that look from scratch in their editing platform than to work with the LUT on.

Because of banding and gamut issues, LUTs can get in the way of taking full advantage of everything available to you in a final grade.

While LUTs are wonderful and are likely here to stay on set, they are slowly being moved out of post. The replacement is what is called a transform. Transforms are incredibly powerful because they don’t have the banding and gamut issues of LUTs. Since it’s math, there is no “out of gamut” error caused by the transform. It can always calculate a new value.


Please rate the helpfulness of this tip.

Click on a star to rate it!