… for Visual Effects

Tip #1309: Deep Fakes – A Creative Perspective

Larry Jordan – LarryJordan.com

Deep fake face swapping is both boon and bane – depending upon how it is used.

(Image courtesy of Pexels.com.)

Topic $TipTopic

This article, Deep Fakes – A Creative Perspective, from VFXVoice, looks at the impact of emerging face-swapping technology on visual effects. This is a summary.

New ‘deep fake’ face-swapping videos seem to go viral on the internet with increasing regularity. Perhaps that’s because artists, and the machine learning algorithms they use for deep fakes, are increasingly getting so much better at them. Many have pondered, therefore, whether deep fakes will soon make their mark – or are already doing so – in traditional filmed entertainment.

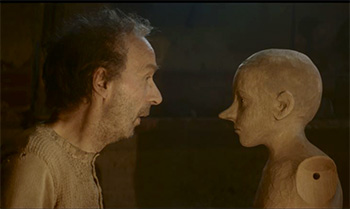
The deep fakes you tend to see in online videos, where a speaking person’s face is typically replaced with that of another (often famous) person, rely on deep learning algorithms and training data. This data is usually video footage or photographs of the other person used to craft a convincing model for face swapping.

Some of the most popular deep fakes made by ctrl shift face include actors doing impressions of other actors, with their faces swapped. Those, in particular, have an extra level of appeal since the voice is already part-way there. “I make videos that I want to see and make me laugh,” ctrl shift face advises, in relation to deep fake video project choices. “Some ideas fail because the technology is not there yet, but most often they fail because of YouTube policies and copyrights.”

“As far as using deep fakes in VFX goes, they’re still very much in their infancy, but they do offer creatives an exciting new range of storytelling possibilities,” outlines Framestore Executive Creative Director William Bartlett. “We used it for example on a very small part of our work on Pokémon: Detective Pikachu where the film required Bill Nighy’s character to appear younger in an ‘old’ news reel. It required some fixes, but deep fakes suited this need because of the nature of what would ultimately be presented on screen.”

The full article presents interviews, videos and more details regarding this process.

EXTRA CREDIT

From my perspective, this article reminds me of the adage: “Just because we can, does not mean we should.” The problem is the deep fake genie is out of the bottle – now what do we do with it? These may solve a creative problem, but there still seems a major societal price to pay.

What happens when we can’t trust anything we see?


Please rate the helpfulness of this tip.

Click on a star to rate it!

… for Visual Effects

Tip #1310: The Path to Mograph – Free Course

Larry Jordan – LarryJordan.com

Tour four different studios and learn how they create their projects.

The Path to Mograph logo

Topic $TipTopic

The School of Motion recently released a free course called “The Path to Mograph.”

“In this short 10-day course you’ll get an in-depth look at what it takes to be a Motion Designer. Along the way, you’ll learn about the software, principles, and techniques used in the field through in-depth case-studies and tons of bonus material.” (School of Motion website)

The course instructor is Joey Korenman. Prior to starting School of Motion, Joey was the Creative Director and Lead Animator at Toil in Boston, MA. There he lead projects for clients like Subway, McDonalds, Progressive, Saucony, and many other high-profile brands.

The course also includes example projects and over six hours of video and audio instruction. Click the link above to learn more.


Please rate the helpfulness of this tip.

Click on a star to rate it!

… for Apple Final Cut Pro X

Tip #1299: Transition Trimming Tricks

Larry Jordan – LarryJordan.com

Dragging these icons trims a clip under the transition without changing the transition duration or custom setings.

The three “drag points” of a transition: Trim the In, both or Out.

Topic $TipTopic

Ever wonder what the icons at the top of transition mean… or do? Here’s the answer.

Dragging these icons trims the clip under the transition without changing the transition’s duration or custom settings.

  • Drag the white double-bars on the left of the transition to trim the In of the In-coming clip. (This performs a ripple trim.)
  • Drag the white double-bars on the right of the transition to trim the Out of the out-going clip. (This performs a ripple trim.)
  • Drag the white bow-tie in the middle to trim both the In and the Out. (This performs a roll trim.)

Remember, you can alter the duration of a transition by dragging a vertical edge.

EXTRA CREDIT

If you don’t see these icons, zoom into the timeline until they become visible.


Please rate the helpfulness of this tip.

Click on a star to rate it!

… for Apple Motion

Tip #1295: Motion Compositions are a Good Start

Larry Jordan – LarryJordan.com

Sometimes, the best way to learn is to take apart something that already works.

A mash-up of the Motion Project Browser, highlighting “Splash.”

Topic $TipTopic

If you are like me, you start Motion and skip right past the Project Browser to create a new project and start designing.

However, the next time you start Motion, take a look at the categories on the left of the Project Broswer (that’s the window that opens when you first start Motion, indicated by the red arrow in the screen shot).

Compositions are a collection of lower thirds, infographics (menus) and opening titles that can jump start your thinking when you need to create something for your next project.

For example, opening Compositions > Splash > Open displays a 12-second animated opening where all you need to do is add text. However, since this is a Motion project, you can also customize any of the settings, colors or elements that you like.

Take a look at these and you’ll learn a lot about how Motion works, as well as giving you plenty of ideas for your next project.

Some very cool stuff.


Please rate the helpfulness of this tip.

Click on a star to rate it!

… for Visual Effects

Tip #1296: The Fairy-Tale Effects in Pinocchio

Larry Jordan – LarryJordan.com

Take a deep dive into on-camera visual effects, aided by CGI.

(Image courtesy of One of Us, ©2019 Archimede/Rai Cinema/Le Pacte/Recorded Picture Company.)

Topic $TipTopic

This article, written by Ian Failes, first appeared in VFXVoice.com. This is a summary.

Matteo Garrone’s Pinocchio, an Italian-made re-telling of the classic tale by Carlo Collodi, is a film that draws upon both practical and digital effects to tell its story of the central puppet character wanting to become a real boy.

Behind the majority of the digital visual effects work was One Of Us, based in London, which augmented several scenes that made use of on-set makeup and prosthetics, as well as delivering a number of fully-CG elements that had to stay within the fairy-tale realm of the story.

Here, One Of Us Visual Effects Supervisor Theo Demiris breaks down a number of the studio’s characters and shots from the film.

“Pinocchio as a character was entirely filmed in-camera made possible by some incredible prosthetics developed by Mark Coulier and his team. Our intervention consisted mainly of cleaning up creases and imperfections, usually around the hands and neck area.”

Donkey underwater: “We knew from the very beginning that this was going to be entirely a VFX shot. This moment was all about hitting the emotional beats of the story, and we very quickly realized that this also meant that it had to be a very long shot, 1,000 frames to be exact. The donkey had to lose its breath and then very slowly be enveloped in a shimmering school of fish.

“Once we blocked the Donkey animation, we started working on the environment and the behavior of the fish. The environment had to feel Mediterranean – highly detailed but murky and poetic. The fish had to behave beautifully but also realistically. For that, Matt Noris, one of our Senior FX Artists, put together a crowd simulation that was flexible and easy to art-direct. Once we had all the ingredients out from CG, Guillaume Menard, our Comp Supervisor, put it together himself and introduced a lot of real-life elements in the environment.”

“The most notable of effect in terms of work was the character of the Tuna. Not only was it a big fish, but also had to interact with the surrounding water and performances. For this, the actor was in prosthetics on the face with the rest his body hidden away underwater. We then kept only the very front of his performance and attached a CG body behind him. To do so seamlessly we had to track the head and attach the body while reverse-engineering his head movements and adjusting the animation to make them feel as if they were coming from the body rather than the other way around. It had, after all, to feel as if the body was floating and driving the movements of the head.”

EXTRA CREDIT

There’s a lot more to his discussion, along with images illustrating some of their VFX work in the article linked above.


Please rate the helpfulness of this tip.

Click on a star to rate it!

… for Visual Effects

Tip #1297: Super Alien Models of Valerian

Larry Jordan – LarryJordan.com

Note that motion capture, more than pure design, was the foundation for these chararacters.

(Image courtesy of VFXVoice.com)

Topic $TipTopic

This article, written by Ian Failes, first appeared in VFXVoice.com. This is a summary.

Among the many creatures and aliens showcased in director Luc Besson’s Valerian and the City of a Thousand Planets are members of the Pearl, a beautiful race of humanoid-like creatures who live in a picturesque beach setting.

The Pearl were completely synthetic creations by Weta Digital, which generated the characters from performances by actors with motion-capture equipment for their face and bodies.

VFX Voice visited Weta Digital in Wellington to find out more from the studio’s Visual Effects Supervisor, Martin Hill, as he runs down some of the main challenges his team faced in making the Pearl. Here are his comments:

Luc didn’t want to go completely human for the faces – otherwise he’d have put makeup on them and just [filmed] them, of course. He wanted to be able to make them abstract enough from their selves that although we could still read their emotions and read their personalities and read their characters, they were still very much not of this world. They were very alien faces. We spent quite a lot of time working at how we can alter their features and still carry their personality across in terms of the eyes.

One of the great things about the performance capture that we did, particularly the stuff on the set, was, as Luc was filming it, he was doing it as both capture and filming – composing the shot. The terrific thing about that is he’s getting the performance he wants. We could rely on the motion capture very heavily as the performance. Essentially, that ‘template’ is what Luc would expect back. That was a really great help for us when it came to giving shots the first-look animation. Nothing was unexpected. The animation would look pretty much exactly like the live template. Obviously, there was finesse and touches we added because the proportions are a little bit different.

EXTRA CREDIT

The article goes into more detail on how these creatures were created, along with video, images and links.


Please rate the helpfulness of this tip.

Click on a star to rate it!

… for Random Weirdness

Tip #1269: 5 Basic Filmmaking Principles

Larry Jordan – LarryJordan.com

None of these are “magic,” but, sometimes, we forget. Here’s a reminder.

(Image courtesy of Pexels.com.)

Topic $TipTopic

This article first appeared in MotionArray.com. This is a summary.

Editing is powerful, but good editing takes time, patience, and practice. The way you edit can either push your viewers away or draw them in. In this tutorial, we’ll explore five practical film editing principles you can start using immediately.

These include:

  1. Avoid Jump Cuts
  2. Use Relevant B-Roll
  3. Cut on Motion
  4. The 180° Rule
  5. What’s Your Motivation?

Editing is where the real magic happens in filmmaking, and the quality of it can make or break your project. These five basic film editing principles may sound very simple. Still, once you’ve learned them, you’ll be astounded at how much difference they make towards making an edit look smooth, believable, and just far more professional.

EXTRA CREDIT

The linked article has a tutorial video, plus additional description of each of these tips.


Please rate the helpfulness of this tip.

Click on a star to rate it!

… for Apple Motion

Tip #1262: Change Behavior Ease In / Out Speed

Larry Jordan – LarryJordan.com

The Behavior menu provides eight different options to change acceleration.

The Behaviors inspector (top) showing the Speed menu. A Motion Path (bottom).

Topic $TipTopic

I discovered this tip while researching a recent PowerUP webinar. We can also change the ease-in / ease-out speed when animating objects using behaviors.

NOTE: Tip #1258 illustrates how to change Ease In/Out speed when using keyframes.

Ease In and Ease Out refer to the acceleration of an object approaching an end point when animated using Behaviors.

  • Ease In. The speed of an object approaching a keyframe.
  • Ease Out. The speed of an object leaving a keyframe.

Apply Behaviors > Basic Motion > Motion Path to an element in the Layers panel. Adjust the two end points to get the movement you want.

NOTE: Click in the middle of the red motion path line and drag to create a curved path.

Go to Inspector > Behaviors and change the Speed menu to change Ease In / Out speeds. Experiment with the different options to see which works best for your project.


Please rate the helpfulness of this tip.

Click on a star to rate it!

… for Visual Effects

Tip #1270: Learning DaVinci Resolve 17

Larry Jordan – LarryJordan.com

Free tutorials simplify getting started with the latest version of Resolve.

(Image courtesy of Blackmagic Design.)

Topic $TipTopic

This DaVinci Resolve tutorial website has a host of tutorials on learning the basics of DaVinci Resolve.

These tutorials include both training video and project files.

Titles include:

  • Introduction to Editing
  • The Art of Color Grading
  • DaVinci Resolve Mini Panel
  • Fusion VFX
  • Fairlight Audio Production
  • Managing Media
  • Delivering Content

All tutorials are free and can either be viewed online or downloaded to your computer.


Please rate the helpfulness of this tip.

Click on a star to rate it!

… for Visual Effects

Tip #1272: Art & Business of VFX for TV & Streamers

Larry Jordan – LarryJordan.com

“Game of Thrones” is considered the Gold Standard for VFX on TV.

Topic $TipTopic

VFXV, the magazine of the Visual Effect Society, has an article, written by Trevor Hogg, on “The Art and Business of VFX for TV and Streaming.” (Link)

“The continued emergence of new streaming platforms, Disney+ and Apple TV+ among some of the most recent to launch, has created entirely new avenues for content, and much of it is prestige programming that requires quality visual effects, with the scope of a traditional feature blockbuster or high-profile cable series,” states Simon Rosenthal, Executive Vice President Global Studio Operations at Method Studios. “At the same time, technology advancements are enabling studios to work more quickly and efficiently, and so producers are increasingly using visual effects to support their storytelling, whether creating a full CG creature, mass destruction, or digitally altering practical locations to be period-authentic.”

This article provides an in-depth look at an industry expanding into new markets along with interviews, screen shots and links.


Please rate the helpfulness of this tip.

Click on a star to rate it!