Drama occurs from conflict. Spike Lee says the best drama is when both sides are right.
(Image courtesy of Pexels.com.)
This article, written by Jason Hellerman, first appeared in NoFilmSchool.com. This is a summary.
Scenes: they’re the backbone of every story, whether it be TV, film, or even on the stage. Scenes build on one another and create a world, a vision, and take people on a journey. But, what should be in every scene?
At the end of the day, every scene needs to have one thing: drama. Does your character have a goal in the scene? What’s standing in their way? That’s it. That’s the center of every scene.
Drama is the perils that your characters face in order to achieve their goal. Those perils can make us laugh, they can be thrilling, they can be emotional. But without drama, you’re not building a story. You’re just boring us.
The biggest pratfall I see from younger writers are scenes that have no conflict. People come in and out of doors and espouse facts, then go on their way. We need to see what stands in their way both tangibly and intangibly if we want to really be a part of the story.
This article includes a video on how to write a scene, along with more details.
Please rate the helpfulness of this tip.
Click on a star to rate it!
https://www.theinsidetips.com/wp-content/uploads/2019/09/Tips-Logo-700x150.jpg00Larry Jordanhttps://www.theinsidetips.com/wp-content/uploads/2019/09/Tips-Logo-700x150.jpgLarry Jordan2020-12-11 01:30:002020-12-11 01:30:00Tip #1232: What Should Be in Every Scene You Write?
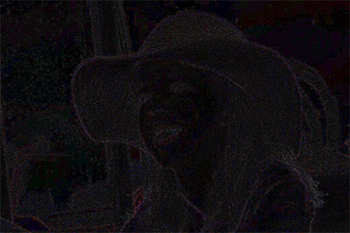
Differences caused by compression are very subtle and confined to edges.
A significantly enhanced difference map highlighting differences between images.
Ever wonder what happens to your images when they are compressed? Well, Motion has a elegant way to illustrate these differences. Here’s how to discover them.
Import the two clips or stills you want to compare – this works for both video and stills.
Select the top clip.
In the Inspector, change Properties > Blend mode to Difference.
The first thing you’ll notice is that differences are VERY slight.
To enhance these results, apply Filters > Color > Levels to the GROUP that holds both images. Then drag the mid-tone slider to the left. This boosts the difference results.
Anything showing gray is different between the two images. Again, you’ll see the big difference is edge definition.
EXTRA CREDIT
If you want to be extra precise, bring these images into your favorite NLE and compare them using the Waveform Monitor.
Two identical images would show a solid black line at 0.
Please rate the helpfulness of this tip.
Click on a star to rate it!
https://www.theinsidetips.com/wp-content/uploads/2019/09/Tips-Logo-700x150.jpg00Larry Jordanhttps://www.theinsidetips.com/wp-content/uploads/2019/09/Tips-Logo-700x150.jpgLarry Jordan2020-12-10 01:30:002020-12-10 01:30:00Tip #1227: Compare Two Images for Artifacts
The lighting technology in Motion is amazing! The key is to turn off the ambient lights first.
A 3D torus, with Dramatic Right lighting and colors applied.
Motion has some very dramatic lighting presets built into it. But, to see them, you need to turn the ambient lights off first. Here’s how.
The screen shot illustrates the Dramatic Right lighting setup, with ambient lights turned off. Here’s how to achieve the same look.
Drag the 3D object of your choice from the Library to the Viewer, then select it in the Layers panel. (I used a Torus.)
From Object > New Light Setup, choose a lighting arrangement that appeals to you. (I used Dramatic Right.)
In the Layers panel, move the 3D object from its own group into the same group as the lights.
Select the 3D object, then go to Inspector > 3D Object and click the Reveal Environmental Lighting button.
Scroll down toward the bottom and set 3D Object Environment to 0. This turns off the inherent lighting of the object. (If the object goes black, remember that you need to move it into the same group as the lighting setup you just added. Put it below the lights in the Layers panel.)
Finally, select each light individually in the Layers panel, go to Inspector > Light and change the color to something you like.
Adjust until you get the look you want — or, until its time for dinner, whichever comes first.
EXTRA CREDIT
As is also true on set, you can adjust lights until there’s no time left for production. Feel free to tweak.
DaVinci Resolve continues to set the pace for color control and creativity.
(Image courtesy of BlackmagicDesign.com.)
DaVinci Resolve has long been respected for its color grading tools. In the Version 17 release, these were improved even more. Here’s a quick summary of the new features, taken from the DaVinci Resolve website.
Next Generation HDR Grading Tools. The HDR grading palette lets you create new color wheels with custom roll off for specific tonal ranges, giving you more creative control to make fine adjustments. The wheels include exposure and saturation controls for each zone. They’re color space aware so you get perceptually uniform results.
Color Warper for Refined Grading. The mesh based warping tool lets you adjust two color parameters at once. You can adjust both hue and saturation or chroma and luma. Adjustments are made by dragging control points, with smooth falloff for clean, natural looking adjustments. It’s an entirely new way to transform color in your images!
Targeted Grading with Magic Mask. Selecting and tracking people for targeted correction has never been easier! Magic mask uses the DaVinci Neural Engine to automatically create masks for an entire person or specific features such as face or arms. You get matte finesse tools, the ability to add and remove strokes and automatic tracking!
Advanced Color Management. DaVinci Resolve color management adds features to simplify your workflow and improve image quality. You get wide gamut image processing, new input and output tone mapping and color space aware tools that provide for a more consistent response while grading and greatly improved image quality!
DaVinci Wide Gamut Color Space. DaVinci wide gamut and DaVinci intermediate are timeline color space and gamma settings that provide a universal internal working color space. It’s larger than what cameras can capture, or BT.2020, ARRI wide gamut and even ACES AP1. You’ll never lose image data, no matter where it comes from!
Updated 3D Professional Scopes. You can now open multiple versions of the same scope, set customizable waveform scales, create 3×3 layouts and open a separate scope window on a second display. You could open 3 vectorscopes, set to different tonal and zoom ranges, allowing you to simultaneously see shadows, midtones, and highlights.
Additional LUT Support. DaVinci Resolve 17 lets you generate 17 point 3D LUTs directly from the timeline, which are great for monitoring on set. There’s also support for video range LUT metadata, as well as the ability to set your own custom LUT paths either on local or to a network volume for sharing LUTs in a facility.
New Viewer Wipe Modes. New diagonal, venetian blind and checkerboard wipes provide additional flexibility for comparing images in different ways. A new split screen mode for comparing up to four playheads from the timeline is useful for comparing multiple clips or for comparing different frames within the same clip.
Please rate the helpfulness of this tip.
Click on a star to rate it!
https://www.theinsidetips.com/wp-content/uploads/2019/09/Tips-Logo-700x150.jpg00Larry Jordanhttps://www.theinsidetips.com/wp-content/uploads/2019/09/Tips-Logo-700x150.jpgLarry Jordan2020-12-09 01:30:002020-12-05 11:19:58Tip #1233: New Color Tools in DaVinci Resolve 17
High-end compositing tools exist to solve tricky problems with edges.
(Image courtesy of Pexels.com.)
Both Adobe Premiere Pro and Apple Final Cut Pro X include powerful chroma-keyers. When should you consider using something even stronger?
The challenge with any key is precisely defining an edge. Yes, the background needs to be evenly lit and actors should not wear green in front of a green background. But, by now, most of us understand that.
Most of the time, finding the edge isn’t that hard. But, I can easily think of five situations to use more powerful compositing (keying) software:
Loose or blowing hair and other fuzzy edges
Translucency between foreground and background
Reflections of the composited background with the foreground
Tracking between foreground and background
Working with 3D composites
What software should you consider if your NLE isn’t enough?
https://www.theinsidetips.com/wp-content/uploads/2019/09/Tips-Logo-700x150.jpg00Larry Jordanhttps://www.theinsidetips.com/wp-content/uploads/2019/09/Tips-Logo-700x150.jpgLarry Jordan2020-12-09 01:30:002020-12-05 11:24:44Tip #1234: When to Use a More Powerful Chroma-Keyer
Motion tracking is an essential skill, especially designed for moving elements.
(Image courtesy of SchoolofMotion.com)
This article, written by Johnathan Paul, first appeared in SchoolofMotion.com. This is a summary.
Motion tracking, in its simplest form, is the process of tracking the movement of an object within a piece of footage. Once you’ve collected this track data from the selected point, you then apply it to another element or object. The results of applying this data are that your element or object now matches the movement of your footage.
What can you use motion tracking for?
Stabilize motion by utilizing tracking data.
Add elements such as text or solids to a composition.
Insert 3D objects into 2D footage.
Apply effects or color grading techniques.
Replace screens on a TV, Computer, or mobile device.
What types of motion tracking is there in After Effects?
Single-Point Tracking
Two-Point Tracking
Corner Pin Tracking
Planar Tracking
Spline Tracking
3D Camera Tracking
Tracking is a crucial technique to learn as a motion designer or visual effects artist. You’ll end up using this technique much more than you think, and for a wide variety of reasons.
The article has videos that illustrate each of the six types of motion tracking, along with different software to accomplish it.
Please rate the helpfulness of this tip.
Click on a star to rate it!
https://www.theinsidetips.com/wp-content/uploads/2019/09/Tips-Logo-700x150.jpg00Larry Jordanhttps://www.theinsidetips.com/wp-content/uploads/2019/09/Tips-Logo-700x150.jpgLarry Jordan2020-12-09 01:30:002020-12-09 01:30:00Tip #1235: 6 Ways to Motion Track in After Effects
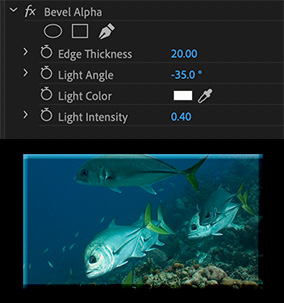
This is a fast way to add dimensionality to a 2D video.
Effect Controls settings (top) and the finished effect.
There’s a little known effect in Premiere that can turn any video into a 3D button. While you wouldn’t use this in a background video, it can create interesting foreground effects. Here’s how it works.
Select a clip – ideally, scale it to less than full screen.
Apply Effects > Perspective > Bevel Alpha.
The default settings aren’t bad, but you can tweak them in Effect Controls. In this example, I increased the Edge Thickness a lot.
Please rate the helpfulness of this tip.
Click on a star to rate it!
https://www.theinsidetips.com/wp-content/uploads/2019/09/Tips-Logo-700x150.jpg00Larry Jordanhttps://www.theinsidetips.com/wp-content/uploads/2019/09/Tips-Logo-700x150.jpgLarry Jordan2020-12-08 01:30:002020-12-05 11:13:24Tip #1226: Make Video Look Like a Button
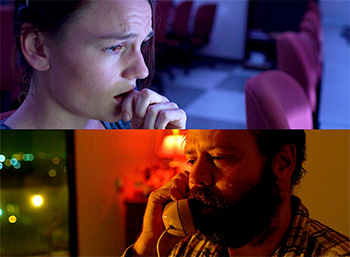
80 minutes – two separate locations – both shot in real-time at the same time.
Screen shot from the film “Last Call.”
When does film become theater… and when does theater become film?
This article first appeared in NoFilmSchool.com. This is a summary.
The film, “Last Call” is about a suicidal alcoholic (played by the film’s co-writer Daved Wilkins) on the anniversary of his son’s death. When he attempts to call a crisis hotline, a mis-dial connects him with Beth, a single mother working as the night janitor (Sarah Booth) at a local community college. The split screen feature showcases both characters in real-time as they navigate a life-changing conversation.
80 minutes – two separate locations – both shot in real-time at the same time. 10 days of rehearsal, 4 days to shoot, 5 good takes.
“We were either going to get it or not,” director/co-writer Gavin Michael Booth says. “We filmed every rehearsal and watched it back to see if a particular section was getting boring and therefore to try something visually to spice it up. I was like an NFL coach being able to watch the game plays back to perfect the technical aspects of the performance.”
Not content with shooting both takes simultaneously in realtime, they shot in locations several blocks away from each other. The crew for each was a camera operator and a sound operator. Cinematographer Seth Wessel-Estes was in charge of Daved’s storyline, while Booth took charge of the other storyline featuring his wife. They shot with a part of RED Helium cameras in 8K.
Shot almost exactly two years ago, the film picked up 25 awards on the festival circuit including the Founders Award at Napa Valley and Best Feature at Hamilton, eventually landing a theatrical release with Mutiny Pictures and a streaming distribution deal with Apple TV+ with more to follow.
The article provides lots more details, plus a trailer and production shots.
Please rate the helpfulness of this tip.
Click on a star to rate it!
https://www.theinsidetips.com/wp-content/uploads/2019/09/Tips-Logo-700x150.jpg00Larry Jordanhttps://www.theinsidetips.com/wp-content/uploads/2019/09/Tips-Logo-700x150.jpgLarry Jordan2020-12-04 01:30:002020-12-04 01:30:00Tip #1216: A Split-Screen Movie – that Works.
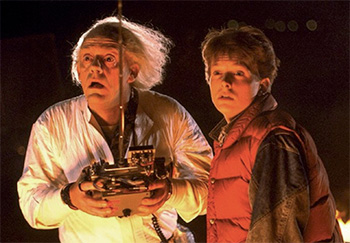
Taglines intrigue audiences. Loglines sell films to investers.
Screen shot of “Back to the Future” (Image courtesy of Universal Pictures.)
This article, written by Darin Bradley, first appeared in PremiumBeat.com. This is a summary.
Every creative medium uses some version of the elevator pitch to condense a project into a simple, memorable description — in the movie business, it’s the logline. Agents and producers of all stripes across the entertainment industry use these one-liners when jockeying scripts, books, or games between the creators they represent and the buyers they’re trying to convince.
A logline is a simple descriptive sentence that identifies the inciting incident (motivation and/or risks), the protagonist, the primary action, and the antagonist. This straightforward sentence reduces all the complexity and nuance of your script into a digestible takeaway that makes it simpler for the various brokers who bring movies to life to move big, beautiful, ungainly scripts around.
Here are the “Rules:”
Create Strong Protagonists
Specific About Character Actions
The Unexpected Is Your Friend
The article then provides almost a dozen examples of both successful and unsuccessful loglines, with an analysis of each.
Please rate the helpfulness of this tip.
Click on a star to rate it!
https://www.theinsidetips.com/wp-content/uploads/2019/09/Tips-Logo-700x150.jpg00Larry Jordanhttps://www.theinsidetips.com/wp-content/uploads/2019/09/Tips-Logo-700x150.jpgLarry Jordan2020-12-04 01:30:002020-12-04 01:30:00Tip #1217: Create Loglines that Sell Movies
We may request cookies to be set on your device. We use cookies to let us know when you visit our websites, how you interact with us, to enrich your user experience, and to customize your relationship with our website.
Click on the different category headings to find out more. You can also change some of your preferences. Note that blocking some types of cookies may impact your experience on our websites and the services we are able to offer.
Essential Website Cookies
These cookies are strictly necessary to provide you with services available through our website and to use some of its features.
Because these cookies are strictly necessary to deliver the website, refuseing them will have impact how our site functions. You always can block or delete cookies by changing your browser settings and force blocking all cookies on this website. But this will always prompt you to accept/refuse cookies when revisiting our site.
We fully respect if you want to refuse cookies but to avoid asking you again and again kindly allow us to store a cookie for that. You are free to opt out any time or opt in for other cookies to get a better experience. If you refuse cookies we will remove all set cookies in our domain.
We provide you with a list of stored cookies on your computer in our domain so you can check what we stored. Due to security reasons we are not able to show or modify cookies from other domains. You can check these in your browser security settings.
Google Analytics Cookies
These cookies collect information that is used either in aggregate form to help us understand how our website is being used or how effective our marketing campaigns are, or to help us customize our website and application for you in order to enhance your experience.
If you do not want that we track your visit to our site you can disable tracking in your browser here:
Other external services
We also use different external services like Google Webfonts, Google Maps, and external Video providers. Since these providers may collect personal data like your IP address we allow you to block them here. Please be aware that this might heavily reduce the functionality and appearance of our site. Changes will take effect once you reload the page.
Google Webfont Settings:
Google Map Settings:
Google reCaptcha Settings:
Vimeo and Youtube video embeds:
Other cookies
The following cookies are also needed - You can choose if you want to allow them:
Privacy Policy
You can read about our cookies and privacy settings in detail on our Privacy Policy Page.