… for Apple Final Cut Pro X

Tip #1261: What is Automatic Speed?

Larry Jordan – LarryJordan.com

Automatic Speed plays every frame in a clip, but at the frame rate of the project.

The Automatic Speed option in the Retiming menu at the bottom of the Viewer.

Topic $TipTopic

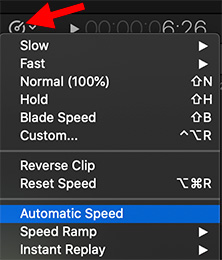
You may have noticed “Automatic Speed” in the Retime menu. What does this do?

Automatic Speed plays every frame in a clip, but at the frame rate of the project. Typically, it is used to create extremely smooth slow motion.

For example, using a modern iPhone, you can shoot up to 240 fps video, depending upon frame size. However, when you play this clip back in Final Cut, that clip plays at “normal” speed, matching the frame rate of the project.

NOTE: Behind the scenes, Final Cut is dropping frames to make the video playback speed appear “normal.”

When you enable Modify > Retime > Automatic Speed, you are telling Final Cut to play every frame in your high-frame-rate video, but at the frame rate of the project. This has the result of creating a slow motion clip.

NOTE: You can also use the Retime menu at the lower left corner of the Viewer. It looks like a stopwatch.

The biggest benefit to this procedure is that, unlike normal slow-mo, high-frame-rate playback is extremely smooth and every frame is in focus.


Please rate the helpfulness of this tip.

Click on a star to rate it!

… for Random Weirdness

Tip #1249: Use a Foil to Enhance a Character

Larry Jordan – LarryJordan.com

Foils are used to enhance our perception of a character.

Sherlock (image courtesy of PBS).

Topic $TipTopic

This article, written by Alejandro Medellin, first appeared in PremiumBeat.com. This is a summary.

A foil character is a simple, yet effective, literary device that uses two opposite characters’ juxtaposition to showcase their differences. According to the Online Etymology Dictionary, the term “foil” came about in the 1500s, and is based on the technique of placing a thin metal sheet, or foil, behind a gem to make it shine.

A foil character can be any character in a film that’s similar to another character, while also being different. Typically, however, foil characters exist to challenge or oppose the main character (or protagonist) of a story. A good foil character highlights the good and bad in their counterpart, shining a light on the foiled character’s personality without spelling it out.

A foil character and an antagonist are not mutually exclusive, but not every foil is an antagonist and vice-versa. An antagonist’s sole purpose in the story is to oppose the protagonist and their actions. Foils are similar, which is why there’s such confusion, but foils aren’t inherently against the protagonist. Instead, they serve as an opposite to contrast the protagonist.

A foil character’s primary role is to bring the character being foiled into sharper focus. By simply existing in the story and taking a different approach to a situation, a foil character can carry the narrative of the opposing character. Whether they do something or don’t, how the foil character reacts in contrast to their counterpart is a useful tool in character development and storytelling.

EXTRA CREDIT

The article provides more detailed analysis of foil characters in:

  • Star Wars: The Force Awakens
  • Harry Potter
  • Iron Man & Captain America
  • Sherlock
  • Star Wars: The Last Jedi


Please rate the helpfulness of this tip.

Click on a star to rate it!

… for Random Weirdness

Tip #1252: Essential Tips for an Indie Film

Larry Jordan – LarryJordan.com

Patience is the watch-word when working on low-budget films.

Alone, starring Stephanie Barkley. (Courtesy of NoFilmSchool.com)

Topic $TipTopic

This article, written by William Hellmuth, first appeared in NoFilmSchool.com. This is a summary.

NOTE: This article – “Essential Tips for Filming Indie Sci-fi on a Tight Budget” – focuses on a sci-fi film. However, these tips apply to just about any low-budget film.

We only had $6,000 to produce a movie that was set almost entirely in outer space, with substantial production design and VFX challenges attached to it. In the end, we not only made our film, but we also got it distributed by Dust.

There’s a saying I’ve heard over and over: “Good, fast, cheap. Pick two.” I knew I needed Alone to be good and cheap. That meant I couldn’t have it fast. Since we didn’t have a lot of money, we had to wait until we could find the right designer and the right star, at the right price. It took almost a year before that happened.

I am terrible at VFX. I’ve seen a lot of sci-fi films get stuck in post-production hell because the director bit off more than they could chew. To avoid that, I wanted to capture as many VFX shots in-camera as possible.

No matter where you’re at in your career, you always have a certain amount of social capital. You’re always better off working with people who want to be in the trenches with you, and the best way to do that is to make sure they know and trust you.

Above all, when you’re working with a shoestring-budget project, be patient. Try not to hover on specific deadlines, because if you want something good and cheap, it won’t come fast.

EXTRA CREDIT

The article, linked above, has a trailer, more details and images from the production.


Please rate the helpfulness of this tip.

Click on a star to rate it!

… for Apple Motion

Tip #1244: Hidden Ways to Rotate Elements

Larry Jordan – LarryJordan.com

Colors and icons assist in rotating elements.

Press Shift and rotate a video clip to constrain rotation to 45° increments.

Topic $TipTopic

Motion provides two hidden options which can assist in rotating elements in the Viewer.

We all know that the Motion Inspector is where we can make changes to a selected element. However, the Viewer itself provides controls that can speed rotation.

When you select a clip in the Viewer (either by clicking it in the Layers panel or in the Viewer itself) a dot with a line attached appears in the center of the clip.

NOTE: If you change the Anchor point in the Inspector, the location of this rotation dot changes as well.

  • Drag the small dot at the right end of the line to rotate the clip. As you do, the line color stays white.
  • Press the Shift key and the line color changes to yellow and the angle of rotation is constrained to 45° angles.

Also, see the small light yellow dot about 4 o’clock in the screen shot? This represents the starting rotation for a clip. So, if you don’t like the current rotation, you can always go back – provided you don’t let go of the mouse first.


Please rate the helpfulness of this tip.

Click on a star to rate it!

… for Visual Effects

Tip #1253: How to Light an Animated Film

Larry Jordan – LarryJordan.com

Lighting a scene happens at the end, but planning the lighting starts much earlier.

Image courtesy “Finding Nemo” and Pixar.

Topic $TipTopic

This article, written by Jasmyne Bell, first appeared in NoFilmSchool.com. This is a summary.

Lighting animated movies isn’t just about making scenes look more stunning, it’s also about choosing an aesthetic that can evoke a desired feeling in audience members. Just like live-action films, lighting plays a major role in how animated films affect moviegoers.

Artists create blueprints called color scripts, which are hand-painted frames that depict scenes throughout a storyline…much like a storyboard only more detailed in terms of tone. When these frames are viewed consecutively, the director and production designer can determine the emotional story arc.

Surfacing determines an object’s texture and how it will appear when light hits it. Surfacing artists will assign numerical values to something in the frame. Something like a jacket could be more prone to something like reflectiveness as opposed to roughness.

Ray tracing is a rendering method that uses the virtual camera to shoot out a light-sensing ray until it hits an object in the scene. This shows what surfaces are translucent or solid, depending on how light is reflected.

Path tracing shoots out multiple rays that bounce around until the light source is located in the scene. This method is used especially in newer animation and is the reason these films look so realistic.

EXTRA CREDIT

The article has more images and details. See the link above.


Please rate the helpfulness of this tip.

Click on a star to rate it!

… for Visual Effects

Tip #1254: Turn Your Kids Into Super-Heroes

Larry Jordan – LarryJordan.com

Super-heroes – without the trauma or destruction.

Super-hero power – without property destruction.

Topic $TipTopic

It’s the holidays – everyone wants to feel special.

Ben Eshagpoor of beMotion.dESIGN shows you how to turn your kids into Super Heroes. Give your kids some superpowers without subjecting them to a radioactive spider bite!

Ben uses Boris Sapphire and footage from ActionVFX. He’s working in Premiere Pro and After Effects. He explains how to work between the programs. It’s tons of fun and, indeed, would be a fun project with your kids over the holidays.

Here’s the link on Toolfarm.com.


Please rate the helpfulness of this tip.

Click on a star to rate it!

… for Adobe Premiere Pro CC

Tip #1246: Hand-painted Fonts for Premiere

Larry Jordan – LarryJordan.com

These hand-drawn letters can be used in ANY NLE – not just Premiere.

Each animated letter is its own movie. Duplicate to increase duration.

Topic $TipTopic

Recently, I wrote an Inside Tip on some hand-painted fonts for Premiere. (Tip #1119). Then, Richard sent me a note asking how to install them. Here’s the answer.

You don’t install these. Instead, each letter is a stand-alone movie file.

  • Drag the letters you need into Premiere.
  • Stack them above each other – since they all need to appear on screen at the same time – in the timeline.
  • Using the Position settings in Effect Controls, position the letters so they are readable.

Each letter has a one-second duration. To make the letters hold on-screen longer, you can either change the speed of the clip (which kinda kills the animation) or add multiple versions of the same letter to the timeline (see screen shot).

EXTRA CREDIT

Change the color of each letter using the Change to Color effect. (See Tip #1247)

To make this more manageable, consider combining all the letters for each word into a nest. This simplifies scaling, adding color or transitions or animating movement using keyframes.


Please rate the helpfulness of this tip.

Click on a star to rate it!

… for Adobe Premiere Pro CC

Tip #1247: The “Change to Color” effect

Larry Jordan – LarryJordan.com

This effect makes it easy to change any color to any other color.

Change to Color settings (top) and a single letter in the new color.

Topic $TipTopic

In Tip #1246, I illustrated how to use hand-painted fonts in Premiere. The problem is that these fonts are all black. How do you change their color?

The answer is the Change to Color effect. Here’s how it works.

  • Drag Effects > Video Effects > Color Correction > Change to Color onto the clip(s) who’s color you want to change.

NOTE: This is not the same effect as Change Color. Change to Color is easier to use.

  • In Effect Controls, click the From color and set it to pure black. (See screen shot)

NOTE: Don’t use the eyedropper to select the letter color in the Program Monitor. The letters are translucent and this picks a blend of colors, which won’t work.

  • In Effect Controls, set the To color to the color you want to display.
  • Next, set Change to Hue, Lightness & Saturation.
  • Finally, set Change by to Transforming to Color. This retains the translucency built into each letter.

EXTRA CREDIT

Nesting the letters will make this process easier because you can apply this effect to the nest and change all the letters at the same time.


Please rate the helpfulness of this tip.

Click on a star to rate it!

… for Random Weirdness

Tip #1230: How to Use Insert Shots Effectively

Larry Jordan – LarryJordan.com

An insert shot provides detail or information to move a story forward.

(Image courtesy of “The Imitation Game.”)

Topic $TipTopic

This article, written by Jourdan Aldredge, first appeared in PremiumBeat.com. This is a summary.

An insert shot is not, necessarily, a close-up. Screenwriting.io defines the insert shot as “…a shot — often a close-up — that focuses on a specific detail.” It’s the “detail” focus that makes inserts so powerful. While inserts might seem simple and self-explanatory, they are actually one of the oldest tricks in the book to help you tell a story in your films or videos.

In more practical filmmaking terms, insert shots—sometimes also called cutaway shots—are all the shots you include to add additional visual information that helps with your cinematic storytelling needs. These are often closeups displaying specific information such as headlines of newspapers, items, weapons, or other small articles like door handles.

However, technically speaking, insert shots aren’t all close-ups. They can include any number of shot styles or techniques across all of the standard shot types. The key element is that they’re edited, or “inserted,” into a scene to help provide further thematic clarity.

The article includes four videos that illustrate different ways to shoot and use insert shots, along with links for more information.


Please rate the helpfulness of this tip.

Click on a star to rate it!

… for Random Weirdness

Tip #1231: How to Break Down a Script

Larry Jordan – LarryJordan.com

Script breakdowns start the process of turning words into images.

(Image courtesy of PremiumBeat.com.)

Topic $TipTopic

This article, written by Jason Boone, first appeared in PremiumBeat.com. This is a summary.

A script breakdown helps a film crew prepare for production. With a proper breakdown, a production team can isolate all the necessary elements, put together a shooting schedule, create a shot list, and generate script sides.

In the video tutorial that accompanies this article, the author uses StudioBinder to break down a script.

Line the Script. The first step in breaking down a script is to separate it into filmable scenes. This is called “lining the script,” and it’s quite easy when things are properly formatted. Since one page of a screenplay is generally translated as one minute of screen time, using eighths just provides extra precision.

Isolate the Production Elements. With the script properly broken into scenes and divided by eighths, tag them. Elements include anything that’s going to be on-screen, including cast members, props, VFX, makeup, set dressing, etc.

Create the Breakdown Summary Sheet. This could include shot lists and production schedule.

Once I have all of the elements isolated, I can now put together a breakdown sheet. With this step, I’m essentially categorizing and listing out all of the elements from the breakdown for each particular scene.

With my script breakdown in hand, I’m now ready to move on to the next stages of pre-production.

EXTRA CREDIT

The article includes a five minute video tutorial along with more details and screen shots.

The StudioBinder website is here.


Please rate the helpfulness of this tip.

Click on a star to rate it!