… for Apple Motion

Tip #1219: Split the Viewer into Multiple Views

Larry Jordan – LarryJordan.com

Multiple views allow faster 3D work in Motion.

Two separate, stacked images. Top shows the active camera, bottom shows the scene from the top (like a floor plan).

Topic $TipTopic

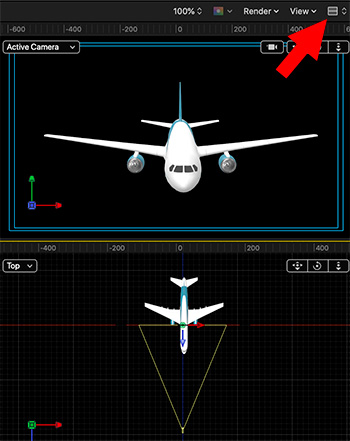
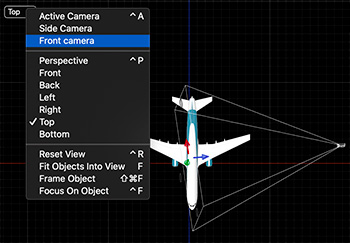
In the top right corner of the Viewer is an icon composed of small boxes (see red arrow in screen shot). This is actually a big benefit when working in 3D. Here’s how.

Click this icon and you are presented with a number of ways to create multiple independent screens in the Viewer. For example, in the screen shot, two independent views are stacked above each other.

And that’s the key word: Independent. You can view multiple views of the same project. In my example, the top box shows the active camera – the screen that will be output during export – while the bottom screen shows the Top view in 3D, which, for me, is the best way to position and animate lights and cameras.

By having both these screens open at once, you can work more quickly without needing to switch back and forth between views.

When the time comes to go back to one screen, which you select from this same popup menu, whichever image has a yellow box around it will be displayed.


Please rate the helpfulness of this tip.

Click on a star to rate it!

… for Apple Motion

Tip #1220: What is the Active Camera?

Larry Jordan – LarryJordan.com

The Active Camera is the shot that’s currently displayed in the timeline.

The Camera view menu with two different cameras applied to the scene.

Topic $TipTopic

Apple Motion allows us to add multiple cameras to any project; which means we need to understand the “Active Camera.”

When you switch between views in Motion, the top option is called Active Camera (Shortcut: Control + A). If you only have one camera, this choice is all you need.

But, if you create a scene where you have two or more cameras, as the screen shot illustrates, you need more choices.

Active Camera is the shot currently displayed at the position of the playhead.

Other cameras are on stand-by, waiting for their turn in the spotlight. For example, here, I have two cameras: Front camera, recording this airplane from directly in front of the nose. Then, halfway through the project, I cut to a second cameras, presenting the image from the side.

NOTE: Using the new 3D shapes, multiple cameras make for a very interesting scene change.

In this camera view menu, I can choose:

  • The camera under the playhead; this is the default>
  • The front camera, whether it is active or not
  • The side camera, whether it is active or not

These camera selection options make it easier to align elements regardless of whether the camera is active or not


Please rate the helpfulness of this tip.

Click on a star to rate it!

… for Visual Effects

Tip #1215: Create a Crash Zoom from Two Shots

Larry Jordan – LarryJordan.com

A crash-zoom rapidly zooms from one shot to the next. Here’s how to do it in post.

A crash-zoom in action. (Image courtesy of PremiumBeat.com.)

Topic $TipTopic

This article, written by Jason Boone, first appeared in PremiumBeat.com. This is a summary.

The crash (or snap) zoom is a cinematography technique you’ll see quite often in big-budget films. Quentin Tarantino frequently uses it to snap the viewer’s attention to specific items on screen, such as the tip of a shotgun or the blade of a Hattori Hanzo sword.

Here are the steps to create this effect in post using After Effects:

  • Step 1: Capture a WS and a CU
  • Step 2: Align the clips so the object centers match
  • Step 3: Animate the Crash Zoom
  • Step 4: Cover up the cut
  • Step 5: Add Camera Shake

The great thing about this technique is that you can quickly add motion graphics elements, as the Crash Zoom is already animated separate from the layers. To add an element, just parent it to the Crash Zoom and switch on the motion blur. Some anime speed lines might work nicely here as well.

EXTRA CREDIT

The article includes step-by-step instructions, along with two demo videos.


Please rate the helpfulness of this tip.

Click on a star to rate it!

… for Visual Effects

Tip #1218: Free After Effects Courses from Adobe

Larry Jordan – LarryJordan.com

Simple steps to help build After Effects mastery.

After Effects composite (Image courtesy of Adobe, Inc.)

Topic $TipTopic

Adobe has created a series of courses to help After Effects users become more proficient. These include:

  • After Effects Get Started
  • Understand Layers
  • Animating Essentials
  • Paint, Clone and Rotoscope Layers
  • Build and Animate Custom Shapes
  • Isolate and Remove Objects
  • Export from After Effects
  • Beginner Projects

And many more. Each runs 2 – 10 minutes and all are free.

Here’s the link.


Please rate the helpfulness of this tip.

Click on a star to rate it!

… for Random Weirdness

Tip #1200: Filmic Pro Adds 10-bit Dolby Vision HDR

Larry Jordan – LarryJordan.com

Filmic Pro has become an iPhone movie-making standard.

Image courtesy of NoFilmSchool.com.

Topic $TipTopic

This article first appeared in NoFilmSchool.com. This is a summary.

Filmic Pro is a versatile tool that is a must-download for any mobile filmmaker who wants more manual control over the native cameras found on smartphones. With v6.12.7 of the iOS app, it now supports 10-bit Dolby Vision HDR on the iPhone 12 series.

Whether you’re just starting out creating content or looking for a low-budget way to shoot your next short, FiLMiC Pro has the essential tools to help dial in your image. The intuitive app has options to adjust white balance, focus, exposure, resolution, frame rate, and even aspect ratio. Want to shoot 2.76:1 or 2.39:1? No problem, the app can do both.

If you’re looking for more advanced features, it has options for focus peaking, a histogram, zebra lines while supporting flat/Log gamma curves, anamorphic lenses (like the Blue Flare lens from Moment), gimbals from DJI, Movi, and Zhiyn, and Bluetooth microphones. You can even record using a clean HDMI output for livestreaming or to an external recorder. So, yeah, it’s versatile.

Dolby Vision is supported by Netflix, Amazon, and Apple iTunes, so it didn’t come as a big surprise when it was announced the iPhone 12 series supports it. The drawback to creating Dolby Vision HDR content is that you need a compatible display to watch it, so at the moment, not everyone is going to see your punchy blacks and sweet highlights. But at least as a creator you can start learning the benefits of HDR as an image pipeline.

The update is free to existing users. For new users, the app has a $15 price tag.

EXTRA CREDIT

This article includes several videos showcasing Filmic Pro, along with a variety of supporting links.


Please rate the helpfulness of this tip.

Click on a star to rate it!

… for Apple Motion

Tip #1195: Create a Watermark That Moves

Larry Jordan – LarryJordan.com

Watermarks are like a footnote in a book – used as a reference, not as the subject.

A sample moving watermark in Motion – tucked into the lower-right corner near Title Safe.

Topic $TipTopic

We first looked at watermarks, a logo that’s added to a compressed video, in Tip #1191. Here, I want to explain more about how to create a moving watermark in Motion.

Most watermarks are stationary – a logo that sits quietly in the corner of your video to identify the source. Stationary watermarks are easy to create in Photoshop. But, a moving watermark is more visually interesting and might fit the style of your video better.

  • Create a Motion project at the same size as the video to which you want to apply it. Motion creates all projects with an alpha channel, meaning that any part of the background that’s black is transparent.

NOTE: Apple Compressor allows you to scale the watermark to fit the source file, but this changes its size, position and resolution, which you may not want.

  • Add whatever text and animation you prefer (see screen shot). Don’t add drop shadows or fine detail, watermarks are designed to be semi-transparent. Go for clarity, readability and non-distracting colors.
  • Export the project as a movie, not as a Motion project.
  • Then, following the instructions in Tip #1191, combine it with your video using Apple Compressor.

EXTRA CREDIT

Keep in mind that, while color is more interesting, be careful to pick colors that don’t clash too severely with your main movie.


Please rate the helpfulness of this tip.

Click on a star to rate it!

… for Apple Motion

Tip #1196: Replicators Can Use Multiple Shapes

Larry Jordan – LarryJordan.com

Replicators duplicate selected objects into geometric shapes, then animate them.

A group of elements, each with different color and movement, all replicated.

Topic $TipTopic

Replicators are a great way to duplicate an element. What you may not know is that replicators can contain multiple elements.

To create a replicator, select it, then click the Replicate button in the top right section of the Motion interface.

Select the Replicator element in the Layers panel, then, adjust it using Inspector > Replicator. Basically, change something and watch what happens.

However, the key point is that a replicator is made from whatever you first select. If you create a group – as I did in this screen shot – then, select the group, all the elements in the group are then replicated.

Plus, each element in the source group can have its own style, position, color, and movement applied to it.

This makes replicators far more versatile than you might at first think.


Please rate the helpfulness of this tip.

Click on a star to rate it!

… for Visual Effects

Tip #1203: What is OFX?

Larry Jordan – LarryJordan.com

OFX: Improve interoperability, reduce support and development time.

The Open Effects Association logo.

Topic $TipTopic

OFX. Many visual effects tools reference this – but what is it?

The OFX Image Effect Plug-in API, is an open standard for 2D visual effects or compositing plug-ins. It allows plug-ins written to the standard to work on any application that supports the standard. It is widely used for visual effects and video processing and is supported by numerous hosts, including Assimilate, Blackmagic Design, Digital Anarchy, FXHOME, NewBlueFX, RE:Vision Effects and more.

Bruno Nicoletti of The Foundry created it in 2004. The OFX API was established because each developer had its own proprietary interface, so developers at different companies couldn’t work together or share code very easily. Developers had to create their own method of porting their plug-ins into each host, which, as you can imagine, can be expensive and time-consuming.

Out of this confusion, the Open Effects Association – and OFX – was born.

Here’s an article from ToolFarm with more details on which software supports it and what plug-ins are available.


Please rate the helpfulness of this tip.

Click on a star to rate it!

… for Codecs & Media

Tip #1191: Create Watermarks That Move

Larry Jordan – LarryJordan.com

Moving watermarks can be created in Motion, then added using Compressor.

Watermark effects settings (top) and the inserted watermark (bottom)

Topic $TipTopic

We are all used to video watermarks, those small images in the lower right corner of a video that identify the source of the video. But, did you know those watermarks can move? If you use the right watermark, it can.

In Motion, create a project the same size as the video it will be added to. Position the watermark at both the size and position you want. Remember this video will loop so be sure the first and last frame match.

Motion automatically creates motion graphics with alpha channels, which means it will key into any video perfectly.

NOTE: I generally set watermarks to sit right at the lower-right corner of Title Safe.

  • Add a video to Compressor, then apply a compression setting to the clip.
  • Select the compression setting, then scroll to the bottom of the Video Inspector.
  • In the Add Video Effects menu, select Watermark (top red arrow).
  • At the bottom of the Watermark effect, click the Select button (bottom red arrow) and select the moving watermark you just created in Motion.
  • At the top of the Watermark effect, change Position to Center. This matches the framing of the watermark to the video.
  • If the watermark and the video are created at different frame sizes, check Scale to Frame Size to get them to match.
  • Finally, because the video needs to loop for the duration of your video, click Repeat (video only) to create the loop.

EXTRA CREDIT

Any application that creates video with an alpha channel can be used to create moving watermarks.


Please rate the helpfulness of this tip.

Click on a star to rate it!

… for Random Weirdness

Tip #1183: Make a Film Using Zoom

Larry Jordan – LarryJordan.com

Remember, Zoom is both a technology and a character in your film.

Image courtesy of Paula Goldberg & PremiumBeat.

Topic $TipTopic

This article, written by Paula Goldberg, first appeared in PremiumBeat.com. This is a summary.

Let’s explore the important elements you’ll need to know to make a successful short film using Zoom technology.

  • Storytelling. The platform might be unusual, but the content demands remain the same. You can’t fix an idea in post. Everything starts with the material. With any short film, you’re looking for a simple plot and complex characters, a compelling conflict, and a surprising, but truthful, resolution. The extra consideration with Zoom is that action will be limited, and your screenplay will be dialogue driven.
  • Casting. Don’t cast your roommate. Good actors want to work on good material. If your script is gripping and your artistic vision clear, chances are you’ll find actors willing to do your project. So much can be forgiven technically, but a bad performance can kill any script.
  • Minimize the Tech. Built-in computer webcams are compact and so are their lenses. This sets a limit on the amount of light that they can capture—a problem especially for low-light conditions. External webcams provide better performance. Some even feature wide-angle lenses. They’ll also give your actor the ability to adjust resolution, frame rate, color, and brightness.
  • Preparation. Time is on your side and a spectacular return on your investment is to spend that time in pre-production. I’d approach it three ways: set/costume, filmmaking, storytelling. The most important part of the preparation is artistic. This is a very unnatural way for actors to work. You may want to suggest that they put a piece of paper over their own image on the screen. This will help them be less self-conscious—in no other medium is the actor able to view themselves while shooting. Once Sasha suggested that, both actors felt much more comfortable playing off each other.
  • Production. A perk about Zoom is that the director can record and watch each take live by muting their audio, disabling their video, and selecting “hide non-video participants.” When the video is processed, there will be no indication that anyone was present except the performers. You can pause between takes and discuss, then hide yourself again and resume another take.
  • Editing. If recording on Zoom, a [close-up] can be quite compelling, especially if the storytelling has numerous reveals and twists. It encourages multiple views to catch moments you didn’t get on the first view. However, don’t be afraid to edit. Most people are used to jump cuts and you have three angles you can use—a split screen two shot and the two singles. What will help the flow is if you cut on action, which can be as simple as a shift in seating position, interaction with a prop, or hand movements.

The article has a variety of technical tips and lots of screen shots, as the author follows her production from first idea through to editing. It is well worth reading.


Please rate the helpfulness of this tip.

Click on a star to rate it!