… for Apple Final Cut Pro X

Tip #264: Set Opacity Keyframes in the Timeline

Larry Jordan – LarryJordan.com

The Video Animation bar allows timeline control for a variety of settings.

The Video Animation bar in Apple Final Cut Pro X.
Every timeline clip has a Video Animation bar attached to it.

Topic $TipTopic

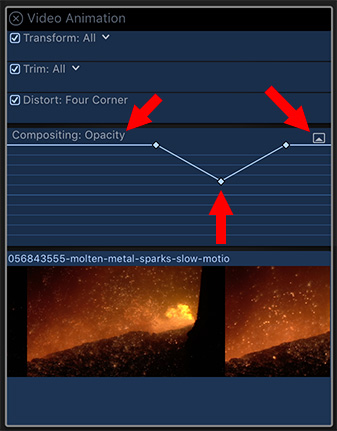
Hidden in the Final Cut timeline is the Video Animation bar. In it, you can set keyframes for automating changes in opacity, cropping, distortion and position. Here’s how to find it.

Let’s illustrate how to set opacity keyframes in a clip in the timeline.

  • Select the clip you want to modify and type Cntrl – V. This displays the Video Animation bar.
  • Click the arrow in a box at the right of the Opacity layer. This opens the opacity keyframe timeline.
  • Option – click on the white line to set a keyframe. (Control – click to remove a keyframe.)
  • Drag the keyframes down to make a clip translucent. (All the way up is 100% opaque.)

Preview your results. Drag a keyframe sideways to change it’s timing. Drag a keyframe up or down to set the amount of change.

Cool.


Please rate the helpfulness of this tip.

Click on a star to rate it!

… for Apple Final Cut Pro X

Tip #262: Libraries: Combine or Split

Larry Jordan – LarryJordan.com

Performance is better when libraries are smaller.

Library icons from Apple Final Cut Pro X.
Put the media you need to access in one library. Use multiple libraries for distinctly different projects.

Topic $TipTopic

Figuring out the best way to manage media in Final Cut is always a challenge because there are so many options. As a recent example, Ron wrote:

I have a challenge with Library’s in FCP X. I have a client that we shoot 4 videos a month. They are only about 5 minutes each. We do this every month and I have one Library (for the year) that has all the months in it along with the usual assets.

This Library is now 450 GB and my question is: would it be more effect if I had a Library for each month rather than a yearly Library.

The short answer is: “Yes.”

If you are not sharing media from one library to the next, putting one month in a library simplifies file management and improves performance. (Keep in mind that libraries need to be open to be accessed.)

There’s nothing wrong with what you are doing, it simply becomes harder to manage the media.

EXTRA CREDIT

Here’s the general rule: Put the media you need to access into a single library.

Keep in mind that the bigger the library, the more RAM you’ll need.


Please rate the helpfulness of this tip.

Click on a star to rate it!

… for Apple Final Cut Pro X

Tip #235: Faster YouTube Compression

Larry Jordan – LarryJordan.com

Faster is actually better.

Compression settings for YouTube in Apple Final Cut Pro X
Compression settings for YouTube.

Topic $TipTopic

Your project is done and you need to get it to YouTube, Facebook or Vimeo. While I normally recommend always exporting a high-quality master file – both for archiving and future compression – sometimes, you just don’t have the time.

So, you are looking at this screen and debating between Faster Encode and Better Quality. You spent a LOT of time on this project – which should you pick?

Faster Quality.

In the past, before hardware acceleration, Better Quality created smaller files and higher image quality. Today, that’s no longer the case. Tests I recently made with Apple Compressor show that Faster Enocde – which uses hardware acceleration is:

  • Much faster
  • Creates smaller files more than 1/2 the time
  • Creates image quality equal to or better then Better Quality

BONUS

The compression engine used by Compressor is the same engine used by Final Cut. The only difference is the interface each has to prep a file for compression.


Please rate the helpfulness of this tip.

Click on a star to rate it!

… for Visual Effects

Tip #177: Ten Tips for Better Slow Motion

Larry Jordan – LarryJordan.com

Slow motion often makes scenes more intense.

An example of a slow motion shot.
Action and drama are both enhanced by selectively using slow motion.

Topic $TipTopic

This tip first appeared on Fstoppers.com.

Here are ten tips that can improve how you shoot and use slow-motion.

  1. Understand your subject. Slow motion is all about movement, and certain subjects do not lend themselves to being interesting in slow motion.
  2. Select a frame rate. Shoot at a higher frame rate than the project you’ll put the video into.
  3. Think about light. Faster frame rates require more light. In general, set the shutter speed to twice the frame rate.
  4. Emphasize drama. Slomo adds drama and intensity to intense scenes.
  5. Emphasize action. Cinema today uses slowmo to enhance action scenes.
  6. Emphasize death. in certain instances, the death of a main character or their impending death will be played in slow motion, which adds to the gravity of the situation
  7. Create alternative reality. Use slow motion to convey a sense of detachment from reality that helps your viewers distinguish what is real versus what is perceived based on your storyline
  8. Emphasize fear. Slow motion can emphasize the anxiety and terror of a dramatic moment.
  9. Use sound to match the motion. Use the sound recorded on set, then slow it down in the final mix to emphasize the slower visual motion.
  10. Use slow motion carefully. Like seasoning, use it wisely and food tastes great. Use too much and the food becomes inedible.

Please rate the helpfulness of this tip.

Click on a star to rate it!

… for Visual Effects

Tip #170: How to Capture Motion and Moving Subjects

Larry Jordan – LarryJordan.com

Minimize blur by following these tips.

Avoiding blur is the goal of all action photos.
The more subjects move, the more blur in your photos.

Topic $TipTopic

Some of the best and most memorable moments in life are in motion. Unfortunately, digital cameras hate movement. Most of the time, moving subjects register as a blur on photographs. So how do you shoot moving objects? Here are some tips:

1. Shutter Speed

When the subject is moving and you want to take a shot of, say a basketball player getting the ball on a rebound, then you should opt for fast shutter speeds. You should use a shutter speed that is at least 1/500th of a second or higher. Keep in mind that faster shutter speeds require more light for a proper exposure.

2. Increase The Aperture

The aperture is the hole where light comes into your camera into the image sensor. Choose a low f-stop to open up the aperture and allow more light in. This will help you counter the low light you get from the fast shutter speed. Keep in mind that opening the aperture decreases depth of field, that is, the area in a photo that’s in focus.

3. Use a Flash

Using a flash with your motion shots is a good way to counter the low light conditions when using a faster shutter speed. It is extremely easy to correct dark photos by using your flash. Keep in mind that most flashes are very short range, so a single flash won’t light a gym.

4. Use a High ISO

Using a high ISO can help you increase the shutter speed and aperture of your camera without increasing the likelihood of getting blurry or dark photographs. However, using high ISOs usually results in a grainy picture with a lot of digital noise.

An extended version of these tips first appeared in PremiumBeat.


Please rate the helpfulness of this tip.

Click on a star to rate it!

… for Visual Effects

Tip #101: What’s the Difference Between Color Grading and Color Correction?

Larry Jordan – LarryJordan.com

Both involve color, but in different ways.

Topic $TipTopic

The short answer is that color correction fixes problems, while color grading gives images a “look.”

Typical color correction involves:

  • Removing color casts
  • Setting proper highlight and shadow levels
  • Controlling any excessive highlights (speculars)

For example, the top image was color corrected to boost highlights and increase saturation.

Color grading, on the other hand, takes what we have done in color correction and tweaks the color and grayscale levels to match the story. For example:

  • Boosting saturation for a romantic comedy
  • Decreasing saturation for dystopian scifi
  • Removing color for a film noir

And so on.

Generally, you fix problems first, then create looks second.


Please rate the helpfulness of this tip.

Click on a star to rate it!

… for Adobe Premiere Pro CC

Tip #241: 3 Faster Ways to Render

Larry Jordan – LarryJordan.com

Render faster by clip or by selecting a portion of the sequence.

An Adobe Premiere Pro CC timeline with In and Out set.
Set an In and Out, then choose Sequence > Render In to Out.

Topic $TipTopic

The only problem with rendering is that it takes time. Sometimes a LOT of time. Worse, Premiere wants to render the entire sequence, when that may not be what you need or have time for. Here are three options.

  • Render and Replace. this lets you flatten video clips and After Effects comps by rendering the clip, then replacing the clip with the render file. Choose Clip > Render and Replace.

NOTE: You can revert to the original clips using Clip > Restore Unrendered.

  • Render In to Out. This allows you to set a range in the sequence using In and Out shortcuts, then rendering only between them. Choose Sequence > Render In to Out.
  • Render Effects In to Out. This only renders the portions of those clip that have video effects applied to them between the In and the Out. This tends to be a much faster option. Choose Sequence > Render Effects In to Out.

EXTRA CREDIT

You can render and replace most of the clips including After Effects compositions except for the following:

  • Special clips or synthetics
  • Nested sequences
  • Adjustment layers

Please rate the helpfulness of this tip.

Click on a star to rate it!

… for Adobe Premiere Pro CC

Tip #240: See the Forest for the Trees


A fast way to toggle between the details and the big picture.

Topic $TipTopic

You’ve got your head buried in the details of your edit, but you need to take a quick look at the big picture of the entire Timeline. The problem is typing Plus or Minus takes forever…! What to do?

Zoom to Sequence to the rescue!

Use Zoom to Sequence in the Timeline to switch between detailed and global views of your sequence with one key press. Press once to zoom out. Press again to zoom back to where you were.

What’s the secret key? The back-slash key!


Please rate the helpfulness of this tip.

Click on a star to rate it!

… for Adobe Premiere Pro CC

Tip #223: What Do Render Bar Colors Mean

Larry Jordan – LarryJordan.com

Premiere is fast, but sometimes not fast enough.

Different render bar colors in Adobe Premiere Pro CC.
Render bar colors indicate what needs to be rendered before playback.

Topic $TipTopic

Most of the time, Premiere can play back your sequence in real-time displaying high-quality, full frame-rate images by harnessing the power of the Mercury Playback Engine.

However, every so often, you’ll create an effect that is so complex, it needs to render for optimum playback.

DEFINITION: Render means to calculate. But “calculate” is a very boring word. “Render” is much sexier. To render an effect means we are calculating the effect and turning it into video.

How can you tell if rendering is necessary? By the color of the render bar at the top of the Timeline.

  • No bar. Everything is playing perfectly. No rendering is necessary.
  • Yellow. An unrendered section that is complex, but may not need to be rendered in order to play back the sequence in real-time and at the full frame-rate.
  • Red. An unrendered section that needs to be rendered in order to play back the sequence in real-time and at the full frame-rate.
  • Green. A fully-rendered section of the sequence.

EXTRA CREDIT

To render some or all of a sequence, select the clips you want to render, then choose Sequence > Render Selection. A dialog appears showing the render status.


Please rate the helpfulness of this tip.

Click on a star to rate it!

… for Codecs & Media

Tip #228: How Much RAM Do You Need For Editing?

Larry Jordan – LarryJordan.com

More RAM helps – to a point.

This chart illustrates how RAM needs increase as frame sizes increase.
RAM requirements for 30-fps, 8-bit video at different frame sizes (MB/second).

Topic $TipTopic

The way most NLEs work is that, during an edit, the software will load (“buffer”) a portion of a clip into RAM. This allows for smoother playback and skimming, as you drag your playhead across the timeline.

When a clip is loaded into RAM, it is uncompressed, allowing each pixel to be processed individually. This means that the amount of RAM used for buffering depends upon several factors:

  • How much RAM you have
  • The frame size of the source video clip
  • The frame rate of the source video clip
  • The bit-depth of the source video clip

This graph illustrates this. It displays the MB required per second to cache 8-bit video into RAM. As you can see, RAM requirements skyrocket with frame size. These numbers increase when you have multiple clips playing at the same time.

NOTE: These numbers also increase as bit-depth increases, however the proportions remain the same.

The amount of RAM you need varies, depending upon the type of editing you are doing.

  • 8 GB RAM. You can edit with this amount of RAM, but editing performance may suffer for anything larger than 720p HD
  • 16 GB RAM. Good for most editing.
  • 32 GB RAM. My recommendation for editing 4K, 6K, multicam and HDR.
  • 64 GB RAM. Potentially good for massive frame sizes, but not required.

Anything more than 64 GB of RAM won’t hurt, but you won’t see any significant improvement in performance; especially considering the cost of more RAM.


Please rate the helpfulness of this tip.

Click on a star to rate it!