… for Adobe Premiere Pro CC

Tip #480: Advanced Mask Controls

Larry Jordan – LarryJordan.com

First, you draw the mask – then you tweak it.

The five mask controls in Premiere.

Topic $TipTopic

This article first appeared in MotionArray.com. This is an excerpt.

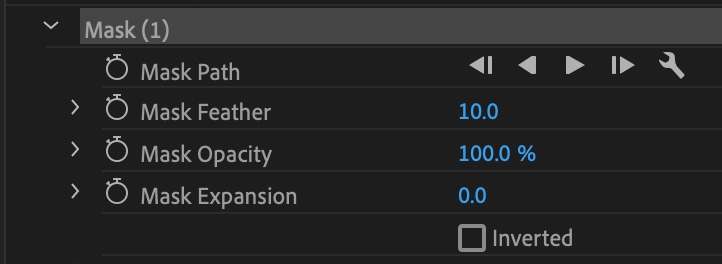
You may be familiar with the Mask Path controls, which allow you to draw a variety of different masks on a clip. But, the other three options can be confusing.

Mask Feather. Feathering allows the effect to slowly fade in or out from the edge of the mask. You can designate how much feathering there is both from the Effects Control panel or dragging the outside blue border in the Program Monitor.

Opacity. When applied to a mask this changes the Opacity of the footage you have cropped out.

Expansion. The Expansion control allows you to increase or decrease how close to your shape line the footage is masked. If you are creating complex shapes, changing your mask explanation can help smooth out some of the rougher edges, meaning you don’t need to spend hours getting each angle perfect.

Invert. This flips the selected portion of a mask; what was in is now out and what was out is now in.


Please rate the helpfulness of this tip.

Click on a star to rate it!

… for Adobe Premiere Pro CC

Tip #479: Copy and Paste Masks in Premiere

Larry Jordan – LarryJordan.com

Masks are easy to copy, provided you select the right thing.

To copy a mask, first select it in Effect Controls.

Topic $TipTopic

This article first appeared in MotionArray.com. This is an excerpt.

There are two ways to apply the same mask to more than one clip: an adjustment layer or copying and pasting a mask.

Adjustment layers are great for those times when you need to affect lots of clips. But, copy and paste is faster when you are only working with a few clips.

To copy a mask:

  • Select the clip with the mask you want to copy
  • Go to the Effects Control panel and select the mask.
  • Choose Edit > Copy
  • Select the clip in the timeline where you want to paste the mask.
  • Choose Edit > Paste.

Done.


Please rate the helpfulness of this tip.

Click on a star to rate it!

… for Codecs & Media

Tip #474: DNxHR vs. ProRes

Larry Jordan – LarryJordan.com

These two codecs are directly comparable, but not the same.

Topic $TipTopic LowePost summarized the differences between Avid’s DNx and Apple’s ProRes codecs. Here’s the link. This is an excerpt.

The Avid DNxHR and Apple Prores codec families are designed to meet the needs of modern, streamlined post-production workflows.

Both the DNxHR and ProRes families offer a variety of codecs for different compressions, data rates and file sizes. Some with just enough image information needed for editing, others for high-quality color grading and finishing, and lossless ones for mastering and archiving.

Codec facts

  • DNxHR 444, ProRes 4444 and ProRes 4444 QC are the only codecs with embedded alpha channels.
  • DNxHR 444 and ProRes 4444 XQ are the only codecs that fully preserve the details needed in HDR- (high-dynamic-range) imagery.
  • Both codec families are resolution independent, but bitrate will vary depending on if you output a proxy file or a higher resolution file.
  • Both codec families can be wrapped inside MXF or MOV containers.

An important difference, however, is that some of the major editing and finishing systems available lacks support for ProRes encoding for Windows. This means Windows users can read a ProRes encoded file, but in some cases cannot export one. For this reason, many post-production facilites have abandoned ProRes and implemented a full DNxHR workflow.


Please rate the helpfulness of this tip.

Click on a star to rate it!

… for Codecs & Media

Tip #456: Uncompressed Audio File Sizes

Larry Jordan – LarryJordan.com

Audio file sizes increase with bit-depth and sample rate.

Topic $TipTopic

This article first appeared in Sweetwater.com. This is a summary.

Here’s a guide to determine how much disk space is required for uncompressed audio recording at various resolutions  (sizes are rounded):

Bit Rate 1 Minute of Mono 1 Minute of Stereo
16 bit / 44.1 kHz 5 MB 10 MB
16-bit / 48 kHz 5.5 MB 11 MB
24-bit / 44.1 kHz 7.5 MB 15 MB
24-bit / 48 kHz 8.2 MB 16.4
16-bit / 88.2 kHz 10 MB 20 MB
16-bit / 96 kHz 11 MB 22 MB
24-bit / 88.2 kHz 15 MB 30 MB
24-bit / 96 kHz 16.4 MB 32.8 MB
16-bit / 176.4 kHz 20 MB 40 MB
16-bit / 192 kHz 22 MB 44 MB
24-bit / 176.4 kHz 30 MB 60 MB
24-bit / 192 kHz 32.8 MB 65.6 MB

Please rate the helpfulness of this tip.

Click on a star to rate it!

… for Adobe Premiere Pro CC

Tip #407: Highlight Your Favorite Fonts in Premiere

All it takes is one little star.

The Premiere font menu with Favorites (the stars) enabled.

Topic $TipTopic

This article first appeared in MotionArray.com. This is an excerpt.

(This tip requires Premiere CC 2018 or later.)

There is a huge variety of fonts you can select from in Premiere Pro, but there are probably less than 10 that you consistently go back to. It can be super helpful to pinpoint your favorites, so instead of scrolling through a list of all the fonts you don’t want to use, you have all your favorites available at the click of a button.

Click on the little star to the left of the font name to add it to your favorites, and click on the star at the top of the font list to show only the fonts you have starred.

How easy is that?


Please rate the helpfulness of this tip.

Click on a star to rate it!

… for Apple Final Cut Pro X

Tip #482: How to Create a 3-point Edit

Larry Jordan – LarryJordan.com

3-point edits provide precision without changing duration.

Topic $TipTopic

A 3-point edit is one where the duration of a range in the Timeline determines where a clip from the Browser will begin and end. These are used in an already-edited project where you need to insert a shot, without changing the duration of the overall sequence.

Here’s how to create one:

  • Set at least an In for a clip in the Browser.
  • Use the Range tool to set an In and Out in the Timeline.
  • Type D to perform an overwrite edit in the timeline equal to the Range and matching the In of the Browser clip to the In of the timeline.
  • Type Q to perform the same edit, but place the new clip on a higher layer.

The benefit to a 3-point edit is precision. You can precisely control where a clip starts and where it ends, without changing the overall duration of your project. And this technique makes creating them very fast.


Please rate the helpfulness of this tip.

Click on a star to rate it!

… for Apple Final Cut Pro X

Tip #481: The Power of a Back-time Edit

Larry Jordan – LarryJordan.com

Back-time edits are used in situations where you care more about the end than the beginning.

Topic $TipTopic

A back-time edit is one where the Out of the clip in the Browser is matched to an Out in the timeline, then Final Cut calculates where to apply the In.

NOTE: A back-time edit doesn’t play a clip backwards, rather it determines the position of a clip based on the Out, rather than the In.

An example of using a back-time edit is sports, where you care more about the runner crossing the finish line than where they started running. To create a back-time edit:

  • Set at least an Out in a clip in the Browser
  • Set at least an Out in the Timeline, or use the Range tool to set both the In and Out.
  • Type Shift + D to back-time edit the clip into the Timeline
  • – or – type Shift + Q to back-time edit the clip on a higher layer.

NOTE: Setting an Out in the timeline always sets a range. When the edit is performed, the duration indicated by the range in the timeline determines the duration of the edit. The Browser In is ignored.

Experiment with this feature, you’ll discover all kinds of places where this can solve an editing challenge.


Please rate the helpfulness of this tip.

Click on a star to rate it!

… for Apple Final Cut Pro X

Tip #440: Secrets of the Range Tool

Larry Jordan – LarryJordan.com

Ranges make it easy to set and In and Out.

A range selected in the Final Cut Pro X timeline.

Topic $TipTopic

The Range tool (shortcut: R) is one of those tools in Final Cut that could be useful, but isn’t as useful as it could be. Still, it can help you to quickly set an In and Out.

Select the Range tool from the Tool popup menu. Then, drag to select a region in the Timeline. What you’ve just done is set an In and an Out that applies to all layers within that range.

  • To change the duration, drag an edge – or –
  • Type Control + D and enter the revised duration using timecode
  • To cancel the range, type Option + X

The Range tool is very helpful in creating a back-time edit, which covered in Tip #481, or a 3-point edit, which is covered in Tip #482.

WHAT’S MISSING?

  • The ability to click in the middle of the range to move it without losing the duration.
  • The ability to select and move an edge using the keyboard.

For me, it’s often easier to just use the playhead and set the In and Out manually.


Please rate the helpfulness of this tip.

Click on a star to rate it!

… for Random Weirdness

Tip #461: 3 Tips to Shoot a Conversation in a Car

Larry Jordan – LarryJordan.com

There’s a direct correlation between believability and dollars and/or time.

(Image courtesy of Pexels.com.)

Topic $TipTopic

This article first appeared in PremiumBeat.com. This is an excerpt. There’s something about the cinematic road scene that is deeply embedded in American film and culture. However, from a DP’s perspective, it can be one of the most difficult and taxing set-ups to tackle.

Green screen. This method involves the least amount of moving (parts, and in general) but the greatest amount of post-production. Leaving the car stationary and setting up a green screen will allow you to control the scene as much as possible. However, it will require some serious editing chops to fill every mirror and window reflection in a believable way that looks natural.

Camera Mount. The car mount method (dash cam, side mount, etc…) would be your best DIY small-production option. It’s also the riskiest in terms of possibly damage to your camera or gear. The small dashboard cam might be the safest shot possible, but it’s also one of the most used. Unless you’re project is embracing a practical DIY approach, it would be worth it to invest time or money into other options.

Tow Car. This is the professional method of choice. The tow car gives you maximum control of your car “set” while in a natural, uncontrolled environment. Tow car production still requires a production team and solid coordination (especially for filming scenes multiple times from multiple angles). But if you can afford a tow car (or makeshift trailer), you’ll get the most authentic cinematic look.


Please rate the helpfulness of this tip.

Click on a star to rate it!

… for Random Weirdness

Tip #460: 5 Tips to Improve a Boring Documentary

Larry Jordan – LarryJordan.com

If your doc is boring, look to your story first.

(Image courtesy of Pexels.com.)

Topic $TipTopic

This article first appeared in PremiumBeat.com. This is an excerpt. The primary goal of any good documentary is — first and foremost — to inform. However, to inform an audience well, you have to put something together that has all the elements of compelling entertainment. If you find yourself working on a documentary project that’s starting to get boring, here are some quick tricks to help you get back on track.

Work on Story and Structure. Whether you’re just starting out on your project or are deep in the editing process, you should ask yourself the following: If you were to sit down with a pen and paper, could you write (or sketch) out the entire story and structure of your film? If not, why not?

Animate or Illustrate When Needed. Adding custom illustrations or animations to a documentary project can be very appealing to documentary filmmakers. However, overusing animations or illustrations is something to avoid — and it can become expensive and time-consuming, depending on the number and quality of the illustrations and animations.

Add Movement and Transitions. In addition to animating or illustrating B-roll or specific scenes, other smaller editing tricks can actually be quite helpful for speeding up sequences and making the general tone and style a bit more appealing.

Alternate Means of Exposition. Consider letting the mystery of your story develop in some areas. Sometimes, all you need to make a compelling documentary is a few sentences over a black screen to provide all the exposition you actually need. Other things like lower thirds, narration, or interviews can provide the rest.

Make Those Tough Cuts. Documentaries are notorious for requiring tons and tons of filming and footage. At the end of the day, you’d much rather someone watch your film and say “I wish that was longer” than “I wish that was shorter.”


Please rate the helpfulness of this tip.

Click on a star to rate it!