… for Apple Motion

Tip #1141: Loop a Video Segment

Larry Jordan – LarryJordan.com

Remember, Loop calculates frames from the start of a clip.

The Loop and Set Speed Behavior settings.

Topic $TipTopic

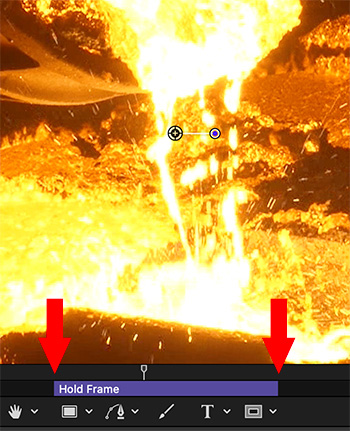
The Loop behavior loops a portion of a video over and over and… over. Here’s how to use it.

Apply Behaviors > Retiming > Loop to a clip.

The Loop behavior applies to the start of a clip. If that’s not what you want to loop, trim the clip until the video you want is at the start of the clip.

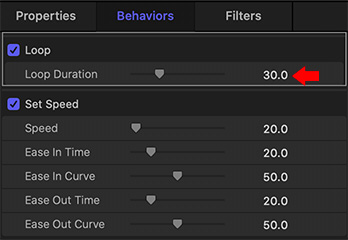
Using Inspector > Behaviors > Loop, set the number of frames you want to loop. The default is 30.

EXTRA CREDIT

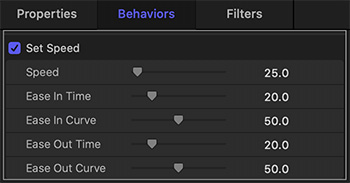
It is often helpful to change the speed of a looping clip, for example, to slow it down.

To do so, apply Behaviors > Retiming > Set Speed and set the Speed setting to the slow motion you want.

NOTE: Be sure to drag Loop above Set speed so that the frames are chosen from the source video. If Set Speed is dragged above Loop, the frame count is based on the slowed-down clip.


Please rate the helpfulness of this tip.

Click on a star to rate it!

… for Apple Motion

Tip #1140: Create a Hold (Freeze) Frame

Larry Jordan – LarryJordan.com

Hold frames work both in the middle and at the end of a clip. Motion supports both.

Note this hold frame starts and ends in the middle of a clip.

Topic $TipTopic

As long as I’m thinking about speed changes (Tip #1139)
let me describe how to create a hold, or freeze, frame.

  • Put the playhead on the frame you want to freeze, then apply Behaviors > Retiming > Hold Frame.
  • This freezes the frame under the playhead until the end of the clip.

NOTE: However, any synced audio linked to that clip continues to play.

EXTRA CREDIT

To play a clip, pause in the middle, then resume playback:

  • Put the playhead in the mini-timeline where you want the pause to take effect
  • Choose Mark > Mark In from the menu bar. (Typing “I” won’t work.)
  • Move the playhead to where you want the freeze to end and choose Mark – Mark Out. (Again, typing “O” won’t work.)

Please rate the helpfulness of this tip.

Click on a star to rate it!

… for Apple Motion

Tip #1139: Change the Speed of a Clip

Larry Jordan – LarryJordan.com

Remember, effects in Motion can have different durations than the clips they are applied to.

The Set Speed behavior adjusted to 25% slomo, with both Ease In & Out applied.

Topic $TipTopic

Like anything in Motion that involves movement, changing the speed of a clip requires a behavior. Here’s how to create a slow-motion effect.

Select the clip in the Layer’s panel who’s speed you want to change, then apply Behaviors > Retiming > Set Speed.

In Inspector > Behaviors > Set Speed (see screen shot):

  • Speed adjusts the overall speed of the clip. Less than 100 is slower.
  • Ease In Time and Curve adjust how the clip gradually changes from normal speed to adjusted.
  • Ease Out Time and Curve adjusts how the clip ends the speed effect and returns to normal speed.

The Ease In/Out settings only apply when the speed effect is shorter than the clip itself. This allows the clip to start or end at normal speed, then change in the middle.

NOTE: I discovered that setting an In or Out to the Set Speed effect does not properly trim it. You will probably need to drag an edge to change it’s duration.

EXTRA CREDIT

It is easier to adjust these settings and watch what happens than to describe them in words.


Please rate the helpfulness of this tip.

Click on a star to rate it!

… for Visual Effects

Tip #1146: 22 FREE After Effect Show Reel Templates

Larry Jordan – LarryJordan.com

These take your work and make it shine!

(Image courtesy of Pexels.com)

Topic $TipTopic

This article first appeared in MotionArray.com.

After a year like this one, any good news is welcome. So MotionArray has assembled twenty-two After Effects showreel templates to kick-start your showreel.

Selecting the best moments is one thing, but how do you piece it together in a fluid and eye-catching way? It can be difficult to devote time to creating a showreel when you’re also busy working and creating videos.

These include a variety of show reels, wedding reels, sports reels, and, ah, just about any other reel you need to create.

All free. Downloads are located here.


Please rate the helpfulness of this tip.

Click on a star to rate it!

… for Visual Effects

Tip #1142: Tutorials from Toolfarm

Larry Jordan – LarryJordan.com

Covering 15 different applications with a wide variety of tutorials.

Software and categories from the Toolfarm website.

Topic $TipTopic

When it comes to effects tutorials for a wide variety of products, there are very few equals to Toolfarm.com.

Covering 15 different software titles – from Premiere and Final Cut to Autodesk and Maya – this website provides a wealth of tutorials for users from beginning to advanced.

Here’s the link to see what they have available.


Please rate the helpfulness of this tip.

Click on a star to rate it!

… for Visual Effects

Tip #1120: Free Title Animations for Premiere

Larry Jordan – LarryJordan.com

These templates require the latest version of both Adobe Premiere & After Effects.

One of these free motion graphic templates for Premiere.

Topic $TipTopic

This article, written by Todd Blankenship, first appeared in PremiumBeat.com. With these free animated motion graphics templates for Premiere Pro, you can add some eye-catching animated titles to your edits — quickly and easily.

As you can tell, we’ve been all about these sort of gritty textured styles of animation and design lately. I feel like it’s a nice step outside of the clean, almost sterile corporate animation and design we see so often. We’ve recently learned some new ways to incorporate some of that handmade stop-motion style texture and vibe into these motion graphics templates for Premiere.

With each of these free motion graphics templates for Premiere, we wanted to include as much customization as possible. Every single one of these templates has a whole slew of options inside of the Essential Graphics Panel. These options will give you the ability to create a vast amount of different, unique title animations, rather than just the ten stock looks included.

Here’s the link to download these free, motion graphics templates for Adobe Premiere.


Please rate the helpfulness of this tip.

Click on a star to rate it!

… for Adobe Premiere Pro CC

Tip #1138: Quickly Change Clip Speed

Larry Jordan – LarryJordan.com

Dragging a clip edge is the fastest. Using the Speed dialog is the most precise.

The Rate Stretch tool in the Tools menu.

Topic $TipTopic

There are three ways to change the speed of a clip… well, OK, four. These are the options:

  1. Control-click a clip and choose Speed/Duration.
  2. Choose Clip > Speed / Duration from the menu bar
  3. Type Cmd + R
  4. Or, select the Rate Change tool

Here’s the coolest: The Rate Change tool. Select it from the Tool palette (Shortcut: R), then, with the tool selected, drag the right edge of a clip in the timeline to the duration you need. Rather than trimming the clip, Premiere will change it’s speed to match the duration you need.

To reset the speed, display the Speed/Duration dialog (Shortcut: Cmd + R) and reset the speed to 100%.

NOTE: Windows users, use Cntrl + R.

EXTRA CREDIT

The Speed / Duration dialog is the most precise, but the Rate Change tool is the fastest.


Please rate the helpfulness of this tip.

Click on a star to rate it!

… for Adobe Premiere Pro CC

Tip #1137: Set vs. Scale to Frame Size. Which to Pick?

Larry Jordan – LarryJordan.com

Set to Frame Size is the best overall option for scaling images.

Malahide Castle, near Dublin, Ireland. (Image courtesy of me.)

Topic $TipTopic

Malahide Castle is a magnificent medieval castle just outside Dublin, Ireland. After having visited it, I decided to create a short visual montage of my photos. Except… when I add still images to the timeline, I need to decide between using Set to Frame Size or Scale to Frame Size. What’s the difference?

Quite a lot, actually. When an image’s frame size is different from the sequence, Premiere resizes it to match. By default, it uses Scale to Frame Size.

You can adjust this behavior globally using Preferences > Media > Default Media Scaling – or – Control – click any clip and select either Scale to Frame Size or Set to Frame Size.

Here are the three scaling options:

  • None. (Only available in Preferences) This displays a clip at 100% size in the timeline, regardless of the frame size of the sequence.
  • Scale to Frame Size. This scales the clip to match the frame size of the sequence, then sets the Scale parameter in Effect Controls > Motion to 100%.
  • Set to Frame Size. This scales the clip to match the frame size of the sequence, then shows the amount the image was scaled in Effect Controls > Motion.

None is the best choice when creating multicam clips.

Set to Frame Size is the best choice for everything else.

While both Scale and Set resize the clip to match the sequence, only the Set option shows you exactly what was changed for the clip. Since image quality decreases as you scale images larger than 100%, with Scale, you have no idea whether an image is larger than 100% of not.

With Set to Frame Size, you always do.


Please rate the helpfulness of this tip.

Click on a star to rate it!

… for Adobe Premiere Pro CC

Tip #1136: New Features in Adobe Premiere Pro

Larry Jordan – LarryJordan.com

Adobe continues to expand its color management for HDR media.

The Adobe Premiere Pro icon.

Topic $TipTopic

With the October, 2020, update, Premiere Pro adds several new features – most revolving around color management. Here’s the list.

  • Color Management of ARRI ProRes. Color management for ARRI ProRes formats with embedded LUTs streamlines the workflow in Premiere Pro. For HDR productions, you can switch out Rec. 709 LUTs and replace them with HLG LUTs
  • Rec. 2100 PQ now supported for HDR workflows
  • ProRes RAW import now supported on Windows for Intel and AMD GPUs.
  • ProRes RAW to Log color space conversion.
  • Improved playback for H.264 and HEVC files using hardware decoding on Windows for Premiere and After Effects.
  • Faster audio pre-roll playback.

Here’s a link to the details.


Please rate the helpfulness of this tip.

Click on a star to rate it!

… for Codecs & Media

Tip #1131: Thunderbolt 4 = Thunderbolt 3 (Mostly)

Larry Jordan – LarryJordan.com

For Mac users, Thunderbolt 4 provides no new capability compared to Thunderbolt 3.

(Image courtesy of Intel.)

Topic $TipTopic

Thunderbolt 4, which is available for some PCs but not Macs (yet), is causing a lot of confusion in terms of performance and capability. To learn more, I interviewed Larry O’Connor, CEO of OWC, a company that specializes in Thunderbolt peripherals.

Here are four relevant quotes:

“Thunderbolt 4 is the latest “version” of Thunderbolt created by Intel. While Thunderbolt 3 brought a brand new connector and a doubling of bandwidth over the prior Thunderbolt 2 standard, Thunderbolt 4 is more a new name, rather than a new technology.”


“While Apple implemented Thunderbolt 3 in the fullest way, that is not the case with PC/Windows. There are multiple, different, allowed implementations that are possible for PCs as Intel pushed for broader Thunderbolt adoption. The result is an inconsistent experience between different PCs listed as having Thunderbolt or being Thunderbolt-ready.”


“What Thunderbolt 4 does is tell PC users that, no exceptions, you have the full Thunderbolt implementation. For Apple users, all Thunderbolt 3 equipped Macs since 2016 already have the full implementation across the board. So for Mac users, there’s no change.”


“Unlike Thunderbolt 3 cables, Thunderbolt 4 cables will universally provide the fully-rated interface speed that host and device support. This solves many tech support issues regarding cable length, speed and power delivery.”

Read the full interview here – it is worth your time.


Please rate the helpfulness of this tip.

Click on a star to rate it!