Use Lighting Setups for speed, then animate them by simply rotating a light.
A rotating red fill light emphasizes the slow turn of the aircraft in Motion.
Last week, I wrote an article for my newsletter on how to create dramatic lighting in Motion. Motion has a full range of lights and, more importantly, lighting presets that can add drama and visual interest to any scene – especially one that involves 3D objects.
After writing this article, I realized that it would look even better if the red fill light could slide along the body of the plane as it turned. It’s actually easy to do.
Select the light you want to adjust in the Layers panel.
Then, keyframe a slow horizontal rotation of that light to slowly pan across the body of the plane.
EXTRA CREDIT
The article, linked at the top, explains how to create this lighting effect.
Please rate the helpfulness of this tip.
Click on a star to rate it!
https://www.theinsidetips.com/wp-content/uploads/2019/09/Tips-Logo-700x150.jpg00Larry Jordanhttps://www.theinsidetips.com/wp-content/uploads/2019/09/Tips-Logo-700x150.jpgLarry Jordan2020-12-24 01:30:002020-12-18 18:09:04Tip #1263: Animate Lights in Motion
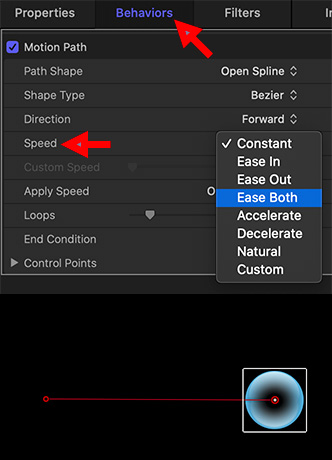
The Behavior menu provides eight different options to change acceleration.
The Behaviors inspector (top) showing the Speed menu. A Motion Path (bottom).
I discovered this tip while researching a recent PowerUP webinar. We can also change the ease-in / ease-out speed when animating objects using behaviors.
NOTE: Tip #1258 illustrates how to change Ease In/Out speed when using keyframes.
Ease In and Ease Out refer to the acceleration of an object approaching an end point when animated using Behaviors.
Ease In. The speed of an object approaching a keyframe.
Ease Out. The speed of an object leaving a keyframe.
Apply Behaviors > Basic Motion > Motion Path to an element in the Layers panel. Adjust the two end points to get the movement you want.
NOTE: Click in the middle of the red motion path line and drag to create a curved path.
Go to Inspector > Behaviors and change the Speed menu to change Ease In / Out speeds. Experiment with the different options to see which works best for your project.
Please rate the helpfulness of this tip.
Click on a star to rate it!
https://www.theinsidetips.com/wp-content/uploads/2019/09/Tips-Logo-700x150.jpg00Larry Jordanhttps://www.theinsidetips.com/wp-content/uploads/2019/09/Tips-Logo-700x150.jpgLarry Jordan2020-12-24 01:30:002020-12-18 18:10:47Tip #1262: Change Behavior Ease In / Out Speed
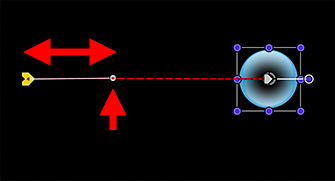
Bezier control dots adjust Ease In/Out speeds and the shape of the motion path.
Drag the white Bezier control dot to or from the keyframe to change Ease In/Out speeds.
I discovered this tip while researching a recent PowerUP webinar. We can change the ease-in / ease-out speed when animating objects using keyframes.
Ease In and Ease Out refer to the acceleration of an object when it is animated using keyframes.
Ease In. The speed of an object approaching a keyframe.
Ease Out. The speed of an object leaving a keyframe.
By default, all keyframes in Motion have both Ease In and Ease Out applied. This means an object accelerates when leaving a keyframe and decelerates when approaching a keyframe.
You can change the speed of this acceleration after applying a keyframe by selecting the keyframed object in the Layers panel, then click the keyframe you want to adjust.
This reveals a thin white line with a white dot at the end of it. (This line is called a Bezier control handle.) Drag the dot along the motion path line to change the Ease In/Out speeds.
NOTE: Dragging the dot around the keyframe puts a curve into the motion path (the dotted red line).
EXTRA CREDIT
Control-click a keyframe and set it to Linear to have a constant speed between keyframes.
“Game of Thrones” is considered the Gold Standard for VFX on TV.
VFXV, the magazine of the Visual Effect Society, has an article, written by Trevor Hogg, on “The Art and Business of VFX for TV and Streaming.” (Link)
“The continued emergence of new streaming platforms, Disney+ and Apple TV+ among some of the most recent to launch, has created entirely new avenues for content, and much of it is prestige programming that requires quality visual effects, with the scope of a traditional feature blockbuster or high-profile cable series,” states Simon Rosenthal, Executive Vice President Global Studio Operations at Method Studios. “At the same time, technology advancements are enabling studios to work more quickly and efficiently, and so producers are increasingly using visual effects to support their storytelling, whether creating a full CG creature, mass destruction, or digitally altering practical locations to be period-authentic.”
This article provides an in-depth look at an industry expanding into new markets along with interviews, screen shots and links.
Please rate the helpfulness of this tip.
Click on a star to rate it!
https://www.theinsidetips.com/wp-content/uploads/2019/09/Tips-Logo-700x150.jpg00Larry Jordanhttps://www.theinsidetips.com/wp-content/uploads/2019/09/Tips-Logo-700x150.jpgLarry Jordan2020-12-23 01:30:002020-12-23 01:30:00Tip #1272: Art & Business of VFX for TV & Streamers
Network rendering speeds output, but setup can be tricky.
(Image courtesy of Pexels.com.)
Toolfarm.com has created an in-depth tutorial on render farms, also called “network rendering.” (Link)
The idea of network, or distributed, rendering is to distribute your render over a network, or farm, of computers, to speed up your render times. This can be done in many different programs with a myriad of different setups, so it isn’t as straight forward and clear cut as I’d like it to be.
Creating the right storage and management can be a challenge but it’s important to get that in place first. There are tons of resources out there but I’m keeping this short and sweet so this will be a page of resources more than actual instructions.
Subjects include:
Setting Up a Network Rendering for After Effects
Network Rendering with RenderGarden
Cinema 4D Team Render
Autodesk BackBurner for Autodesk Maya, 3ds Max, Flame, and more
Chaos Group V-Ray Swarm
Pipeline
Pixar’s Tractor
Digital Rebellion Pro Render
Aeriform Ramma
Using your Plug-ins and Software on a Network Rendering Setup
The article linked above has much more information, plus links to more resources.
Please rate the helpfulness of this tip.
Click on a star to rate it!
https://www.theinsidetips.com/wp-content/uploads/2019/09/Tips-Logo-700x150.jpg00Larry Jordanhttps://www.theinsidetips.com/wp-content/uploads/2019/09/Tips-Logo-700x150.jpgLarry Jordan2020-12-23 01:30:002020-12-18 17:59:46Tip #1271: How to Setup Network Rendering
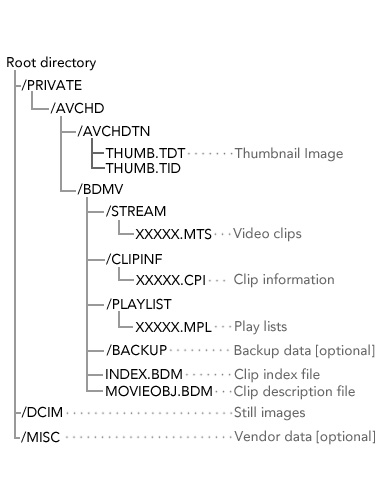
Typical AVCHD directory structure (Image courtesy of Vector15.com).
AVCHD (Advanced Video Coding High Definition) is a format for digital recording and playback of high-definition video developed jointly by Sony and Panasonic. An AVCHD file is actually not a single video file, but a hierarchical file structure derived from the file structure you would find on a Blu-ray disc, containing multiple video clips.
On OSX, the AVCHD folder is automatically viewed as a package (aka bundle). If you are not familiar with packages on OSX, a package is a file system folder that is normally displayed in the Finder as if it were a single file. A package can contain hundreds of other folders and files and such. An iPhoto Library is a package, for example. In addition, OSX further treats the BDMV folder as a package as well.
The problem is that macOS does not handle AVCHD files well, including limited QuickTime support, inability to rename the files in the AVCHD bundle, and extracting just the file you want to access.
Instead, it is better to simply copy the ENTIRE AVCHD folder to your hard disk, open it into your NLE and import just the clips you need for your edit.
Ideally, it would also be good to transcode that original AVCHD media (which uses the H.264 codec) into something easier to edit, such as ProRes 422.
Here’s an article from Vector15.com that describes AVCHD in more detail.
Please rate the helpfulness of this tip.
Click on a star to rate it!
https://www.theinsidetips.com/wp-content/uploads/2019/09/Tips-Logo-700x150.jpg00Larry Jordanhttps://www.theinsidetips.com/wp-content/uploads/2019/09/Tips-Logo-700x150.jpgLarry Jordan2020-12-22 01:30:002020-12-18 16:57:28Tip #1275: How an AVCHD Folder is Organized?
Timecode is a separate track stored inside the QuickTime movie container.
A typical timecode display.
We often think of a QuickTime movie as a file. But, it actually isn’t. It’s a container for multiple files – each of which can be different.
Timecode tracks, which are stored inside the QuickTime container, store external timecode information, such as SMPTE timecode. QuickTime provides a timecode media handler that interprets the data in these tracks to track each frame of video.
A movie’s timecode is stored in a timecode track. Timecode tracks contain:
Source identification information (this identifies the source; for example, a given videotape or digital file)
Timecode format information (this specifies the characteristics of the timecode and how to interpret the timecode information)
Frame numbers (these allow QuickTime to map from a given movie time, in terms of QuickTime time values, to its corresponding timecode value)
Apple has defined the information that is stored in the track in a manner that is independent of any specific timecode standard. The format of this information is sufficiently flexible to accommodate all known timecode standards, including SMPTE timecoding.
In essence, you can think of the timecode media handler as providing a link between the digital QuickTime-specific timing information and the original analog timing information from the source material.
Please rate the helpfulness of this tip.
Click on a star to rate it!
https://www.theinsidetips.com/wp-content/uploads/2019/09/Tips-Logo-700x150.jpg00Larry Jordanhttps://www.theinsidetips.com/wp-content/uploads/2019/09/Tips-Logo-700x150.jpgLarry Jordan2020-12-22 01:30:002020-12-18 16:58:56Tip #1274: Where a QuickTime Movie Stores Timecode
MKV files, like QuickTime or MXF, are containers that hold media files.
This morning, a reader emailed me a question asking whether MKV files are supported in Big Sur. That got me thinking about what an MKV file is.
According to HowToGeek.com, “MKV files are actually multimedia container formats. An MKV container can incorporate audio, video, and subtitles into a single file—even if those elements use different types of encoding….
MKV container files were designed to be future proof, meaning that the files would not become outdated.”
Features of an MKV file include:
Fast seeking
Chapter, menu, and metadata support
Different selectable audio and video streams
Online streaming compatibility
Subtitle (hard-coded and soft-coded) support
Error recovery, which allows for playback of corrupted files
The MKV container itself also supports almost any audio and video format, making the format highly adaptive and easy to use. However, while the MKV file may not become outdated, the players that support them can. For example, QuickTime Player does not support MKV files.
Here’s a list, published by Wondershare, of the top 10 MKV players for Windows, Mac, iOS and Android devices.
So, as for compatibility, if your MKV player runs on Big Sur, the MKV files should play as well.
Please rate the helpfulness of this tip.
Click on a star to rate it!
https://www.theinsidetips.com/wp-content/uploads/2019/09/Tips-Logo-700x150.jpg00Larry Jordanhttps://www.theinsidetips.com/wp-content/uploads/2019/09/Tips-Logo-700x150.jpgLarry Jordan2020-12-22 01:30:002020-12-22 01:30:00Tip #1273: What is an MKV File?
Alpha channels are the magic that make compositing and most effects possible.
Viewing the alpha channel: White is opaque, black is transparent & gray is translucent.
The process of adding an alpha channel to an image – at the developer level – is highly complex. Fortunately, we don’t need to understand how the channel is added to take advantage of it.
Just as the red, blue and green channels describe the amount of red, blue or green in each pixel, the alpha channel describes the amount of transparency in each pixel. An alpha channel provides a way to store images and their transparency information in a single file without disturbing the color channels.
Many file formats can include an alpha channel, including Adobe Photoshop, ElectricImage, TGA, TIFF, EPS, PDF, and Adobe Illustrator. ProRes, AVI and QuickTime (saved at a bit depth of Millions Of Colors+), also can contain alpha channels, depending upon the codecs used to generate these file types.
Alpha channels store transparency information in files in one of two ways: straight or premultiplied. Although the alpha channels are the same, the color channels differ.
With straight (or unmatted) channels, transparency information is stored only in the alpha channel, not in any of the visible color channels. With straight channels, the effects of transparency aren’t visible until the image is displayed in an application that supports straight channels.
With premultiplied (or matted) channels, transparency information is stored in the alpha channel and also in the visible RGB channels, which are multiplied with a background color. The colors of semitransparent areas, such as feathered edges, are shifted toward the background color in proportion to their degree of transparency.
Some software lets you specify the background color with which the channels are premultiplied; otherwise, the background color is usually black or white.
Straight channels retain more accurate color information than premultiplied channels. While premultiplied channels are compatible with a wider range of programs, such as Apple QuickTime Player.
Often, the choice of whether to use images with straight or premultiplied channels has been made before you receive the assets to edit and composite. Premiere Pro and After Effects recognize both straight and premultiplied channels, but only the first alpha channel they encounter in a file containing multiple alpha channels.
ProRes 4444 is a good choice when you need to create or transfer clips with alpha channels.
Alpha channels are supported in all NLEs, and there are dozens of articles on the web detailing how to work with them to create a variety of different effects.
Please rate the helpfulness of this tip.
Click on a star to rate it!
https://www.theinsidetips.com/wp-content/uploads/2019/09/Tips-Logo-700x150.jpg00Larry Jordanhttps://www.theinsidetips.com/wp-content/uploads/2019/09/Tips-Logo-700x150.jpgLarry Jordan2020-12-22 01:30:002020-12-22 01:30:00Tip #1266: Interpreting an Alpha Channel
We may request cookies to be set on your device. We use cookies to let us know when you visit our websites, how you interact with us, to enrich your user experience, and to customize your relationship with our website.
Click on the different category headings to find out more. You can also change some of your preferences. Note that blocking some types of cookies may impact your experience on our websites and the services we are able to offer.
Essential Website Cookies
These cookies are strictly necessary to provide you with services available through our website and to use some of its features.
Because these cookies are strictly necessary to deliver the website, refuseing them will have impact how our site functions. You always can block or delete cookies by changing your browser settings and force blocking all cookies on this website. But this will always prompt you to accept/refuse cookies when revisiting our site.
We fully respect if you want to refuse cookies but to avoid asking you again and again kindly allow us to store a cookie for that. You are free to opt out any time or opt in for other cookies to get a better experience. If you refuse cookies we will remove all set cookies in our domain.
We provide you with a list of stored cookies on your computer in our domain so you can check what we stored. Due to security reasons we are not able to show or modify cookies from other domains. You can check these in your browser security settings.
Google Analytics Cookies
These cookies collect information that is used either in aggregate form to help us understand how our website is being used or how effective our marketing campaigns are, or to help us customize our website and application for you in order to enhance your experience.
If you do not want that we track your visit to our site you can disable tracking in your browser here:
Other external services
We also use different external services like Google Webfonts, Google Maps, and external Video providers. Since these providers may collect personal data like your IP address we allow you to block them here. Please be aware that this might heavily reduce the functionality and appearance of our site. Changes will take effect once you reload the page.
Google Webfont Settings:
Google Map Settings:
Google reCaptcha Settings:
Vimeo and Youtube video embeds:
Other cookies
The following cookies are also needed - You can choose if you want to allow them:
Privacy Policy
You can read about our cookies and privacy settings in detail on our Privacy Policy Page.