… for Apple Final Cut Pro X

Tip #1242: How to Move a Generated Shape

Larry Jordan – LarryJordan.com

Scaling a generator scales the frame, not the object. Use Transform to move it.
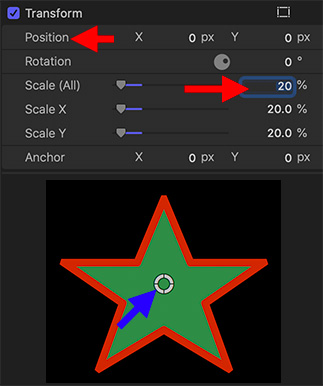
Don’t drag the white circle, use Transform > Position settings instead.

Topic $TipTopic

I use Generators > Shapes frequently in my projects – especially the arrow. However, if I don’t pay attention, when I scale the arrow smaller, then drag it around the screen, it disappears. Here’s why.

When you add Generators > Shapes to a project, use the Generator Inspector to set the shape, colors and shadows, but don’t change the Center setting.

Next, go to the Video Inspector and adjust Scale and Rotation to the size and orientation you need (bottom red arrow in the screen shot).

Finally, to adjust the position of the generator, DON’T use the white circle in the Viewer!! (Blue arrow.) Why? Because when you scaled the generator, you actually scaled the frame that contains it. Dragging the white circle drags the frame, not the image.

Instead, change the position of a generator using Video Inspector > Transform > Position (top red arrow). Or the on-screen Transform controls.

EXTRA CREDIT

This “disappearing generator” drove me nuts until I finally figured it out.


Please rate the helpfulness of this tip.

Click on a star to rate it!

… for Apple Final Cut Pro X

Tip #1241: Shortcuts for On-screen Viewer Controls

Larry Jordan – LarryJordan.com

The on-screen controls make effect adjustments a lot faster and more intuitive.

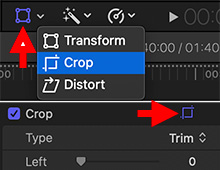
On-screen Viewer controls in the Viewer (top) and Video Inspector (bottom).

Topic $TipTopic

The Transform, Crop and Distort inspector settings can all be adjusted on-screen. There are actually two places these can be enabled.

The first is at the bottom left of the Viewer. Click the small downward pointing arrow just to the left of the “Magic Wand” and select the controls you want to activate.

If the correct controls – indicated by the icon – are already selected, you only need to click the icon itself to enable them; as illustrated by the left red arrow in the screen shot.

– OR –

Go to the Video Inspector and click the small icon to the right of the name of the controls you want to activate – “Transform,” “Crop,” or “Distort.”

If the icon is gray, clicking will enable the controls. If the icon is blue, as shown by the right red arrow in the screen shot, clicking will disable the controls.

EXTRA CREDIT

Remember, when you are done using the on-screen controls to either click “Done” in the top right corner of the Viewer or click the now-blue icon in the Video Inspector to disable the controls.


Please rate the helpfulness of this tip.

Click on a star to rate it!

… for Apple Final Cut Pro X

Tip #1240: Turn Categories Off or On

Larry Jordan – LarryJordan.com

Categories can easily be hidden – if you click in the right place.

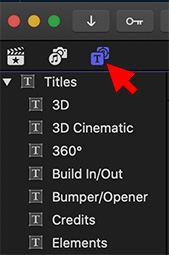
The blue “Categories” button for the Titles browser.

Topic $TipTopic

The longer I use Final Cut, the more hidden features I discover. Here’s another. (I don’t know when this feature first appeared, but it is in the 10.5 version of Final Cut and probably many versions prior to that. )

Effects are grouped into categories, displayed on the left of the appropriate browser. If you click the button for that Browser once, the contents of that Browser are displayed.

However, if you click that now-blue button a second time, the category display is hidden. Click it a third time to show it again.

This “hiding” technique works for the:

  • Library List
  • Photos & Music browser
  • Titles & Generators browser

To hide/display categories for either the Effects or Transitions browsers, click the small sidebar icon in the lower-left corner of each browser.


Please rate the helpfulness of this tip.

Click on a star to rate it!

… for Random Weirdness

Tip #1232: What Should Be in Every Scene You Write?

Larry Jordan – LarryJordan.com

Drama occurs from conflict. Spike Lee says the best drama is when both sides are right.

(Image courtesy of Pexels.com.)

Topic $TipTopic

This article, written by Jason Hellerman, first appeared in NoFilmSchool.com. This is a summary.

Scenes: they’re the backbone of every story, whether it be TV, film, or even on the stage. Scenes build on one another and create a world, a vision, and take people on a journey. But, what should be in every scene?

At the end of the day, every scene needs to have one thing: drama. Does your character have a goal in the scene? What’s standing in their way? That’s it. That’s the center of every scene.

Drama is the perils that your characters face in order to achieve their goal. Those perils can make us laugh, they can be thrilling, they can be emotional. But without drama, you’re not building a story. You’re just boring us.

The biggest pratfall I see from younger writers are scenes that have no conflict. People come in and out of doors and espouse facts, then go on their way. We need to see what stands in their way both tangibly and intangibly if we want to really be a part of the story.

This article includes a video on how to write a scene, along with more details.


Please rate the helpfulness of this tip.

Click on a star to rate it!

… for Random Weirdness

Tip #1231: How to Break Down a Script

Larry Jordan – LarryJordan.com

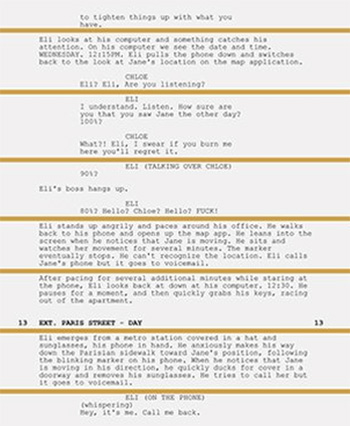
Script breakdowns start the process of turning words into images.

(Image courtesy of PremiumBeat.com.)

Topic $TipTopic

This article, written by Jason Boone, first appeared in PremiumBeat.com. This is a summary.

A script breakdown helps a film crew prepare for production. With a proper breakdown, a production team can isolate all the necessary elements, put together a shooting schedule, create a shot list, and generate script sides.

In the video tutorial that accompanies this article, the author uses StudioBinder to break down a script.

Line the Script. The first step in breaking down a script is to separate it into filmable scenes. This is called “lining the script,” and it’s quite easy when things are properly formatted. Since one page of a screenplay is generally translated as one minute of screen time, using eighths just provides extra precision.

Isolate the Production Elements. With the script properly broken into scenes and divided by eighths, tag them. Elements include anything that’s going to be on-screen, including cast members, props, VFX, makeup, set dressing, etc.

Create the Breakdown Summary Sheet. This could include shot lists and production schedule.

Once I have all of the elements isolated, I can now put together a breakdown sheet. With this step, I’m essentially categorizing and listing out all of the elements from the breakdown for each particular scene.

With my script breakdown in hand, I’m now ready to move on to the next stages of pre-production.

EXTRA CREDIT

The article includes a five minute video tutorial along with more details and screen shots.

The StudioBinder website is here.


Please rate the helpfulness of this tip.

Click on a star to rate it!

… for Random Weirdness

Tip #1230: How to Use Insert Shots Effectively

Larry Jordan – LarryJordan.com

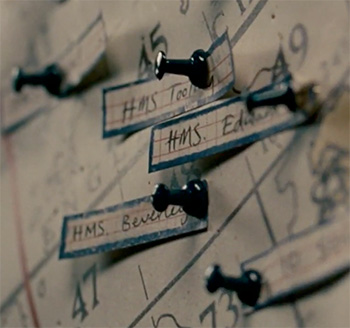
An insert shot provides detail or information to move a story forward.

(Image courtesy of “The Imitation Game.”)

Topic $TipTopic

This article, written by Jourdan Aldredge, first appeared in PremiumBeat.com. This is a summary.

An insert shot is not, necessarily, a close-up. Screenwriting.io defines the insert shot as “…a shot — often a close-up — that focuses on a specific detail.” It’s the “detail” focus that makes inserts so powerful. While inserts might seem simple and self-explanatory, they are actually one of the oldest tricks in the book to help you tell a story in your films or videos.

In more practical filmmaking terms, insert shots—sometimes also called cutaway shots—are all the shots you include to add additional visual information that helps with your cinematic storytelling needs. These are often closeups displaying specific information such as headlines of newspapers, items, weapons, or other small articles like door handles.

However, technically speaking, insert shots aren’t all close-ups. They can include any number of shot styles or techniques across all of the standard shot types. The key element is that they’re edited, or “inserted,” into a scene to help provide further thematic clarity.

The article includes four videos that illustrate different ways to shoot and use insert shots, along with links for more information.


Please rate the helpfulness of this tip.

Click on a star to rate it!

… for Apple Motion

Tip #1229: Enable Dramatic Lighting in Motion

Larry Jordan – LarryJordan.com

The lighting technology in Motion is amazing! The key is to turn off the ambient lights first.

A 3D torus, with Dramatic Right lighting and colors applied.

Topic $TipTopic

Motion has some very dramatic lighting presets built into it. But, to see them, you need to turn the ambient lights off first. Here’s how.

The screen shot illustrates the Dramatic Right lighting setup, with ambient lights turned off. Here’s how to achieve the same look.

  • Drag the 3D object of your choice from the Library to the Viewer, then select it in the Layers panel. (I used a Torus.)
  • From Object > New Light Setup, choose a lighting arrangement that appeals to you. (I used Dramatic Right.)
  • In the Layers panel, move the 3D object from its own group into the same group as the lights.
  • Select the 3D object, then go to Inspector > 3D Object and click the Reveal Environmental Lighting button.
  • Scroll down toward the bottom and set 3D Object Environment to 0. This turns off the inherent lighting of the object. (If the object goes black, remember that you need to move it into the same group as the lighting setup you just added. Put it below the lights in the Layers panel.)
  • Finally, select each light individually in the Layers panel, go to Inspector > Light and change the color to something you like.

Adjust until you get the look you want — or, until its time for dinner, whichever comes first.

EXTRA CREDIT

As is also true on set, you can adjust lights until there’s no time left for production. Feel free to tweak.


Please rate the helpfulness of this tip.

Click on a star to rate it!

… for Apple Motion

Tip #1228: How to Burn-in Timecode

Larry Jordan – LarryJordan.com

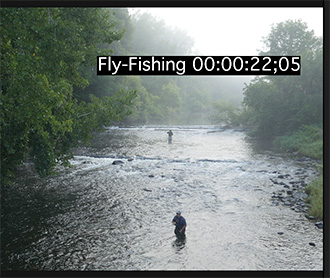
FxFactory Pro provides a wide variety of generators, transitions and effects for Motion and FCP X.

The Timecode generator, top, and the results. (Image courtesy: Hallmark Broadcast Ltd. (www.hallmarkbroadcast.tv))

Topic $TipTopic

Motion does not have the ability to burn timecode into video, say to provide a reference when sending a project to a client to review. But, you still can – with a little help from FXFactory.

Using the Timecode generator from FXFactory Pro, you can easily superimpose timecode for a single clip, or an entire project.

Adjustable settings include:

  • Position
  • Font size, color and kerning
  • Type of timecode
  • Background
  • Drop shadow

A free trial is available.

Link: https://fxfactory.com/info/fxfactorypro/


Please rate the helpfulness of this tip.

Click on a star to rate it!

… for Apple Motion

Tip #1227: Compare Two Images for Artifacts

Larry Jordan – LarryJordan.com

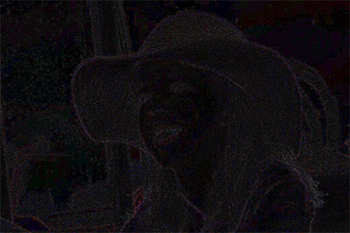
Differences caused by compression are very subtle and confined to edges.

A significantly enhanced difference map highlighting differences between images.

Topic $TipTopic

Ever wonder what happens to your images when they are compressed? Well, Motion has a elegant way to illustrate these differences. Here’s how to discover them.

  • Import the two clips or stills you want to compare – this works for both video and stills.
  • Select the top clip.
  • In the Inspector, change Properties > Blend mode to Difference.

The first thing you’ll notice is that differences are VERY slight.

To enhance these results, apply Filters > Color > Levels to the GROUP that holds both images. Then drag the mid-tone slider to the left. This boosts the difference results.

Anything showing gray is different between the two images. Again, you’ll see the big difference is edge definition.

EXTRA CREDIT

If you want to be extra precise, bring these images into your favorite NLE and compare them using the Waveform Monitor.

Two identical images would show a solid black line at 0.


Please rate the helpfulness of this tip.

Click on a star to rate it!

… for Visual Effects

Tip #1235: 6 Ways to Motion Track in After Effects

Larry Jordan – LarryJordan.com

Motion tracking is an essential skill, especially designed for moving elements.

(Image courtesy of SchoolofMotion.com)

Topic $TipTopic

This article, written by Johnathan Paul, first appeared in SchoolofMotion.com. This is a summary.

Motion tracking, in its simplest form, is the process of tracking the movement of an object within a piece of footage. Once you’ve collected this track data from the selected point, you then apply it to another element or object. The results of applying this data are that your element or object now matches the movement of your footage.

What can you use motion tracking for?

  • Stabilize motion by utilizing tracking data.
  • Add elements such as text or solids to a composition.
  • Insert 3D objects into 2D footage.
  • Apply effects or color grading techniques.
  • Replace screens on a TV, Computer, or mobile device.

What types of motion tracking is there in After Effects?

  1. Single-Point Tracking
  2. Two-Point Tracking
  3. Corner Pin Tracking
  4. Planar Tracking
  5. Spline Tracking
  6. 3D Camera Tracking

Tracking is a crucial technique to learn as a motion designer or visual effects artist. You’ll end up using this technique much more than you think, and for a wide variety of reasons.

The article has videos that illustrate each of the six types of motion tracking, along with different software to accomplish it.


Please rate the helpfulness of this tip.

Click on a star to rate it!