… for Codecs & Media

Tip #1467: Create WebM Files on a Mac

Larry Jordan – LarryJordan.com

There are only a few tools that create WebM files on a Mac.

The WebM logo.

Topic $TipTopic

Last week, Tip #1436 reported that support for WebM video playback was in current beta builds of Apple Safari. However, as several readers pointed out, that didn’t answer the question of how to create WebM files on a Mac. Here’s what I learned.

While there are LOTS of ways to convert WebM into MP4, there are only a very limited number of ways to convert anything into WebM.

NOTE: ffMPEG supports WebM creation. However, that’s accessed using the command line in Terminal; hardly easy for non-developers to use.

ONLINE TOOLS

  • Video2Edit — Here’s the link.
  • Wondershare Online Uniconverter — Here’s the link.
  • EZGIF — Here’s the link.
  • ClipChamp — Here’s the link.
  • WeVideo — Here’s the link.

STAND-ALONE SOFTWARE

  • ffWorks (using ffMPEG) — Here’s the link.
  • Bigasoft WebM Converter for Mac — Here’s the link.
  • Wondershare UniConverter — Here’s the link.
  • NCH Software’s Prism — Here’s the link.
  • AppGeeker’s Video Converter — Here’s the link.

SUMMARY

I’m a big fan, and regular user, of ffWorks, however, I haven’t used any of the rest of these. The good news is that, so far, no one has asked me for a WebM file. If you know of other conversion software, please let us know in the comments.


Please rate the helpfulness of this tip.

Click on a star to rate it!

… for Adobe Premiere Pro CC

Tip #1465: Add Different Marker Colors in Real-Time

Larry Jordan – LarryJordan.com

All eight marker colors can have keyboard shortcuts.

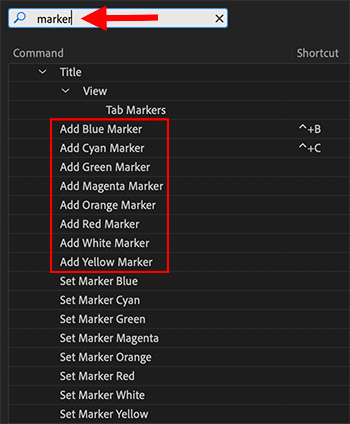
The red box indicates which menu options add markers of different colors.

Topic $TipTopic

A reader asks: “Is it possible to create different color markers during playback in Premiere? I could then highlight answers during an interview in real-time.” The answer is: Yes. Here’s how.

There are eight different marker colors in Premiere, but only the green version has a default keyboard shortcut.

Open Premiere Pro > Keyboard Shortcuts (Windows: Edit > Keyboard Shortcuts).

Search for “marker” (top red arrow in screen shot).

In the Title section, you’ll see eight uanassigned options to add a marker for each color (red box in screen shot).

In this example, I assigned shortcuts to add Blue and Cyan markers.

During playback, typing these shortcuts adds markers in real time. As always, if the clip is selected, the marker is added to the clip. If nothing is selected, the marker is added to the timeline.


Please rate the helpfulness of this tip.

Click on a star to rate it!

… for Codecs & Media

Tip #1434: Fix for Intermittent Audio Playback

Larry Jordan – LarryJordan.com

Simply renaming the file fixed the problem!

An audio waveform.

Topic $TipTopic

This tip came from Shaun Fothergill.

I am running macOS Big Sur and the latest version of FCP.

I had a problem with importing an mp4 Teams (Microsoft) video into my timeline. Intermittently, I would see only part of the audio wave form but could see/hear the whole video/audio playback.

When I exported the gaps in the audio waveform were silenced on play back – this got my head scratching!

If I played the video before import in QT or dropped it into Premiere then all seemed good – full audio waveform seen in Premiere for example.

So with a combination of these I was able to use FCP to get through my edit.

Today the dropped audio waveform happened again but, then, I stumbled on a ridiculously easy fix!

Before you import the file into FCP, rename your .mp4 video to .mov . Bingo! Audio is back on the timeline

All it took was renaming the file.


Please rate the helpfulness of this tip.

Click on a star to rate it!

… for Apple Final Cut Pro X

Tip #1474: Adjust the Anchor Point for Better Moves

Larry Jordan – LarryJordan.com

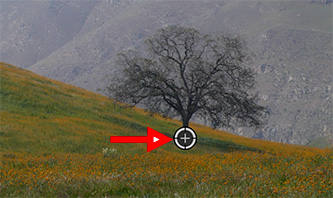
The anchor point determines where an image revolves or scales.

The anchor point was moved from center to the tree trunk.

Topic $TipTopic

The Anchor Point is that position around which an image rotates or scales. It is indicated by a plus sign in a white circle – red arrow in the screen shot – whenever you activate the Transform controls for a clip in the Timeline.

NOTE: I find scaling or rotating an image looks MUCH more interesting when you move the Anchor Point to a corner, rather than the center. Or, to a central element in the frame, as shown in this screen shot.

While it would be great to drag the Anchor Point, Final Cut does not support this, even if the Transport controls are active in the Viewer. Instead:

  • Select the clip in the Timeline.
  • Go to Inspector > Transform and adjust the Anchor point settings.

By default the anchor point is in the center of the frame. When you move the anchor point, you’ll also need to move the clip to get it back to the center of the frame.


Please rate the helpfulness of this tip.

Click on a star to rate it!

… for Apple Final Cut Pro X

Tip #1472: FCP: Problems Chroma-Keying HDR Media

Larry Jordan – LarryJordan.com

This problem doesn’t have a workaround, yet.

The results of keying HDR HLG media in Final Cut Pro.

Topic $TipTopic

Brandon brought this issue to my attention.

There seems to be a problem chroma-keying HDR green screen footage that was shot on an iPhone 12 using HEVC 10-bit HLG.  I’m running Apple Final Cut Pro 10.5.2 on macOS Catalina.

NOTE: This problem also occurs in FCP 10.5.1.

The source clip is 4K, 10-bit, HEVC HDR HLG.

When imported into FCP, and the Keyer filter is applied, what results is illustrated in the screen shot.

  • The background is green.
  • His shirt is blue.
  • His face is Caucasian.

Sampling the green background, tweaking color selection and adjusting any other setting has no effect on the results. There seems to be no way for the system to separate green values from any other color.

I don’t have a workaround, yet. I’ve notified Apple and will let you know what I find out.


Please rate the helpfulness of this tip.

Click on a star to rate it!

… for Apple Final Cut Pro X

Tip #1470: Apple Releases Final Cut Pro 10.5.2

Larry Jordan – LarryJordan.com

This latest version is a bug-fix release.

The Final Cut Pro logo

Topic $TipTopic

Last week, Apple released Final Cut Pro 10.5.2. This is principally a bug fix release. Here’s what’s new.

Here are the Apple Release Notes

  • Adds support for a new Universal RED plugin enabling native RED RAW decoding and playback on both Apple silicon and Intel-based Mac computers.
  • Improves stability when playing back H.264 video files with corrupt data.
  • Fixes an issue in which text could disappear when double clicking a value field in the inspector.
  • Fixes an issue in which FCPXML files created from drop frame projects would import as non drop frame.
  • Fixes an issue that may prevent custom Motion titles stored inside the library from appearing in the Titles browser.
  • Improves stability when choosing the DPP/Editorial Services metadata view with MXF media.
  • Improves stability when using AirPlay with Final Cut Pro on a Mac computer with Apple silicon.

The folks at Digital Anarchy added the following notes to the upgrade:

Final Cut Pro 10.5.x uses a new version of the FCP plugin architecture (FXPlug4). The older plugin versions (FxPlug3) still works for now but these new builds of the plugins will be required at some point. They also add support for Apple’s Metal (replacement for OpenCL), the Apple Silicon machines and Big Sur (FxPlug4 and FxPlug3).

10.5.2 adds some bug fixes for FxPlug4, so we highly recommend you upgrade to this version if you’re using 10.5 or higher. 10.4.x will still use FxPlug3 plugins but you still want to download these releases as they add Big Sur support.


Please rate the helpfulness of this tip.

Click on a star to rate it!

… for Random Weirdness

Tip #1456: Google is Dumbing Down TVs

Larry Jordan – LarryJordan.com

Google will offer Google TV users a chance to make TVs simpler.

The logo for Google TV.

Topic $TipTopic

OK, so maybe it’s a cheesy headline, but Google recently announced that it will allow users of an upcoming version of Google TV to select a “Basic TV” feature.

As reported by 9to5Google, “the idea behind this version of Google TV is to strip away essentially all of the features that make a smart TV… smart. It goes beyond the “apps-only” mode we saw on Chromecast with Google TV too.”

This new “Basic TV” option appears at setup for television sets running on Google TV, not set-top boxes. It allows users to disable:

  • Apps
  • Content Recommendations
  • Google Assistant
  • Live TV
  • External Inputs, like HDMI

In other words, Google is giving users the option to return to a simpler time.

Here’s the link to the original article.


Please rate the helpfulness of this tip.

Click on a star to rate it!

… for Random Weirdness

Tip #1455: A Win for Creative Folks

Larry Jordan – LarryJordan.com

Overnight ratings are not relevant in a world of “watch when you want” viewing.

Image courtesy of Lukas, via Pexels.com.

Topic $TipTopic

Not all of us work in broadcast, but many of us have seen projects canceled when an initial showing didn’t generate immediate success.

Variety reports that NBC “just announced that it would stop the practice of issuing daily fast affiliate ratings reports altogether.”

Overnight ratings are not relevant in a world of “watch when you want” viewing. Quoting from the article:

“We didn’t come to this decision lightly, but believe it’s important to accurately reflect how the television business is changing and, specifically, how these early ratings numbers are no longer representative of the performance of a particular show or series,” wrote NBC’s Stuart Levine, another Variety alum who wrote plenty of ratings stories during his time here, and therefore knows the significance of ending those daily morning emails. “Long gone are the days when a vast majority of viewers watched their favorite shows in the exact timeslot in which they were scheduled.”

So much of the primetime strategy that we used to cover in the 1990s and 2000s was about those numbers, from scheduling big events vs. a rival’s important premiere, and earning the bragging rights that can be trumpeted in promos, at upfront presentations and yes, in those daily press releases. It was the game.

So many great shows or series with real potential were snuffed out because of those initial ratings, and often replaced by shows that performed even worse.

The entire article is worth reading. This appears to be the significant step toward recognizing the new world of how, and when, TV is viewed.


Please rate the helpfulness of this tip.

Click on a star to rate it!

… for Apple Motion

Tip #1450: Simple 3D Text Lighting Tricks

Larry Jordan – LarryJordan.com

Be sure to turn Environmental lighting off to get the full effect.

Lighting Styles for 3D text: Dramatic Top Right (top), Below, Medium Right (bottom).

Topic $TipTopic

(I discovered this tip while researching a recent PowerUP webinar illustrating Cameras, Sets & Drop Zones in Apple Motion 5.5.)

The more I play with 3D text in Motion, the more fun I have. Here is a very quick way to dramatically change the look of your text.

  • Create some 3D text, give it enough depth that you can see the edges.
  • In Inspector > Text > Appearance, uncheck Lighting > Environment.
  • Then, change Lighting Style and watch what happens.

For this screen shot, I set:

  • Font: Optima
  • Size: 300 points
  • Depth: 60

Then, I applied three different Lighting Styles, from top to bottom in the screen shot:

  • Dramatic Top Right
  • Below
  • Medium Right

EXTRA CREDIT

Once environmental lighting is turned off, if you plan to use other elements you’ll need to add lights to see them,


Please rate the helpfulness of this tip.

Click on a star to rate it!

… for Apple Motion

Tip #1449: Add Depth of Field to a Camera

Larry Jordan – LarryJordan.com

Rendering Depth-of-Field is very processor intensive. Turn it off when you don’t need it.

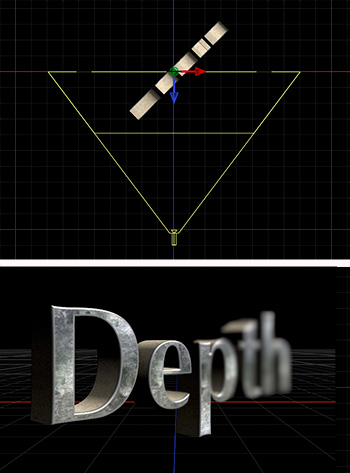
Top view showing camera angle, far and near focus. Text displaying resulting depth of field.

Topic $TipTopic

(I discovered this tip while researching a recent PowerUP webinar illustrating Cameras, Sets & Drop Zones in Apple Motion 5.5.)

Depth of field (focus) can be added to any camera in Motion; though it is off by default. Here’s how to turn it on and adjust it.

  • Go to the Render menu in the top right corner of the Canvas (Viewer) and enable Depth of Field.
  • Add a camera to your project.
  • Select the camera, then, in Inspector > Camera, twirl down Depth of Field.
  • DOF Blur Amount. The amount of blurriness.
  • Near Focus. Indicated by a yellow line nearest the camera. This represents the nearest an object can be to the camera and still be in focus.
  • Far Focus. Indicated by a yellow line farthest from the camera. This represents the farthest an object can be to the camera and still be in focus.
  • Focus Offset. Drag this setting to roll the focus from foreground to background.

In this screen shot:

  • DOF Blur Amount: 60
  • Focus Offset: -2.0
  • Near Focus: 311
  • Far Focus: 0 (This is, generally, left at 0)
  • Camera Angle of View: 74°

EXTRA CREDIT

Use keyframes to animate Focus Offset to create a real-time roll focus.

Rendering depth-of-field is processor intensive. If playback is too slow, turn it on to set values, then turn off until ready to create final exports.


Please rate the helpfulness of this tip.

Click on a star to rate it!