… for Random Weirdness

Tip #1476: Walter Murch: Thoughts on Editing

Larry Jordan – LarryJordan.com

Walter Murch is legendary. Here’s his key thoughts on the craft.

Walter Murch, standing at his editing desk, surrounded by his screenshots.

Topic $TipTopic I have been a fan of Walter Murch for many years and had the great pleasure of meeting him twice. Recently, Jourdan Aldredge wrote an article for PremiumBeat.com, discussing how Murch edits a film.

NOTE: Here’s the link

What makes Jourdan’s article especially helpful are the videos he included of Walter Murch discussing his craft.

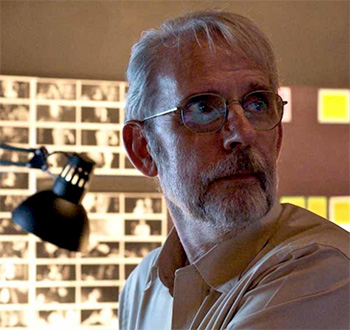
Famous for working on classic films like Apocalypse Now, The Godfather I, II, and III, The Conversation, and The English Patient (as well as for editing all his films while standing for increased creativity), Murch helped to develop new systems and means for editing in the analog world, all while serving as an early pioneer for electronic editing. In fact, Murch was the first editor to receive an Academy Award for a film edited electronically on Avid.

With a career spanning over fifty years, it’s safe to say that Murch has developed one of the most fundamental systems for cinematic editing. As he has often spoken over the years, Murch has whittled down the majority of his expertise to his own six-point criteria for when and how to edit a scene. You can read more about these six criteria points in his book In the Blink of an Eye: A Perspective on Film Editing, but the tenets are basically this:

  • Emotion
  • Story
  • Rhythm
  • Direction of the audience’s sight
  • Bi-dimensional space of the screen
  • Tri-dimensional space of the action

I really like Murch’s explanations above as he further outlines the thoughts behind these criteria, as well as proposes questions you can ask yourself when cutting films or projects of your own. These criteria and questions should be addressed hierarchically as you work your way down the list.

  • Did the transition from one shot to the next make you feel a certain way?
  • Did that cut help you to understand the story?
  • Did it happen at the right place rhythmically?
  • Where is the eye of the audience likely to be looking?
  • Are we convinced that person A is looking at person B?
  • Does the cut follow the continuity of the three-dimensional reality of the space?

It’s important to learn from industry stalwarts, like Murch, with his criteria for cutting, as well as follow his advice on how to look forward in creating your own techniques and innovations as you piece your stories together.


Please rate the helpfulness of this tip.

Click on a star to rate it!

… for Apple Motion

Tip #1454: Expose Shows What’s In a Motion Project

Larry Jordan – LarryJordan.com

An easy way to remember “Expose” is “X”

An exposed project consisting of seven discreet elements.

Topic $TipTopic

Often, Motion projects get so complex, it can be hard to find and modify the element you need to adjust. The Expose feature helps solve that problem.

Motion’s expose commands provide a way of viewing multiple layers at once, “exploding” and re-scaling them. The expose commands allow you to access all layers in a project in the canvas without having to drill down into the Layers list. Expose commands also let you select inactive layers at the playhead’s current position or jump to a selected layer’s In point.

  • To expose layers that are active at the playhead position, type X.
  • To expose all layers in your project, type Shift + X.

In both cases, layers will temporarily scale down and spread over the canvas. Each layer is represented by a white frame in the canvas. Move the pointer over a frame to show the layer’s name.

Click anywhere in the Canvas to reset the display.


Please rate the helpfulness of this tip.

Click on a star to rate it!

… for Apple Motion

Tip #1440: How to Export a Partial Motion Project

Larry Jordan – LarryJordan.com

Play ranges make it easy to focus on small sections of your project.

Keyboard shortcuts associated with play ranges.

Topic $TipTopic

Most of the time, when you finish a Motion project, you want to export all of it. But, what do you do if you only want to export some of it? Easy. Watch.

The area just above the mini-timeline, where the playhead slides back and forth, is home to two other icons:

  • Play Range In
  • Play Range Out

Many times, when you are working on somewhat longer projects, you may want to focus just on playback within a portion of the timeline. These play range markers make that happen.

But, they also control what gets exported.

Set these, either by dragging or typing Shift + Cmd + I or O, to set a play range In and/or Out.

NOTE: Using the keyboard shortcuts jumps the appropriate play range marker to the position of the playhead.

Then, choose Share > Export Selection to Movie. Only that portion of the project contained between those two markers export.

To reset the markers, type Option + X.

EXTRA CREDIT

The screen shot shows other shortcuts for working with these markers.

These markers do not support saving a portion of a project as a Final Cut template. To retime a template, you would need to reconstruct it.


Please rate the helpfulness of this tip.

Click on a star to rate it!

… for Apple Motion

Tip #1432: Secrets of the Spinning Gear

Larry Jordan – LarryJordan.com

Use the Background Tasks window to monitor exports.

Click the spinning gear to reveal the Background Tasks List.

Topic $TipTopic

Have you ever noticed a small gear spinning in the lower right corner of the Viewer? Well, here’s what it means.

When you export a project from Apple Motion, a small spinning gear appears in the lower right corner of the Viewer. (Red arrow in the screen shot.)

This spinning gear disappears when the export is complete.

Click the spinning gear to display the Background Tasks List dialog. This window, which can’t be displayed any other way, shows the progress of an export.

Click the “X in a circle” to cancel the export.


Please rate the helpfulness of this tip.

Click on a star to rate it!

… for Visual Effects

Tip #1475: Recreating 1859 Harpers Ferry

Larry Jordan – LarryJordan.com

Interviews with the VFX team for “The Good Lord Bird.”

For the great reveal of the Harpers Ferry region, a horse and wagon and grassy field appear in the foreground. Right behind them, production rigged a bluescreen. Ingenuity Studios created everything beyond the foreground elements in order to simulate Harpers Ferry in 1859 in this panoramic shot. Images courtesy of Showtime.

Topic $TipTopic

This article, written by Chris McGowan, first appeared in VFXVoice.com. This is an excerpt.

NOTE: Here’s the link

For the Showtime series “The Good Lord Bird,” show-side Visual Effects Supervisor Brad Minnich and Ingenuity Studios Visual Effects Supervisor Andrew Woolley were tasked with recreating Harpers Ferry in 1859 and other settings from the last years of abolitionist John Brown.

Matthew Poliquin was Executive Producer and Adam Lambert the VFX Producer for Ingenuity Studios. Marz VFX, Barnstorm VFX, Trehmer Film and Technicolor VFX were other participating visual effects studios. Ingenuity Studios, the primary VFX house, completed 450 shots and worked on everything from period towns and landscapes to CGI fires, muzzle flashes, train smoke, extensive matte paintings and CG body doubles in battle.

“We had a lot of on-set photography and drone footage to reference to build that town,” Minnich comments. A lot of older photography from the area was also used for reference of what the structures and landscape looked like. “The cool thing about Harpers Ferry is that it is still intact and still has the [pre-Civil War] essence. I remember a session with Andrew where we picked off the modern buildings.” With those cleared out, “Andrew and his team at Ingenuity Studios had a good guide.”

Harpers Ferry is in a river valley, with mountains on either side. One of the memorable establishing scenes is a great reveal of the region. A horse and wagon and grassy field are in the foreground of the shot. Right behind them, production rigged a bluescreen. Ingenuity Studios created everything beyond the foreground elements. “We had to find or build all the elements – trees and grasses, mountains and so on, in the correct varietals and topography for the location,” Woolley notes. Another item was a bridge built in CG and added to the scene. “We had to match all the lighting to the practical elements in the scene,” he adds. “We stitched everything together and projected it onto some rough geo to give more 3D feel. It’s essentially 2.5D, though where the various depths move independently to achieve the correct parallax through the crane move. Finally, it was all integrated with atmosphere and the sky replacement to cap it off. It was the big reveal of Harpers Ferry. Once we locked that in, it established the lay of the land for our viewers.”

EXTRA CREDIT

The article continues with more interviews, along with before and after images of various effects shots.


Please rate the helpfulness of this tip.

Click on a star to rate it!

… for Visual Effects

Tip #1473: Lunar Animation: Mac Pro Big Help in VFX

Larry Jordan – LarryJordan.com

The high-end Mac Pro vastly speeds creating animation & VFX assets.

Detail from Lunar Animation ad for Disney+

Topic $TipTopic

Lunar Animation wrote a detailed blog about how using high-end Mac Pros enabled their animation activities over the last year. Their blog “looks at the noticeable things that this machine really helps with once you start working as an artist.”

NOTE: Here’s the link

The following are excerpts from their blog.

Today we’re going to give a 12 month 3D computer animation perspective on the Mac Pro and Pro Display XDR. We really push our computers hard on a daily basis and benchmarks don’t always reflect real world use on a project. So in this post we will focus on how the Mac Pro has affected our current workflows and how it’s opening up new and exciting workflows for the future.

We currently have two Mac Pros in the studio, we have a mid-tier model which has the 16-core CPU and dual graphics cards and then a higher tier 28 core model, which has four graphics cards. Now I know what you’re thinking, why on earth would you want four graphics cards? Well we’ll get to that later in the post.

Their software includes:

  • MAYA – 3D Modelling and Animation
  • V-RAY – Rendering Engine for Maya
  • HOUDINI – Simulation and Effects
  • NUKE – Compositing
  • DAVINCI RESOLVE – Editing
  • SUBSTANCE PAINTER – Shading and Texturing
  • ZBRUSH – 3D Sculpting
  • ADOBE PHOTOSHOP – Image Editing
  • DEADLINE – Render Management Software

[What using a high-end Mac Pro ] means is that rather than having to close the heavy scene, load up the 3D model we want to adjust and then close that and reopen the original scene to continue working, we are able to simply switch spaces in macOS, add a light to a 3D model and quickly switch back and check the update with the interactive IPR renderer.

Then while we’re waiting for that to create a preview render, we can switch over to another screen and adjust another model.

What we’re seeing here is the fluidity of the artist working and not having to be ground to a halt because the computer is having to think. It feels like having multiple computers at your fingertips. All without constant crashing, which means we avoid losing work and more importantly save artists’ time.

The entire blog is a tour de force and well worth reading. And the behind-the-scenes video is amazing.


Please rate the helpfulness of this tip.

Click on a star to rate it!

… for Visual Effects

Tip #1464: Maxon Acquires forger

Larry Jordan – LarryJordan.com

forger offers professional-level sculpting workflows on mobile devices.

The Maxon logo.

Topic $TipTopic

Last week, Maxon announced it has acquired forger, a digital 3D sculpting and texture painting application for iOS. Conceived over a decade ago by Javier Edo Meseguer, forger offers desktop-class, professional-level sculpting workflows on mobile devices.

Quoting from the Maxon press release:

forger features an intuitive multitouch interface and a comprehensive collection of sculpting brushes and tools. Powerful remeshing algorithms as well as masking and layering capabilities make concept- and production-level sculpting on a mobile device a reality. The ability to import/export OBJ and Alembic file formats further facilitates mobile to desktop workflows.

forger supports all iOS devices (iPad/iPhone/iPod Touch), although it benefits from the extra workspace found in the larger devices and makes great use of the performance benefits that iPad Pro(s) bring to the table. It also supports Apple Pencil.

EXTRA CREDIT

Read the press release here.


Please rate the helpfulness of this tip.

Click on a star to rate it!

… for Adobe Premiere Pro CC

Tip #1471: Four Faster Timeline Mouse Shortcuts

Larry Jordan – LarryJordan.com

Pressing different modifier keys changes behavior.

The Adobe Premiere Pro logo.

Topic $TipTopic

Here are four mouse shortcuts you can use in Premiere’s timeline to move around faster; plus one that you already know.

TIMELINE

  • Scroll wheel. Rolls the timeline up or down.
  • Option + scroll wheel. Zooms into, or out of, the current position of the cursor; not the playhead.
  • Cmd + scroll wheel. Move the timeline left or right.
  • Control + scroll wheel. Depending upon the position of the cursor, not the playhead, scrolls the video or audio tracks up or down.

TRACK HEADER

  • Option + scroll wheel. Enlarges or shrinks the vertical height of video or audio tracks, depending upon the position of the cursor, not the playhead.

Please rate the helpfulness of this tip.

Click on a star to rate it!

… for Adobe Premiere Pro CC

Tip #1469: Set a Marker Range

Larry Jordan – LarryJordan.com

Marker durations are very useful for transcripts.

Set a marker duration in the Edit Marker dialog. A range marker is illustrated below.

Topic $TipTopic

Normally, a marker in Premiere indicates a specific point in time. However, you can extend a marker to cover a range in the timeline. This technique is good for adding transcriptions, marking selected regions of a quote, or whenever you need to indicate something that takes time.

Here’s how:

  • Add a marker to a clip or timeline.
  • Double-click the marker to open the Edit Marker dialog.
  • Change the Duration (top red arrow) timecode to reflect the duration of the marker.

NOTE: This measures the duration of a marker, not the marker’s location in the timeline.

EXTRA CREDIT

Once a duration is applied to a marker, you can change it by dragging either the start or ending marker to a new timeline location (bottom red arrow).


Please rate the helpfulness of this tip.

Click on a star to rate it!

… for Codecs & Media

Tip #1468: Which is Better: WebM or MP4?

Larry Jordan – LarryJordan.com

While royalty-free is compelling for some, most of the time, MP4 is a better choice.

The WebM logo.

Topic $TipTopic

There are a gazillion codecs out there. WebM is one of the newer ones. Is it better than MP4?

First, as we all know, “better” is a very squishy term.

  • MP4 is based on the 2001 QuickTime File Format and supports a vareity of codecs: AVC, HEVC/H.264, and H.264. It is essentially ubiquitous – and plays on everything from computers to Bic pens. (OK, maybe not Bic pens, but just about everything else.)
  • WebM is much newer, released in 2010. Both create files about the same size – assuming the compression software supports tweaking the settings. WebM file sizes can be smaller than MP4, depending upon compression settings.

While the image quality of WebM is reported as “better,” but most consumers probably wouldn’t notice. Essentially, image quality is a wash.

SO, WHICH TO CHOOSE?

The big benefits to WebM are that it is royalty-free and newer. The big benefits to MP4 are virtually universal playback and full support in a wide variety of software.


Please rate the helpfulness of this tip.

Click on a star to rate it!