Foundry offers free licenses Nuke Studio, Mari, Modo and Katana to students at select universities, plus the ability to apply for a free license if your school isn’t listed. There’s also a wealth of other training materials on their website.
As well, this web page offers free tutorials, educator resources and other discounts.
Even if you aren’t a student or educator, this page is worth visiting for the tutorials alone.
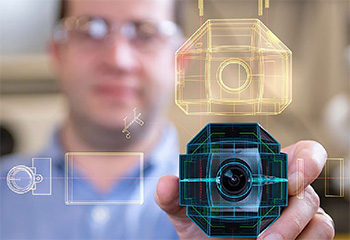
Workflow thoughts from a world-class photo-manipulator.
(Image courtesy: Nemanja Sekulic, via BorisFX.com.)
Nemanja Sekulic is a pro photographer and digital artist, who has a passion for photomanipulation and compositing. In both his personal and commissioned projects, some of which you can see on his website, Sekulic weaves elements of science fiction, fantasy, and surrealism into realistic everyday vignettes.
BorisFX.com interviewed him about his though-process and workflow. (Here’s the link.)
Here are three questions from the article:
What type of photography or photographic genre do you work in? I like to do a bit of everything, which I think lets me have more fun creatively speaking. And since I do photo manipulations and composites, it allows me to take different kinds of photos — portraits, maybe a landscape for a background, and then small objects, food, etc. — and combine them into a new fun, and unique story.
How do you prep for a big project? I approach most projects in the same manner: First, I do research on the topic. I want to know as much as I can about my subject. But how long I have to do my research depends on the size of the project and its complexity. Next, I’ll do some sketching, which is an important step in compositing since it helps me understand what elements I need to include in the work to be able to create a final image. Then, after that, I take all the necessary photos for the project, which could also include other visual elements like stock photos or models of a 3D element.
What’s a keyboard shortcut you can’t live without? It’s hard to choose just one, but I’d pick Ctrl+Z, or UNDO.
EXTRA CREDIT
Here’s Nemanja’s website. He has some AMAZING images on his portfolio page!
Autodesk created a webpage specifically for educators – from elementary school through to professional development – providing resources for students and teachers.
Some of these resources are free, most are subscription-based.
NOTE: I especially like the entry-level “Tinkercad” for grade-school students.
Adobe Media Encoder Watch folders are flexible, useful & easy.
The Adobe Media Encoder logo.
Adobe Media Encoder (AME) supports creating nested watch folders, which is a great way to perform multiple actions at once.
A Watch Folder is an automated way to compress (or transcode, actually) any media file using AME with settings that you apply to the Watch Folder itself.
Here’s a tutorial I wrote that explains how to create a simple watch folder setup, then extends that into nested watch folders which can accomplish multiple compression tasks automatically and hands-free.
You can also program AME to automatically transfer compressed files to a website when compression is complete. We used this feature a LOT during our live coverage of NAB for the Digital Production Buzz.
Please rate the helpfulness of this tip.
Click on a star to rate it!
https://www.theinsidetips.com/wp-content/uploads/2019/09/Tips-Logo-700x150.jpg00Larry Jordanhttps://www.theinsidetips.com/wp-content/uploads/2019/09/Tips-Logo-700x150.jpgLarry Jordan2021-04-06 01:30:002021-04-06 01:30:00Tip #1550: Use Nesting to Add Power to Watch Folders
Handbrake is a free, general-purpose media compression program.
HandBrake is a free open-source video transcoder available for Linux, Mac, and Windows.
HandBrake takes videos you already have and makes new ones that work on your mobile phone, tablet, TV media player, game console, computer, or web browser—nearly anything that supports modern video formats.
Features:
Convert nearly any video to MP4 or MKV
Crop and resize video
Restore old and low-quality video
Remove combing artifacts caused by interlacing and telecine
Pass-through audio without conversion for certain audio types
Downmix discrete surround sound to matrixed surround or stereo
Adjust audio volume levels, and dynamic range for certain audio types
Preserve existing subtitles, and add or remove soft subtitles (subtitles stored as text)
HandBrake does not:
Combine multiple video clips into one
Pass-through video without conversion (video is always converted)
Create Blu-ray, AVCHD, or DVD discs
Transcode into professional codecs such as ProRes, DNx, or GoPro Cineform
HandBrake also does not defeat or circumvent copy protection of any kind. It does not work with video files employing Digital Rights Management (DRM). This includes but is not limited to, copy protected content from iTunes, Amazon Video, Netflix, or other online providers, and many commercial DVD and Blu-ray discs.
https://www.theinsidetips.com/wp-content/uploads/2019/09/Tips-Logo-700x150.jpg00Larry Jordanhttps://www.theinsidetips.com/wp-content/uploads/2019/09/Tips-Logo-700x150.jpgLarry Jordan2021-04-06 01:30:002021-04-02 16:55:50Tip #1549: What Is Handbrake?
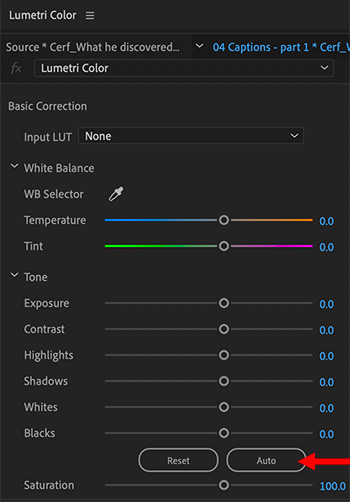
If you have an image that isn’t exposed properly and you need a quick fix, here’s how.
Select the image in the timeline, then go to: Color workspace > Lumetri Color > Basic Correction and click the Auto button (see screen shot).
This adjusts the sliders in Basic Correction to correct exposure problems.
WHAT THIS DOESN”T FIX
This won’t fix color problems. It won’t fix blown-out areas caused by over-exposure. And it won’t fix black levels that were crushed when the image was taken such that all shadow detail was lost.
So, this doesn’t work miracles, but it can make many images look a LOT better.
Also, because this moved sliders, if you don’t like something in the new settings, the modified settings are easy to adjust manually.
Please rate the helpfulness of this tip.
Click on a star to rate it!
https://www.theinsidetips.com/wp-content/uploads/2019/09/Tips-Logo-700x150.jpg00Larry Jordanhttps://www.theinsidetips.com/wp-content/uploads/2019/09/Tips-Logo-700x150.jpgLarry Jordan2021-04-06 01:30:002021-04-06 01:30:00Tip #1537: A Fast Way to Improve an Image
The key is to convert a PDF to PNG before importing into Premiere.
The Page Options dialog in Photoshop scales the PDF image before import.
Premiere does not support importing PDF documents. This doesn’t mean that you can’t use them. Here are two workarounds.
TWO WORKAROUNDS
If all you need to do is import the entire PDF page without zooming into a portion of the page, use this workaround.
Workaround #1: Open the PDF in Preview, choose File > Export and set the export format to PNG. This exports the PDF at the size it was created, not the frame size of your project.
NOTE: Ignore the Resolution setting on export, even if you choose a higher number, the size and resolution of the exported image won’t change. I consider this a bug.
If you need to zoom into elements on the page – for example to provide closeups of an embedded image – this workaround is a better option:
Workaround #2: Open the file in Photoshop, or another image editing program. In the Page Options dialog (see screen shot) that appears: Set the Resolution to at least 400 Pixels/inch. This enlarges the image – while retaining image quality – so that you can easily zoom in or out of the PDF in the timeline.
EXTRA CREDIT
There are two types of PDFs: those that originated as bitmaps and those that originated as vectors.
Photos, scans and Photoshop documents will not scale very well, if at all. Text, Illustrator files or images created using musical notation should scale perfectly.
Please rate the helpfulness of this tip.
Click on a star to rate it!
https://www.theinsidetips.com/wp-content/uploads/2019/09/Tips-Logo-700x150.jpg00Larry Jordanhttps://www.theinsidetips.com/wp-content/uploads/2019/09/Tips-Logo-700x150.jpgLarry Jordan2021-04-06 01:30:002021-04-06 01:30:00Tip #1536: Working with PDFs in Premiere
I’m shooting XAVC-L with four discrete audio tracks. No matter which audio option I choose I get the same stereo track with mics 1 & 2 mixed in both tracks. What I want is to maintain separate channel 1 and 2 sources so I can duck each mic if necessary.
Here’s my workaround.
I select the camera 1 source clip and choose: Modify > Audio Channels > Clip Channel:
Format = Stereo
Number of Clips = 1
That gives me a single stereo track with mic one on the left and two on the right.
Then I create my multicam selecting Stereo and the resulting multicam clip has the same stereo channel assignments.
Finally, I select the Multicam clip in the bin, Modify > Audio Channels > Clip Channel:
Format = Mono
Number of Clips = 2
This puts it back to two discrete audio tracks. Seems cumbersome, but it solved my problem.
Scale PDF images BEFORE bringing them into Final Cut.
The Page Options dialog in Photoshop scales the PDF image before import.
When you import a PDF file into Final Cut, it gets converted into a PNG. This causes problems when you need to scale the image because PDF files, generally, retain image quality when they are scaled. PNGs do not.
Essentially, the PNG is created at 100% of the size of the PDF page AFTER it is scaled to fit within the frame size of your project, not the original size of the PDF itself.
This conversion means that we can’t zoom into a portion of the PNG image without seriously losing image quality.
TWO WORKAROUNDS
If all you need to do is import the entire PDF page without zooming into a portion of the page, use this workaround.
Workaround #1: Open the PDF in Preview, choose File > Export and set the export format to PNG. This exports the PDF at the size it was created, not the frame size of your project. (You could, also, use this as a way to enlarge a PDF image to do a screen grab of a portion of a page.)
NOTE: Ignore the Resolution setting on export, even if you choose a higher number, the size and resolution of the exported image won’t change. I consider this a bug.
If you need to zoom into elements on the page – for example to provide closeups of an embedded image – this workaround is a better option:
Workaround #2: Open the file in Photoshop, or another image editing program. In the Page Options dialog (see screen shot) that appears: Set the Resolution to at least 400 Pixels/inch. This enlarges the image – while retaining image quality – so that you can easily zoom in or out of the PDF in the timeline.
EXTRA CREDIT
There are two types of PDFs: those that originated as bitmaps and those that originated as vectors.
Photos, scans and Photoshop documents will not scale very well, if at all. Text, Illustrator files or images created using musical notation should scale perfectly.
Please rate the helpfulness of this tip.
Click on a star to rate it!
https://www.theinsidetips.com/wp-content/uploads/2019/09/Tips-Logo-700x150.jpg00Larry Jordanhttps://www.theinsidetips.com/wp-content/uploads/2019/09/Tips-Logo-700x150.jpgLarry Jordan2021-04-05 01:30:002021-04-05 01:30:00Tip #1535: Better Options Working with PDF Files
We may request cookies to be set on your device. We use cookies to let us know when you visit our websites, how you interact with us, to enrich your user experience, and to customize your relationship with our website.
Click on the different category headings to find out more. You can also change some of your preferences. Note that blocking some types of cookies may impact your experience on our websites and the services we are able to offer.
Essential Website Cookies
These cookies are strictly necessary to provide you with services available through our website and to use some of its features.
Because these cookies are strictly necessary to deliver the website, refuseing them will have impact how our site functions. You always can block or delete cookies by changing your browser settings and force blocking all cookies on this website. But this will always prompt you to accept/refuse cookies when revisiting our site.
We fully respect if you want to refuse cookies but to avoid asking you again and again kindly allow us to store a cookie for that. You are free to opt out any time or opt in for other cookies to get a better experience. If you refuse cookies we will remove all set cookies in our domain.
We provide you with a list of stored cookies on your computer in our domain so you can check what we stored. Due to security reasons we are not able to show or modify cookies from other domains. You can check these in your browser security settings.
Google Analytics Cookies
These cookies collect information that is used either in aggregate form to help us understand how our website is being used or how effective our marketing campaigns are, or to help us customize our website and application for you in order to enhance your experience.
If you do not want that we track your visit to our site you can disable tracking in your browser here:
Other external services
We also use different external services like Google Webfonts, Google Maps, and external Video providers. Since these providers may collect personal data like your IP address we allow you to block them here. Please be aware that this might heavily reduce the functionality and appearance of our site. Changes will take effect once you reload the page.
Google Webfont Settings:
Google Map Settings:
Google reCaptcha Settings:
Vimeo and Youtube video embeds:
Other cookies
The following cookies are also needed - You can choose if you want to allow them:
Privacy Policy
You can read about our cookies and privacy settings in detail on our Privacy Policy Page.