… for Adobe Premiere Pro CC

Tip #1620: How to Rename Timeline Tracks

Larry Jordan – LarryJordan.com

Scale tracks vertically, then control-click a track to rename.

Control-click a track name in the Timeline to change its name.

Topic $TipTopic

Premiere allows renaming audio or video tracks – if you know where to click.

Here’s how:

  • Load the sequence you want to label into the Timeline.
  • Select the Timeline panel.
  • Type Cmd + [plus] to increase the vertical height of the video tracks until you see the names of the tracks.

NOTE: To increase the height of audio tracks, type Option + [plus].

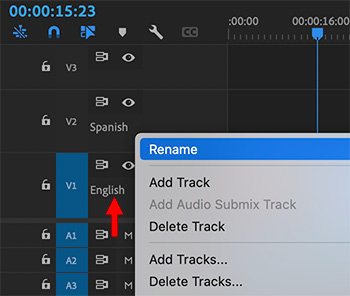
  • Control-click the name of the track you want to change and select Rename (see screen shot).

These names will show up in the Timeline and Audio Track Mixer.

Once you save the project, these names will stay with that sequence until you change them.


Please rate the helpfulness of this tip.

Click on a star to rate it!

… for Codecs & Media

Tip #1610: Add Automated Job Actions in Compressor

Larry Jordan – LarryJordan.com

Job Actions can trigger an Automator workflow for extensive automation.

The Job Action menu options inside Apple Compressor.

Topic $TipTopic

Apple Compressor has eight pre-built automation tasks that can be triggered when compression is complete.

These include:

  • Save the file
  • Add to TV Home Videos
  • Create a Blu-ray or AVCHD Disc
  • Create a DVD
  • Open with a specific application
  • Prepare for HTTP Live Streaming
  • Run Automator Workflow
  • Send Email
  • Post to YouTube or Facebook

To access these:

  • Select a file in the Job list.
  • Scroll down in the Job Inspector (top red arrow) to the bottom.
  • In the Action menu (bottom red arrow), select what you want Compressor to do when compression is complete.

Most of the time, I simply want Compressor to save a file. However, I used HTTP Live Streaming every week to provide mobile device support for my webinars.

EXTRA CREDIT

For true flexibility, you can couple Compressor to Automator for significant file processing after compression is complete.


Please rate the helpfulness of this tip.

Click on a star to rate it!

… for Codecs & Media

Tip #1608: Add Metadata to Videos in Compressor

Larry Jordan – LarryJordan.com

Metadata can be read by many different applications, as well as asset managers.

Custom metadata fields that can be added to any ProRes, MP4, MP3 or QuickTime movie.

Topic $TipTopic

You can use Apple Compressor to add metadata (labels) to your videos during compression using Compressor. Here’s how.

  • Import one or more files into Apple Compressor.
  • Select the file name in the Job list, not the compression setting.
  • In the Job Inspector (top red arrow in screen shot), scroll down to the Metadata menu (bottom red arrow).
  • Click it and select as many custom fields as you need.

NOTE: No, you can’t add fields that aren’t on this list. However, you can import an XML Property List, if you know how to create XML files.

Metadata can be added to ProRes, MP4, MP3 and QuickTime files.


Please rate the helpfulness of this tip.

Click on a star to rate it!

… for Codecs & Media

Tip #1604: SoftRAID Now Compatible with M1 Macs

Larry Jordan – LarryJordan.com

Be sure to upgrade to macOS 11.3 for SoftRAID to work.

The SoftRAID logo.

Topic $TipTopic

Due to significant changes in file handling with Big Sur and M1 Macs, it took at while for OWC SoftRAID to become compatible.

Then, with Big Sur 11.2, Apple broke that compatibility, again, with file changes that affected M1 Macs.

SoftRAID just announced that Big Sur 11.3 now allows SoftRAID to work with both Big Sur and M1 Macs.

Here’s a blog post from Tim Standing, head of the SoftRAID team at OWC with the details.


Please rate the helpfulness of this tip.

Click on a star to rate it!

… for Apple Final Cut Pro X

Tip #1607: Add Metadata to Videos in Compressor

Larry Jordan – LarryJordan.com

Metadata can be read by many different applications, as well as asset managers.

Custom metadata fields that can be added to any ProRes, MP4, MP3 or QuickTime movie.

Topic $TipTopic

You can use Apple Compressor to add metadata (labels) to your videos during compression using Compressor. Here’s how.

  • Import one or more files into Apple Compressor.
  • Select the file name in the Job list, not the compression setting.
  • In the Job Inspector (top red arrow in screen shot), scroll down to the Metadata menu (bottom red arrow).
  • Click it and select as many custom fields as you need.

NOTE: No, you can’t add fields that aren’t on this list. However, you can import an XML Property List, if you know how to create XML files.

Metadata can be added to ProRes, MP4, MP3 and QuickTime files.


Please rate the helpfulness of this tip.

Click on a star to rate it!

… for Apple Final Cut Pro X

Tip #1606: Change Metadata Labels for Video Exports

Larry Jordan – LarryJordan.com

Metadata can be embedded into ProRes, MP4, MP3 and QuickTime files.

The Project Metadata Inspector (top red arrow). The white arrow displays more metadata fields (bottom red arrow).

Topic $TipTopic

Have you ever wondered where those labels come from when you share (export) a file? These labels are stored as project metadata.

Here’s how to change them:

  • Select the project in the Browser.
  • Click the “trident” arrow in the Inspector (top arrow in screen shot). This displays the project metadata.
  • Change the text in any field.
  • Or, click the white down arrow (bottom red arrow in screen shot) to display more than a dozen other metadata fields that can be added to your export.

These will be retained in the project until you change them.

EXTRA CREDIT

You can also add metadata to videos using Compressor.


Please rate the helpfulness of this tip.

Click on a star to rate it!

… for Apple Final Cut Pro X

Tip #1605: How to Reset a Slomo Clip to Normal

Larry Jordan – LarryJordan.com

Shift + N is the shortcut to reset clips to 100% speed.

The Retiming menu under the Viewer.

Topic $TipTopic

When you need to reset a slow motion clip back to 100% speed, the easiest way to do this is to choose Modify > Retiming > Normal (100%).

This matches the speed of the clip to the frame rate of your project.

EXTRA CREDIT

You can also use the Retiming menu underneath the Viewer (see screen shot) or the shortcut: Shift + N.


Please rate the helpfulness of this tip.

Click on a star to rate it!