… for Adobe Premiere Pro CC

Tip #1465: Add Different Marker Colors in Real-Time

Larry Jordan – LarryJordan.com

All eight marker colors can have keyboard shortcuts.

The red box indicates which menu options add markers of different colors.

Topic $TipTopic

A reader asks: “Is it possible to create different color markers during playback in Premiere? I could then highlight answers during an interview in real-time.” The answer is: Yes. Here’s how.

There are eight different marker colors in Premiere, but only the green version has a default keyboard shortcut.

Open Premiere Pro > Keyboard Shortcuts (Windows: Edit > Keyboard Shortcuts).

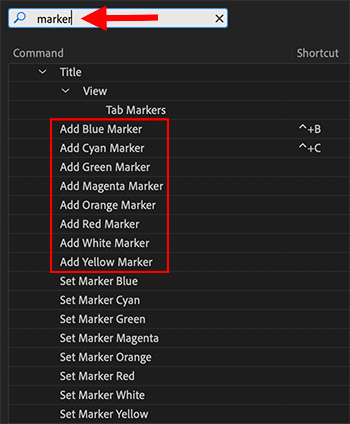
Search for “marker” (top red arrow in screen shot).

In the Title section, you’ll see eight uanassigned options to add a marker for each color (red box in screen shot).

In this example, I assigned shortcuts to add Blue and Cyan markers.

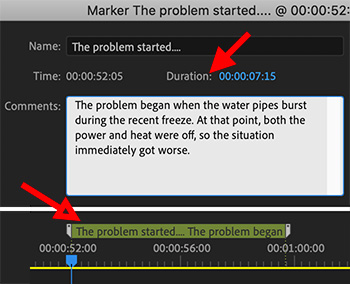
During playback, typing these shortcuts adds markers in real time. As always, if the clip is selected, the marker is added to the clip. If nothing is selected, the marker is added to the timeline.


Please rate the helpfulness of this tip.

Click on a star to rate it!

… for Adobe Premiere Pro CC

Tip #1469: Set a Marker Range

Larry Jordan – LarryJordan.com

Marker durations are very useful for transcripts.

Set a marker duration in the Edit Marker dialog. A range marker is illustrated below.

Topic $TipTopic

Normally, a marker in Premiere indicates a specific point in time. However, you can extend a marker to cover a range in the timeline. This technique is good for adding transcriptions, marking selected regions of a quote, or whenever you need to indicate something that takes time.

Here’s how:

  • Add a marker to a clip or timeline.
  • Double-click the marker to open the Edit Marker dialog.
  • Change the Duration (top red arrow) timecode to reflect the duration of the marker.

NOTE: This measures the duration of a marker, not the marker’s location in the timeline.

EXTRA CREDIT

Once a duration is applied to a marker, you can change it by dragging either the start or ending marker to a new timeline location (bottom red arrow).


Please rate the helpfulness of this tip.

Click on a star to rate it!

… for Adobe Premiere Pro CC

Tip #1471: Four Faster Timeline Mouse Shortcuts

Larry Jordan – LarryJordan.com

Pressing different modifier keys changes behavior.

The Adobe Premiere Pro logo.

Topic $TipTopic

Here are four mouse shortcuts you can use in Premiere’s timeline to move around faster; plus one that you already know.

TIMELINE

  • Scroll wheel. Rolls the timeline up or down.
  • Option + scroll wheel. Zooms into, or out of, the current position of the cursor; not the playhead.
  • Cmd + scroll wheel. Move the timeline left or right.
  • Control + scroll wheel. Depending upon the position of the cursor, not the playhead, scrolls the video or audio tracks up or down.

TRACK HEADER

  • Option + scroll wheel. Enlarges or shrinks the vertical height of video or audio tracks, depending upon the position of the cursor, not the playhead.

Please rate the helpfulness of this tip.

Click on a star to rate it!

… for Adobe Premiere Pro CC

Tip #1457: Premiere’s Floating Timecode Panel

Larry Jordan – LarryJordan.com

The floating timecode panel provides real-time display of project durations.

This is the full-size floating timecode panel in Premiere.

Topic $TipTopic

Premiere has a floating timecode panel which simplifies tracking project durations and selections.

This panel displays the timecode for:

  • The current location for the playhead
  • The total duration for the active sequence
  • The duration between the current timeline In and Out

To display this panel, go to Window > Timecode.

EXTRA CREDIT

If you are tight on space, go to the small “pancake” menu in the top right corner and select Compact. Same information in less space.


Please rate the helpfulness of this tip.

Click on a star to rate it!

… for Adobe Premiere Pro CC

Tip #1458: Quick Sky Enhancement

Larry Jordan – LarryJordan.com

Gradients, combined with blend modes, can quickly create amazing looks.

The gradient (top), original image (center) and composite using Overlay blend mode.

Topic $TipTopic

Here’s a fast way to improve the look of a cloud-filled sky, using a simple gradient and a blend mode in Premiere.

Take a look at the middle image in the screen shot. It is an OK shot of the sky, but doesn’t have any “pop.”

  • Create a simple gradient in Photoshop, similar to the screen shot, that roughly corresponds to the position of the sky.
  • Stack the gradient above the clip with the sky in the timeline.
  • Apply Effect Controls > Opacity > Blend mode > Overlay to the gradient clip. This darkens the sky and brightens the foreground.

As you can see in the right side of the screen shot, the sky is a LOT more dramatic!

EXTRA CREDIT

If you don’t want the foreground brightened, either replace the white in the gradient with transparency, or use an Opacity mask to cut the gradient at the horizon line. (This was what we did here.)


Please rate the helpfulness of this tip.

Click on a star to rate it!

… for Adobe Premiere Pro CC

Tip #1459: A Hidden Keyframe Menu

Larry Jordan – LarryJordan.com

Control-click a keyframe to reveal the keyframe controls menu.

Control-click a keyframe to view the keyframe control menu in Effect Controls.

Topic $TipTopic

Most of the time, we add a keyframe and move on. But, hidden in the Effect Controls panel is a wide range of keyframe options that can add life to your visual effects.

After applying a keyframe to an effect, scroll to the right in the Effect Controls window and Control-click the keyframe you want to adjust.

The options in this menu support:

  • Copying and pasting keyframe settings
  • Adding curves to keyframes
  • Adding acceleration and deceleration to a keyframe

As you change settings the icon applied to the modified keyframe changes as well.


Please rate the helpfulness of this tip.

Click on a star to rate it!

… for Adobe Premiere Pro CC

Tip #1445: Change a Sequence Starting Timecode

Larry Jordan – LarryJordan.com

All Premiere sequences start at timecode: 00:00:00:00. This can be changed.

Change starting timecode from the pancake icon, top, then use the dialog to specify options.

Topic $TipTopic

Timecode is an essential element in any video edit. Even if you aren’t paying attention, Premiere uses timecode to properly place and edit every clip, keyframe and edit point in your sequence.

Most of the time, the default starting timecode of 00:00:00:00 (Hours : Minutes : Seconds : Frames) is fine. The web will work with any timecode.

However, there are occasions when a different timecode is needed. The good news is that changing starting timecode is easy and can be done at any time.

Here’s how.

  • Go to the “pancake” menu in the top left corner of the timeline (see screen shot) and select Start Time.

In the popup dialog that appears, you can:

  • Set the starting timecode (just type numbers, Premiere will add punctuation)
  • Click a checkbox to make that timecode the default for future sequences.
  • Or, set timecode for the sequence to match the timecode of the first clip you edit into the sequence.

NOTE: This last option can be handy if you are matching a bunch of clip shot using real time timecode.

  • Click OK and your timecode is changed.

Done.

EXTRA CREDIT

You can also change the starting timecode of a sequence when you export it using File > Export > Media.

Use Set Start Timecode, at the very bottom of export window, to change the starting timecode.


Please rate the helpfulness of this tip.

Click on a star to rate it!

… for Adobe Premiere Pro CC

Tip #1446: Match Captions to Sequence Timecode

Larry Jordan – LarryJordan.com

Caption timecode only matters when exporting a finished sequence.

The Captions options panel, in File > Export > Media.

Topic $TipTopic

JZ recently sent me an email worried that his caption timecode didn’t match the timecode of where the captions were to appear in his Premiere sequence.

Worse, there was no way he could find to change the caption timing.

The answer, as Gandalf once said, is easy once you know it. An SRT caption file is a file like any other video file – except it contains captions. Timecode doesn’t matter when you import, only when you export.

In other words, after you import a caption file:

  • Put the playhead where you want the captions to start in the timeline.
  • Select the caption file in the Project panel.
  • Edit the caption file to the position of the playhead in the timeline.

NOTE: Remember, captions always need to be the top track in your sequence.

Just as you can put a video clip anywhere – regardless of the timecode of that video clip, you can do the same with a caption file. The key is to place the start of the captions in the right spot.

EXPORTING

When it comes time to export the captions, once they are placed in a sequence, choose File > Export > Media.

  • In the Export Settings dialog, click the Captions tab.
  • Set Export Options to Create Sidecar File
  • Set File Format to SubRip Subtitle Format (SRT)

This creates a separate SRT caption file whose timecode matches the sequence.


Please rate the helpfulness of this tip.

Click on a star to rate it!

… for Adobe Premiere Pro CC

Tip #1447: Change Caption Timing

Larry Jordan – LarryJordan.com

Caption timing is adjusted in the timeline, similar to trimming clips.

A caption clip with three trimmed captions inside.

Topic $TipTopic

In Premiere, captions are contained in a caption file. As the screen shot illustrates, multiple captions are stored in the same file.

  • To change the duration of a caption, drag an edge; this is similar to trimming a clip.
  • To change the location of a caption, click in the center and drag the caption.
  • To delete a caption, click it, then press the big Delete key.
  • To add a new caption, double-click the caption file in the timeline to open the Caption panel. Click the Plus button in the lower right corner to add a new caption at the position of the playhead.
  • To correct a typo, use the same Caption panel.

EXTRA CREDIT

You can also use the Caption panel to adjust formatting and alignment.


Please rate the helpfulness of this tip.

Click on a star to rate it!

… for Adobe Premiere Pro CC

Tip #1414: New Features in Premiere Pro

Larry Jordan – LarryJordan.com

Monthly improvements include faster audio rendering, exports and bug fixes.

The speed improvements (shorter is better) for the new audio optimization in Premiere (orange bars).

Topic $TipTopic

Last week, Adobe released a few performance updates for Premiere Pro and Premiere Rush that are available immediately as part of Adobe’s monthly release cadence. 

These updates include faster exports and audio filter improvements in Premiere Pro, and comprehensive performance improvements for Premiere Rush on iOS.

Premiere Pro

  • Audio Filter Performance Improvements in Premiere Pro: faster audio effect rendering delivers speed gains ranging from 20-80%; optimized audio effects include Analog Delay, Automatic Click Remover, DeEsser, DeNoise, DeReverb, Notch Filter and Mastering (see graph)
  • Faster exports for H.264 and HEVC on macOS
  • Plus several bug fixes.

Learn more about changes in Premiere.

Premiere Rush

  • Performance improvements on iOS: optimizations deliver better battery life, less heating, and faster exports

Learn more about changes in Premiere Rush.


Please rate the helpfulness of this tip.

Click on a star to rate it!