… for Adobe Premiere Pro CC

Tip #1415: Bugs Fixed in 2021 Premiere Updates

Larry Jordan – LarryJordan.com

Adobe continues their push to improve stability. Here’s what they fixed recently.
The Adobe Premiere Pro logo.

Topic $TipTopic

Adobe continues their push to improve the stability of Premiere Pro. Here’s the list of bugs they fixed in the February, 2021, update to Adobe Premiere Pro:

  • Fixed issue with Durations when seeting minimum values in the Essential Sound panel
  • Fixed issue with rolling edits when rulers are displayed in the Program Monitor
  • Improved stability when sending sequence with Essential Sound Panel effects to AU
  • Fixed issue with contextual menus and Track resizing when renaming tracks
  • Fixed issue where Extensions were displayed as greyed out
  • Fixed issue where Ghosts projects were created when saving in some virtualized environments

Here’s what was fixed in the January, 2021, update to Adobe Premiere Pro:

  • Home screen panels don’t resize correctly with high resolution displays.
  • Improved stability when quitting immediately from Home Screen.
  • Marquee selection fails to select video track.
  • Images are squeezed horizontally when scaled below 50% in non-square pixel aspect ratio sequence.
  • Media Browser icons appear incorrect on macOS Big Sur.
  • Block noises when importing some Canon MP4 files.
  • Application may hang when changing playback setting to software only with ProRes RAW on macOS.
  • DVCPro HD file fails to import.
Please rate the helpfulness of this tip.

Click on a star to rate it!

… for Adobe Premiere Pro CC

Tip #1416: Tips to Export HDR Media

Larry Jordan – LarryJordan.com

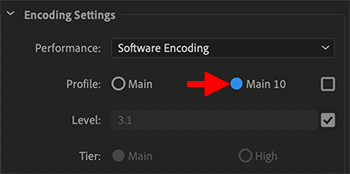
In both cases, uncheck Profile to gain access to the right compression settings.

The Main 10 profile, when HEVC is selected as the compression format.

Topic $TipTopic

If you are working with HDR (High-Dynamic Range) media, deciding how to export it can be tricky.

Normally, you’d probably export a high-end ProRes file to maintain the 10-bit depth that HDR requires for both extended color and gray-scale. However, you can also use H.264 or HEVC. Here are key settings.

H.264

  • H.264 only supports the HLG format for HDR. When exporting make sure to set the Format menu (at the top) to H.264.
  • Then, uncheck Profile and set it to High10.

NOTE: All the other H.264 profiles only support 8-bit media.

HEVC

  • HDR in HEVC requires you use the 10-bit setting. Set the Format menu to HEVC (H.265).
  • Then, uncheck Format and set it to Main 10.

However, most computers do not support hardware accelerated 10-bit compression, so expect the output to take several hours to complete.


Please rate the helpfulness of this tip.

Click on a star to rate it!

… for Adobe Premiere Pro CC

Tip #1370: intoPIX JPEG XS Now Supports Premiere

Larry Jordan – LarryJordan.com

intoPIX offers JPEG codec optimized for large frame sizes and speed.

The intoPIX JPEG XS logo.

Topic $TipTopic

intoPIX, provider of innovative image processing solutions, announced the launch of its JPEG XS Plugin for Adobe Premiere for video editing and live streaming. An innovative solution that significantly speeds up the pre- and post-production pipeline in JPEG XS format.

“Our plugin creates a perfect match between a versatile tool and the low-complexity, low latency codec that will preserve the picture quality” explains Justine Hecq, Product Marketing and Business Development Manager. “It grants Adobe Premiere users hassle-free access to 10 times the data space, compared to using uncompressed video.”

The new Plugin is embedding the FastTICO-XS SDK and meets all the requirements to switch to a JPEG XS-based workflow effortlessly: super-fast encoding and decoding, support of all resolutions from HD, 4K to 8K, a wide range of pixel formats (4:2:2, 4:4:4,…), MXF wrapping and audio support. Moreover, it does not require a high loading process: you can achieve all of this using a normal Intel or AMD processor.

NOTE: Missing from this list is support for M1 Macs.

Here’s a link to learn more.


Please rate the helpfulness of this tip.

Click on a star to rate it!

… for Adobe Premiere Pro CC

Tip #1395: Saturation vs. Vibrance

Larry Jordan – LarryJordan.com

Vibrance is a better choice for boosting color saturation for video clips.

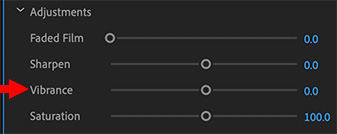
The Vibrance setting in the Lumetri Color > Creative panel.

Topic $TipTopic

What’s the difference between Vibrance and Saturation? Something significant, actually. Both these settings are in the Lumetri Color > Creative panel.

The short answer is that when you need to adjust saturation, you may get better results by using Vibrance, than Saturation, especially if there are a lot of highlights or shadows in your image.

  • Saturation. Adjusts the saturation of all colors in the clip equally from 0 (monochrome) to 200 (double the saturation).
  • Vibrance. Adjusts the saturation so that color clipping is minimized as colors approach full saturation. This setting changes the saturation of all lower-saturated colors, while having less effect on the higher-saturated colors. Vibrance also prevents skin tones from becoming oversaturated.

Please rate the helpfulness of this tip.

Click on a star to rate it!

… for Adobe Premiere Pro CC

Tip #1396: Change a Specific Setting – FAST!

Larry Jordan – LarryJordan.com

Prevent accidents – select the setting you want to change first!

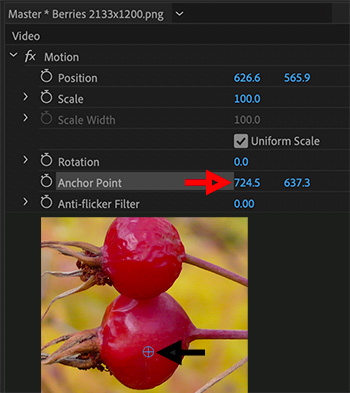
Motion settings in Effect Controls can be set on-screen by selecting the setting, then dragging the on-screen icon.

Topic $TipTopic

Normally, when we want to change the position, scale or rotation of a clip, we go to the Effect Controls panel and start tweaking numbers.

If, instead, you click the word “Motion” in the Effect Controls panel, several blue on-screen controls light up in the Program Monitor. These allow us to change position, scale or rotation depending upon the control you drag.

However, sometimes you don’t want all that choice. Specifically, you may want to change only one setting – say the Anchor Point – without changing anything else.

We can do that!

Simply click the name of the setting you want to change in the Effect Controls panel, then drag the appropriate icon in the Program Monitor.

For example, in the screen shot, I selected Anchor Point, then dragged the blue cross-hair in the Program Monitor. With only one setting selected, only one setting got changed.


Please rate the helpfulness of this tip.

Click on a star to rate it!

… for Adobe Premiere Pro CC

Tip #1369: Premiere Pro, Big Sur & M1 Macs

Larry Jordan – LarryJordan.com

Premiere supports Big Sur, but only partially supports M1 Macs

Topic $TipTopic

Just a quick FYI.

Premiere Pro is compatible with macOS Big Sur (version 11) and there are no known issues at this time. For the best experience, Adobe recommends running the latest version of Premiere Pro.

Premiere Pro 14.6 onwards will run under Rosetta 2 emulation mode on Apple devices with Apple Silicon M1 processors with this known issue: keyboard shortcuts appear grayed-out, but still work.

A new version of Premiere Pro with native support for Apple M1 systems is currently in Beta. You can install the Premiere Pro Beta from the Beta tab in the Creative Cloud Desktop.

Here’s the link to Adobe’s help with more information.


Please rate the helpfulness of this tip.

Click on a star to rate it!

… for Adobe Premiere Pro CC

Tip #1372: Premiere Pro – Sundance NLE of Choice

Larry Jordan – LarryJordan.com

68% of Sundance films were edited on Adobe Premiere Pro.

The Adobe logo.

Topic $TipTopic

Adobe last week announced that Adobe Premiere Pro was used by more filmmakers taking part in the 2021 Sundance Film Festival than any other video editing system.

According to an Adobe blog, 68% of films used the Premiere Pro video editing software on their films; this is the third year in a row that Premiere Pro was the most used editing tool among Sundance Film Festival entrants. In addition, Adobe says that 89% of the 2021 lineup is powered by Creative Cloud tools, including After Effects and Photoshop.

Throughout the Festival you will also be able to see ‘When I Tell the Story’, Adobe’s short spot highlighting the work of Sundance Institute alumni Ro Haber (2019 Momentum Fellow), Natalie Erika James (2021 Momentum Fellow & 2021 Sundance Film Festival), Amber Fares (2019 Momentum Fellow), Rachael Moton (2019 Sundance Ignite x Adobe Fellow) — and co-directed and edited by Carol Nguyen (2018 Sundance Ignite x Adobe Fellow).

The 2021 Sundance Film Festival is taking place primarily virtually from Jan. 28-Feb. 3.


Please rate the helpfulness of this tip.

Click on a star to rate it!

… for Adobe Premiere Pro CC

Tip #1373: New Features in the Latest Premiere Release

Larry Jordan – LarryJordan.com

New features, faster performance and more inclusion.

The Adobe Premiere Pro icon.

Topic $TipTopic

Late last week, Adobe released a handful of new feature updates and performance improvements for Premiere Pro and After Effects.

Premiere Pro

  • Timecode Support for Non-Standard Frame Rates – Added support to display and use any non-standard frame rate timecodes, such as 120fps, 240fps or VFR clips.
  • Color space and Gamma changes – The default working space and Gamma curve is modified for all RED files.
  • Performance improvements in H.264/HEVC encoding for Intel TigerLake processors.

Learn more.

After Effects

  • New Lighting Correction in Content-Aware Fill – Handle lighting shifts in footage better with improved Content-Aware Fill. The new Lighting Correction helps you cleanly remove objects from footage where harsh lighting changes occur throughout the footage.
  • Color Space and Gamma Changes – The default working space and Gamma curve is modified for all RED files.

Learn more.


As well, Adobe announced it will be updating terminology across Premiere Pro, After Effects and Audition to provide an inclusive toolset for all users.

Learn more.


Please rate the helpfulness of this tip.

Click on a star to rate it!

… for Adobe Premiere Pro CC

Tip #1357: Customize the Timeline

Larry Jordan – LarryJordan.com

The Wrench icon – in any panel – is the key to customization.

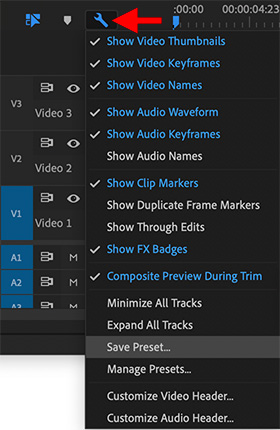
The timeline customization menu. Blue indicates active elements.

Topic $TipTopic

The Timeline Wrench icon provides many ways to customize the timeline in Premiere. Located in the top left corner of the timeline (see screen shot), blue elements are active.

Those labeled “Show” affect the display of elements in the Timeline.

The two “Customize” options determine which icons are displayed for video and audio tracks. (By default, all icons are visible.)

Tip #1358 discusses the Save and Manage Preset options.

EXTRA CREDIT

The easiest way to see what the “Show” options do is to uncheck them and watch what happens. Changing these has no effect on your media, edit or project; they only affect the display of objects in the timeline.


Please rate the helpfulness of this tip.

Click on a star to rate it!

… for Adobe Premiere Pro CC

Tip #1358: Save & Manage Timeline Presets

Larry Jordan – LarryJordan.com

Track height presets only change the height of tracks, which can also be assigned keyboard shortcuts.

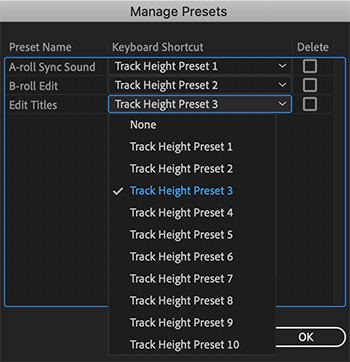
The Manage Presets window. Accessed using the timeline Wrench icon.

Topic $TipTopic

One of the challenges in any large edit is seeing what you’ve got across all the tracks you are working with. Track Height presets make this easy. Here’s how.

There are a variety of ways to change the height of tracks:

  • Type Shift + [plus] to maximize all track heights
  • Type Shift + [minus] to minimize all track heights
  • Type Cmd + [plus]/[minus] to change video track heights
  • Type Option + [plus]/[minus] to change audio track heights
  • Drag the horizontal line between tracks in the track header up or down

CREATE A PRESET

Let’s say that you like minimizing all tracks EXCEPT V1, A1 & A2, which you want taller for dialog editing.

  • Configure the track heights as you wish.
  • Then, click the Wrench icon in the top left corner of the timeline and choose Save Preset.
  • Give the Preset a name and click OK.

You can assign keyboard shortcuts to these by searching for “Height” in the Keyboard Shortcuts window.

NOTE: Saved presets appear in the timeline Wrench menu.

MANAGE PRESETS

Go to the timeline wrench menu and choose Manage Presets (see screen shot).

Here you can reassign keyboard shortcuts, as well as delete any presets you no longer need.


Please rate the helpfulness of this tip.

Click on a star to rate it!