… for Adobe Premiere Pro CC

Tip #1359: How to Find Available Shortcuts

Larry Jordan – LarryJordan.com

Any shortcut can have multiple keys assigned to it.

Shortcuts with no key assigned (top). Notice one shortcut has two keys assigned (blue box).

Topic $TipTopic

Adobe Premiere Pro has hundreds of potential keyboard shortcuts – but only a fraction of these are enabled. Here’s how to find what’s missing.

One of my favorite pastimes is looking for unassigned keyboard shortcuts. (Yes, I know, I need a life.)

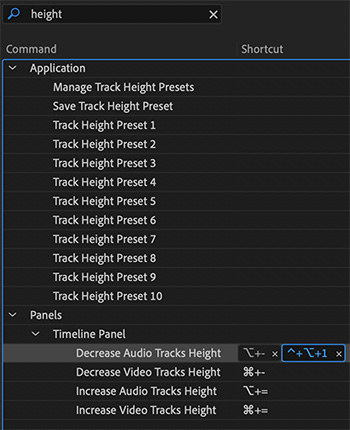
Open the Keyboard Shortcuts window (Edit menu for Windows, Premiere Pro menu for Mac).

In the search box on the lower left enter the word or partial word you want to find. (“height” in the screenshot example.) This searches all shortcut titles and text and displays whatever it finds.

NOTE: I generally search on partial words to find the most potential shortcuts that I can.

Using different words will find different shortcuts. Don’t assume Adobe calls stuff the same thing you do.

  • If no key combination is assigned, the Shortcut field will be empty (top of screen shot).
  • If a key combination is assigned, you’ll see it to the right of the name (see bottom four entries in screen shot).

You can assign more than one key combination to the same shortcut. I use this to match shortcuts between Premiere and Final Cut so I don’t keep tripping over the wrong shortcut.

NOTE: To add a shortcut, double-click the gray area in the Shortcut column, or to the right of any existing assigned key.

To remove a shortcut, click the small “x” next to the key combination.


Please rate the helpfulness of this tip.

Click on a star to rate it!

… for Adobe Premiere Pro CC

Tip #1333: Set vs. Scale to Frame Size

Larry Jordan – LarryJordan.com

For greatest flexibility, always choose “Set to Frame Size” when scaling images.

When scaling an image, the best option is to select “Set to Frame Size.”

Topic $TipTopic

When placing an image, or video, that has a different size from the sequence, Premiere provides three different ways to scale it. But not all these choices are good ones.

When the clip frame size and sequence frame size don’t match, Premiere offers three options:

  • None. This places the image at 100% size in the timeline, regardless of the sequence frame size.
  • Scale to Frame Size. This scales the image to fit in the sequence frame, but does not change the Scale setting in the Effect Controls panel. This means that you don’t know how much the size of an image has been changed.
  • Set to Frame Size. This scales the image to fit in the sequence frame AND changes the Scale setting in the Effect Controls panel to indicate how much the image size changed.

You can create a default setting using the Default Media Scaling menu in Preferences > Media. Or you can set these individually for each clip by control-clicking the clip in the Timeline. (See screen shot.)

If you want to create “Ken Burns” style moves on stills, None is the best choice.

Otherwise, use Set to Frame Size. This fits the image into the frame and shows how much it was scaled in the Effect Controls panel.

NOTE: I can’t think of any reason to use Scale to Frame Size.

EXTRA CREDIT

Image quality degrades if you enlarge an image much more than 100%.


Please rate the helpfulness of this tip.

Click on a star to rate it!

… for Adobe Premiere Pro CC

Tip #1334: Frame Hold vs. Frame Hold Segment

Larry Jordan – LarryJordan.com

When pausing the action, a frame hold segment provides the most flexibility.

The Frame Hold options available for each clip.

Topic $TipTopic

In the past, when we needed to freeze the action, we created a stand-alone freeze frame by exporting a still, then, reimporting it and adding it to the Premiere timeline. But, there’s a much better way: Frame Hold.

A Frame Hold is attached to the source clip, rather than a separate piece of media. To create it, put the playhead on the frame you want to freeze, then control-click the clip in the timeline. Scroll about half way down to find two options:

  • Add Frame Hold
  • Insert Frame Hold Segment.

Add Frame Hold freezes the frame at the position of the playhead and replaces the rest of the clip with the freeze. This is useful when you want to create a freeze, then add a transition.

Insert Frame Hold Segment inserts a two-second freeze at the position of the playhead, then returns to the original video. This is useful when you want to pause the action – say to add a graphic – then return to the action.

EXTRA CREDIT

You can trim the duration of the Frame Hold Segment as long as you use the yellow trimming tool. Rolling the edit point will break the sync between the two shots.


Please rate the helpfulness of this tip.

Click on a star to rate it!

… for Adobe Premiere Pro CC

Tip #1335: Add Ease In / Ease Out to Keyframes

Larry Jordan – LarryJordan.com

To access Ease In/Out settings, control-click a keyframe and adjust the temporal options.

Control-click a keyframe to adjust timing and movement options.

Topic $TipTopic

Motion keyframes in Adobe Premiere Pro support changing the speed of movement as you approach or leave the keyframes. Here’s how.

Control-click a keyframe in the Effect Controls panel, then choose Temporal Interpolation.

  • Linear means all speeds are constant.
  • Bezier means that speeds can vary.
  • Ease In adjusts the animation speed coming into a keyframe, slowing it down on the approach. Selecting this option also selects Bezier in this same menu.
  • Ease Out adjust the animation speed leaving a keyframe, accelerating as it leaves the keyframe. Selecting this option also selects Bezier in this same menu.

To remove the Ease In / Out settings, simply re-select Linear from this menu.


Please rate the helpfulness of this tip.

Click on a star to rate it!

… for Adobe Premiere Pro CC

Tip #1318: Interesting Ways to Flip a Transition

Larry Jordan – LarryJordan.com

Remember, wipe transitions are designed to break your story and take viewers somewhere “else.”

Flip transition settings (top) and the results (bottom).

Topic $TipTopic

The Flip Over transition in Adobe Premiere has several hidden settings that can make this transition more interesting. Let me show you.

  • Select the edit point between two clips.

NOTE: Any transition needs “handles,” extra media before the In and after the Out, in order to exist.

  • Apply Effects > Video Transitions > 3D Motion > Flip Over.
  • Select the transition icon in the timeline, then open the Effect Controls panel.
  • The four small arrows (top red arrow) determine the direction of the wipe.
  • Show Actual Sources (middle red arrow) displays the video clips on either side of the selected transition.
  • Custom (bottom arrow) opens a dialog where the number of bands and the background color can be changed.

NOTE: There is no option to make the background transparent.

These options can make an overused transition look more interesting and fresh. Feel free to play.


Please rate the helpfulness of this tip.

Click on a star to rate it!

… for Adobe Premiere Pro CC

Tip #1319: Customize a Zoom Cut

Larry Jordan – LarryJordan.com

The key to making this transition invisible is to find matching colors in the two shots.

The small white circles indicate the targets for a zoom cut.

Topic $TipTopic

A Zoom cut zooms into the middle of a clip, cuts to a second shot, then zooms back out. What you may not know is that this transition can be customized to make it even more effective.

  • Apply Effects > Video Transitions > Zoom > Cross Zoom to a transition in the timeline.

NOTE: Any transition needs “handles,” extra media before the In and after the Out, in order to exist.

  • Select the transition in the timeline.
  • Open the Effect Controls panel and check Show Actual Sources.
  • In addition to showing images of the actual timeline clips, these small thumbnails also show two white circles (indicated by red arrows in the screen shot). These white circles define the target of each zoom.
  • Drag these “zoom targets” so that they both are on top of reasonably matching colors.

Now, when you zoom, the cut will occur when both shots display similar colors, making the actual transition harder to see and, therefore, more convincing.


Please rate the helpfulness of this tip.

Click on a star to rate it!

… for Adobe Premiere Pro CC

Tip #1320: What Does “Ganging Monitors” Do?

Larry Jordan – LarryJordan.com

Ganging plays two clips in sync to help figure out the best place to place an edit.

Set ganging using the menu under the Wrench icon in the Program Monitor.

Topic $TipTopic

When you display the Wrench icon menu in either the Source or Program monitors, the first choice is “Gang Source and Program.” What does this do?

Ganging plays two clips in sync – one in the Source panel and the other in the Program Monitor – to help you figure out the best place to place an edit.

To set this up, open a clip into the Source monitor.

Then, place the playheads in both the Source panel and timeline on the frame where you want each clip to start.

Click the Wrench icon in the Program Monitor and select Gang Source & Program from the popup menu.

Now, as you drag the playhead in the timeline, the Source monitor will follow along; perfectly in sync.


Please rate the helpfulness of this tip.

Click on a star to rate it!

… for Adobe Premiere Pro CC

Tip #1301: Enable High Quality Playback

Larry Jordan – LarryJordan.com

High-quality compensates for the visual difference when playing or pausing a clip.

Topic $TipTopic

Premiere allows control over playback quality and resolution. By default High Quality Playback is turned off. When should you turn it on?

Here’s the answer, from Adobe Help.

NOTE: Click the Wrench icon in either the Source or Program Monitors to see these menu options.

Playback vs. Paused Resolution

Some formats are difficult to display in full-motion playback, due to their high compression or high data rate. A lower resolution permits faster motion playback, but at the expense of display image quality. This tradeoff is most visible when viewing AVCHD and other H.264 -codec based media. Below full resolution, these formats have error correction turned off, and artifacts are common during playback. These artifacts, however, do not show up in exported media.

Providing separate playback and pause resolutions gives you more control over your monitoring experience. With high-resolution footage, you can set playback resolution to a lower value (for example, 1/4) for smooth playback, and set the pause resolution to Full. These settings allow you to check the quality of focus or edge details when playback is paused. Scrubbing puts the monitor in playback resolution, not pause resolution.

Not all resolutions are available for all sequence types. For Standard Definition sequences, such as DV, only Full and 1/2 are available. For many HD sequences up to 1080 frame size, Full, 1/2, and 1/4 are available. For sequences with frame sizes larger than 1080, such as RED, more fractional resolutions are available.

High Quality Playback

To optimize playback performance, playback quality at any of the monitor’s playback resolutions (Full, ½, and ¼) is lower than it is when pausing the video. Due to the difference in quality, users may notice a slight “bump” in image quality between playback and pause. Frames can have a slightly softer look during playback versus pause at the default settings, even when both are set to full resolution. With High-Quality Playback toggled on, the quality of playback frames will match paused frames when they’re set to the same resolution and eliminate the quality “bump” when starting and stopping playback. However, turning High-Quality Playback on can decrease playback performance, including causing dropped frames.

EXTRA CREDIT

For my projects, I set:

  • Playback resolution to 1/2
  • Paused Resolution to Full
  • And turn High Quality Playback off

When I get a newer/faster system, I’ll turn High Quality on.


Please rate the helpfulness of this tip.

Click on a star to rate it!

… for Adobe Premiere Pro CC

Tip #1302: Surprising Preview Resolutions

Larry Jordan – LarryJordan.com

Be careful – preview files may not match your source file resolution.

Topic $TipTopic

Render file resolution can vary, depending upon two hidden settings. Here’s what you need to know to avoid problems.

According to the Help files for Adobe Premiere:

If your previews are rendered at a resolution below the sequence resolution, the playback resolution is actually a fraction of the preview resolution.

For example, you can set your preview files to render at 1/2 the sequence frame size (1/2 resolution) and your playback resolution to 1/2 resolution. The rendered previews play back at 1/4 of original resolution (assuming that the resolution of the original media matched the sequence resolution).

NOTE: You can set keyboard shortcuts to change the playback resolution.

Not all resolutions are available for all sequence types. For Standard Definition sequences, such as DV, only Full and 1/2 are available. For many HD sequences up to 1080 frame size, Full, 1/2, and 1/4 are available. For sequences with frame sizes larger than 1080, such as RED, more fractional resolutions are available.

EXTRA CREDIT

This possible resolution difference is why I never use existing preview files when exporting. I always want to be sure exports are at the highest resolution.

Here’s the link to Adobe’s Help for more information.


Please rate the helpfulness of this tip.

Click on a star to rate it!

… for Adobe Premiere Pro CC

Tip #1278: Jump in Time

Larry Jordan – LarryJordan.com

Typing in timecode is often faster and more precise than dragging the playhead.

Click and enter either absolute or relative timecode values.

Topic $TipTopic

Here’s a quick tip to help you move around Premiere’s timeline more easily.

Double-click the timecode display in the top left corner of the timeline, then enter the timecode position where you want to move the playhead.

NOTE: Unlike earlier versions of Premiere, you only need to enter digits, not punctuation.

  • To jump to an absolute timecode reference, enter the full number (i.e. 00001000 in the screen shot).
  • To jump a relative distance to the right, enter the amount you want to move as a positive number (i.e. +25 jumps 25 frames forward).
  • To jump a relative distance to the left, enter the amount you want to move as a negative number (i.e. -215 jumps 2 seconds, 15 frames back).

NOTE: If you enter 75, Premiere will automatically calculate the number of seconds and frames to move the playhead based on the frame rate of the sequence.

EXTRA CREDIT

In the timecode display, a semi-colon before the frame number indicates drop-frame timecode. All colons means non-drop frame timecode.


Please rate the helpfulness of this tip.

Click on a star to rate it!