Media Apple FCP X

… for Codecs & Media

Tip #882: What is Resolution?

Larry Jordan – LarryJordan.com

DPI is irrelevant for digital media. The key setting is total pixels across & down.
The New Image menu in Photoshop.

Topic $TipTopic

When you create a new image in Photoshop, one of the parameters you need to set is Resolution. But, is resolution even relevant for digital media?

The short answer is: No.

Resolution is a print term that defines – for a fixed size image – how many pixels fit into a given space.

Digital media is the opposite. The number of pixels is fixed, but the size of the shape – the monitor – varies widely.

When creating images for the web, we have standardized on a resolution setting of 72. NOT because this is an accurate setting, it isn’t. Rather it’s to remind us to look only at total pixels across by total pixels down.

These are the pixels that will be spread to fit whatever sized monitor / frame they are displayed in.

EXTRA CREDIT

When creating images for the web or video, RGB 8-bit is the best and most compatible choice.


Please rate the helpfulness of this tip.

Click on a star to rate it!

… for Codecs & Media

Tip #849: 8 Reasons Why You Should Shoot Raw

Larry Jordan – LarryJordan.com

RAW files are bigger and require processing, but the advantages are worth it.

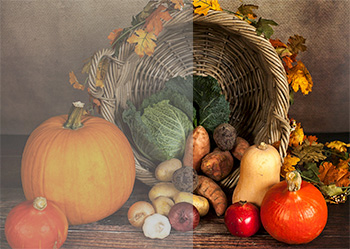
A simulated RAW (left) and corrected image. (Courtesy of Pexels.com)

Topic $TipTopic

This article, written by Rob Lim, first appeared in PhotographyConcentrate.com. This is an excerpt.

NOTE: This article was originally written for shooting still images in JPEG. However, these comments also apply to shooting video using AVCHD or H.264 codecs.

Raw is a file format that captures all image data recorded by the sensor when you take a photo. When shooting in a format like JPEG image information is compressed and lost. Because no information is compressed with raw you’re able to produce higher quality images, as well as correct problem images that would be unrecoverable if shot in the JPEG format.

NOTE: Raw is not an acronym. So, unless you are discussing ProRes RAW, it’s spelled lower case.

Here’s a list of the key benefits to shooting raw:

  1. Get the Highest Level of Quality
  2. Record Greater Levels of Brightness
  3. Easily Correct Dramatically Over/Under Exposed Images
  4. Easily Adjust White Balance
  5. Get Better Detail
  6. Enjoy Non-Destructive Editing
  7. Have an Efficient Workflow
  8. It’s the Pro Option

EXTRA CREDIT

The article linked at the top has more details on each of these points.


Please rate the helpfulness of this tip.

Click on a star to rate it!

… for Codecs & Media

Tip #851: A Comparison: Frame Size vs. File Size

Larry Jordan – LarryJordan.com

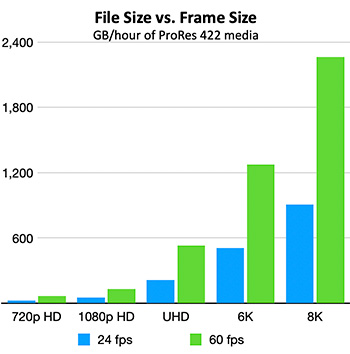
This chart, measured in GB/hour, illustrates how file size expands with frame size.

Topic $TipTopic

As frame sizes continue expanding to equal a living room wall, the accompanying file sizes explode as well.

This chart in this screen shot illustrates how quickly file sizes increase with frame size.

NOTE: This table is based on ProRes 422, at two frame rates: 24 fps and 60 fps. Shooting raw or log files would increase these file sizes about 2X.

Here are the source numbers for this chart.


Gigabytes Needed to Store 1 Hour of ProRes 422 Media

24 fps 60 fps
720p HD 26 66
1080p HD 53 132
UHD 212 530
6K 509 1,273
8K 905 2,263

(File sizes published by Apple in their ProRes White Paper.)


Please rate the helpfulness of this tip.

Click on a star to rate it!

… for Codecs & Media

Tip #852: What is ProRes RAW?

Larry Jordan – LarryJordan.com

ProRes RAW is a codec optimized for speed and quality.

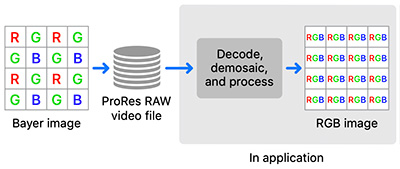
Processing flowchart for ProRes RAW. Note that image processing is done in the application, not camera.

Topic $TipTopic

Apple ProRes RAW is based on the same principles and underlying technology as existing ProRes codecs, but is applied to a camera sensor’s pristine raw image data rather than conventional image pixels.

ProRes RAW is available at two compression levels: Apple ProRes RAW and Apple ProRes RAW HQ. Both achieve excellent preservation of raw video content, with additional quality available at the higher data rate of Apple ProRes RAW HQ. Compression-related visible artifacts are very unlikely with Apple ProRes RAW, and extremely unlikely with Apple ProRes RAW HQ.

ProRes RAW is designed to maintain constant quality and pristine image fidelity for all frames. As a result, images with greater detail or sensor noise are encoded at higher data rates and produce larger file sizes.

ProRes RAW data rates benefit from encoding Bayer pattern images that consist of only one sample value per photosite. Apple ProRes RAW data rates generally fall between those of Apple ProRes 422 and Apple ProRes 422 HQ, and Apple ProRes RAW HQ data rates generally fall between those of Apple ProRes 422 HQ and Apple ProRes 4444.

NOTE: What is means is that, rather than creating RGB images in camera, which triples file size, the raw image is processed later, in the application. This still provides the highest image quality, but decreases the size of the native raw files.

Like the existing ProRes codec family, ProRes RAW is designed for speed. Raw video playback requires not only decoding the video bitstream
but also demosaicing the decoded raw image. Compared to other raw video formats supported by Final Cut Pro, ProRes RAW offers superior performance in both playback and rendering

EXTRA CREDIT

Here’s the link to Apple’s ProRes RAW white paper, which contains much more information on this format.


Please rate the helpfulness of this tip.

Click on a star to rate it!

… for Codecs & Media

Tip #782: Compare Proxy Files to Source Media

Larry Jordan – LarryJordan.com

Proxy files are optimized for editing and small file size.

Topic $TipTopic

Here’s a table that compares proxy file storage and bandwidth requirements to source media.

Keep in mind that unlike H.264, proxy files are optimized for editing. H.264 is often difficult to edit on older or slower systems.

Data Rates and Storage Needs for UHD Media
4K Media Frame rate Bandwidth Store 1 Hour
H.264 30 fps 18.75 MB/sec 67.5 GB
ProRes Proxy 30 fps 22.75 MB/sec 82 GB
ProRes 422 30 fps 73.6 MB/sec 265 GB
BMD RAW 3:1 30 fps ~175 MB/sec 630 GB
R3D Redcode 4K 4:1 30 fps 215 MB/sec 774 GB

Notes:

  • H.264 specs based on JVC specs
  • ProRes specs from Apple ProRes White Paper
  • Blackmagic specs interpolated from Blackmagic Design website
  • Red redcode specs from Red website

Please rate the helpfulness of this tip.

Click on a star to rate it!

… for Adobe Premiere Pro CC

Tip #739: Premiere: No Support for FireWire DV Capture

Larry Jordan – LarryJordan.com

FireWire capture of DV media is no longer supported on Macs.

Topic $TipTopic

This tip first appeared on Adobe’s support page. While this won’t affect a lot of folks, it is still worth knowing.

Starting with macOS 10.15 Catalina, Premiere Pro, Audition, and Adobe Media Encoder no longer support the capture of DV and HDV over FireWire.

This change does not impact other forms of tape capture.
You can still edit DV/HDV files that have previously been captured.
DV/HDV capture is still available with Premiere Pro on Windows.

WORKAROUND

If you need access to DV/HDV ingest you can:

  • On macOS: Use Premiere Pro 12.x and 13.x on macOS 10.13.6 (High Sierra) or 10.14 (Mojave)
  • On Windows: Continue to use the latest versions of Premiere Pro with no impact.

Please rate the helpfulness of this tip.

Click on a star to rate it!

… for Codecs & Media

Tip #744: What is Interlacing?

Larry Jordan – LarryJordan.com

Interlacing was needed due to limited bandwidth.

Interlace artifact – thin, dark, horizontal lines radiating off moving objects.

Topic $TipTopic

Even in today’s world of 4K and HDR, many HD productions still need to distribute interlaced footage. So, what is interlacing?

Interlacing is the process of time-shifting every other line of video so that the total bandwidth requirements for a video stream are, effectively, cut in half.

For example, in HD, first all the even numbered lines are displayed, then 1/2 the frame rate later, all the odd numbered lines are displayed. Each of these is called a “field.” The field rate is double the frame rate.

NOTE: HD is upper field first, DV (PAL or NTSC) is lower field first.

In the old days of NTSC and PAL this was done because the broadcast infrastructure couldn’t handle complete frames.

As broadcasters converted to HD at the end of the last century, they needed to make a choice; again due to limited bandwidth: They could either choose to broadcast a single 720 progressive frame, or an interlaced 1080 frame.

Some networks chose 720p because they were heavily into sports, which looks best in a progressive frame. Others chose interlaced, because their shows principally originated on film, which minimized interlaced artifact, which is illustrated in the screen shot.

As we move past HD into 4K, the bandwidth limitations fade away, which means that all frames are progressive.

EXTRA CREDIT

It is easy to shoot progressive and convert it to interlaced, with no significant loss in image quality. It is far harder to convert interlaced footage to progressive; and quality always suffers. Also, the web requires progressive media because interlacing looks terrible.

For this reason, it is best to shoot progressive, then convert to interlacing as needed for distribution.


Please rate the helpfulness of this tip.

Click on a star to rate it!

… for Codecs & Media

Tip #745: What is HDR Rec. 2020 HLG

Larry Jordan – LarryJordan.com

HLG is compatible with both HDR and SDR broadcast and television sets.

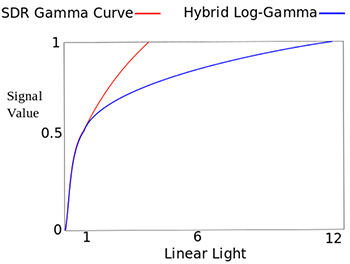
Chart showing a conventional SDR gamma curve and Hybrid Log-Gamma (HLG). HLG uses a logarithmic curve for the upper half of the signal values which allows for a larger dynamic range.

Topic $TipTopic

High-dynamic-range video (HDR video) describes video having a dynamic range greater than that of standard-dynamic-range video (SDR video). HDR capture and displays are capable of brighter whites and deeper blacks. To accommodate this, HDR encoding standards allow for a higher maximum luminance and use at least a 10-bit dynamic range in order to maintain precision across this extended range.

While technically “HDR” refers strictly to the ratio between the maximum and minimum luminance, the term “HDR video” is commonly understood to imply wide color gamut as well.

There are two ways we can display HDR material: HLG and PQ. (Tip #746 discusses PQ).

HLG (Hybrid Log Gamma) is a royalty-free HDR standard jointly developed by the BBC and NHK. HLG is designed to be better-suited for television broadcasting, where the metadata required for other HDR formats is not backward compatible with non-HDR displays, consumes additional bandwidth, and may also become out-of-sync or damaged in transmission.

HLG defines a non-linear optical-electro transfer function, in which the lower half of the signal values use a gamma curve and the upper half of the signal values use a logarithmic curve. In practice, the signal is interpreted as normal by standard-dynamic-range displays (albeit capable of displaying more detail in highlights), but HLG-compatible displays can correctly interpret the logarithmic portion of the signal curve to provide a wider dynamic range.

HLG is defined in ATSC 3.0, among others, and is supported by video services such as the BBC iPlayer, DirecTV, Freeview Play, and YouTube. HLG is supported by HDMI 2.0b, HEVC, VP9, and H.264/MPEG-4 AVC.


Please rate the helpfulness of this tip.

Click on a star to rate it!

… for Codecs & Media

Tip #746: What is HDR Rec. 2020 PQ?

Larry Jordan – LarryJordan.com

PQ provides for the brightest images, even though technology today can’t fully support it.

The PQ inverse EOTF (electro-optical transfer function). I thought you’d like to see the math.

Topic $TipTopic

High-dynamic-range video (HDR video) describes video having a dynamic range greater than that of standard-dynamic-range video (SDR video). HDR capture and displays are capable of brighter whites and deeper blacks. To accommodate this, HDR encoding standards allow for a higher maximum luminance and use at least a 10-bit dynamic range in order to maintain precision across this extended range.

While technically “HDR” refers strictly to the ratio between the maximum and minimum luminance, the term “HDR video” is commonly understood to imply wide color gamut as well.

There are two ways we can display HDR material: HLG and PQ. (Tip #745 discusses HLG).

Perceptual Quantizer (PQ), published by SMPTE as SMPTE ST 2084, is a transfer function that allows for the display of high dynamic range (HDR) video with a luminance level of up to 10,000 cd/m2 and can be used with the Rec. 2020 color space.

NOTE: cd/m2 refers to “candela per meter squared.” One cd/m2 equals one IRE.

PQ is a non-linear electro-optical transfer function (EOTF). On April 18, 2016, the Ultra HD Forum announced industry guidelines for UHD Phase A, which uses Hybrid Log-Gamma (HLG) and PQ transfer functions with a bit depth of 10-bits and the Rec. 2020 color space. On July 6, 2016, the ITU announced Rec. 2100, which uses HLG or PQ as transfer functions with a Rec. 2020 color space.

The key takeaway here is that PQ supports extremely bright images, but in a format that is not compatible with anything else.


Please rate the helpfulness of this tip.

Click on a star to rate it!

… for Apple Final Cut Pro X

Tip #734: What is Tone-Mapping

Larry Jordan – LarryJordan.com

Tone-mapping preserves highlights when displaying HDR media on SDR displays.

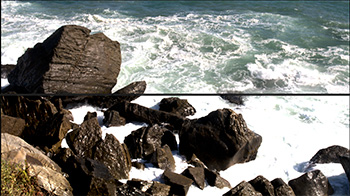
HDR media not tone-mapped (bottom) and tone-mapped (top). Tone-mapping preserves highlights.

Topic $TipTopic

HDR (High Dynamic Range) media has grayscale values that far exceed what our computer monitors can display. (The Apple Pro XDR is a video monitor, not a computer monitor.)

As well, if we try using HDR media in a Rec. 709 HD project, the white levels are way past out of control.

NOTE: To convert HDR video to SDR video as part of a project, use the HDR Tools effect.

Tone-mapping solves this problem. This process automatically converts the vast grayscale range of HDR into the much more limited range of SDR (Standard Dynamic Range).

Final Cut Pro X does this using either a preference setting (Preferences > Playback) or a setting in the View menu at the top right corner of the Viewer.

This screen shot illustrates the difference. When tone-mapping is turned off (bottom of image) the highlights are blown out, with the detail lost; even though the image will look fine on an HDR monitor.

The top of the image is tone mapped to convert the highlights to fit within SDR specs. This means the image will look good on your computer monitor AND on an HDR monitor.


Please rate the helpfulness of this tip.

Click on a star to rate it!