Media Apple FCP X

… for Codecs & Media

Tip #513: How Changing Frame Rate Affects File Size

Larry Jordan – LarryJordan.com

Faster frame rates more than double file size.

As frame rates increase, file storage needs also increase – dramatically.

Topic $TipTopic

I want to look at the effect increasing video frame rates has on storage capacity and bandwidth.

NOTE: In this example, I’m using Apple ProRes as a measurement codec. Other codecs will generate different numbers, but the overall results are the same. Here’s a white paper from Apple with all the source numbers.

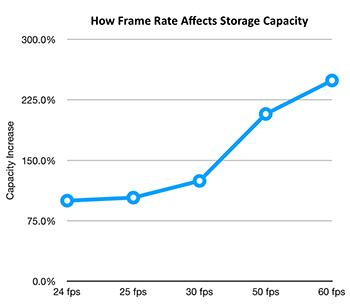
Regardless of frame size, as frame rates increase, storage needs and bandwidth also increase. If we set the storage needs of 24 fps video (regardless of frame size) to 100%, then:

  • 25 fps video = 104% capacity and bandwidth increase
  • 30 fps video = 125% capacity and bandwidth increase
  • 50 fps video = 208% capacity and bandwidth increase
  • 60 fps video = 250% capacity and bandwidth increase

Just as capacity increases by these amounts, so, also, does bandwidth. Higher frame rates require bigger and faster storage.

EXTRA CREDIT

Here’s a link to my website to learn more.


Please rate the helpfulness of this tip.

Click on a star to rate it!

… for Codecs & Media

Tip #514: The Brave New World of 8K Media

Larry Jordan – LarryJordan.com

8K files require vast storage with super-fast bandwidth.

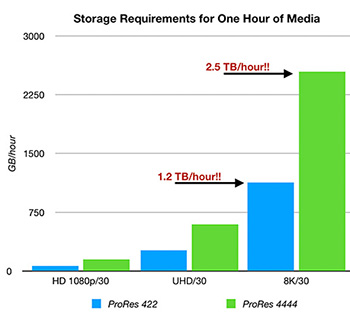
File storage requirements as frame size increases for ProRes 422 and 4444.

Topic $TipTopic

Technology continues its relentless advance and we are hearing the drumbeats for 8K media. Editing 4K takes a lot of computer horsepower. Editing 8K requires 4 TIMES more than 4K! Which is why Apple is promoting the new Mac Pro for use with 8K workflows.

I don’t minimize the need for a powerful CPU or the potential of the new Mac Pro when editing frame sizes this huge. However, important as the computer is in editing media, the speed and size of your storage are even MORE critical.

Let’s start by looking at storage requirements for different frame sizes of media.

NOTE: For this example, I’m using ProRes 422 and 4444 because Apple has done a great job documenting the technical requirements of these codecs. Other codecs will have different numbers, but the size and bandwidth relationships will be similar.

More specifically, the three frame sizes in my chart are:

  • 1080/30 HD. 30 fps, 1920 x 1080 pixels
  • UHD/30. 30 fps, 3940 x 2160 pixels
  • 8K/30. 30 fps, 8192 x 4320 pixels

As the screen shot illustrates, an hour of 8K media takes 1.2 TB for ProRes 422 and 2.5 TB for ProRes 4444! These amounts require totally rethinking the capacity of our storage – and remember, this does not include typical work or cache files, many of which will also be 8K.

EXTRA CREDIT

Here’s a link to my website to learn more, including the bandwidth needs of these super-huge frame sizes.


Please rate the helpfulness of this tip.

Click on a star to rate it!

… for Apple Final Cut Pro X

Tip #518: Super-Secret, Super-Fast Export Trick

Larry Jordan – LarryJordan.com

The key to speed is to use the Browser.

Image courtesy of StandardFilms.com.
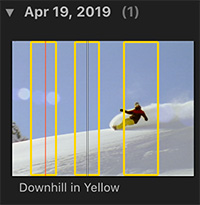
Set an In and Out first, then Command-drag to define multiple segments.

Topic $TipTopic

Imagine you need to get multiple highlights of breaking news/sports/weather/life up to the web like, ah, yesterday. Final Cut has a very fast way to make that happen. Watch…!

In order for us to export a segment from the timeline, we need to use the Range tool (or keyboard shortcuts) to set an In and Out. No problem – except that we can only have one In and one Out in the timeline at any time.

This doesn’t help us when we need to export a bunch of highlights as fast as possible.

But… there’s a hidden trick in FCP X that makes exporting segments even faster. Remember that I wrote: “You can only have one In and Out in the timeline?” That’s true for the timeline, but NOT true for the Browser.

Clips in the Browser support as many segments as you want. For example, in this screen shot, I have three separate areas in the same clip selected – all at the same time!

NOTE: This multiple selection technique applies to clips in the Browser, but not Projects.

To select more than one section in a clip, drag to set the In and Out for the first section, then press the Command key and drag to set as many additional sections as you want!

With the areas you want to export selected, choose File > Share and note that this menu now shows the number of clips you’ll export.

Exporting from FCP X has always been fast. But, when you need to break a movie into sections, it will be even faster – and at the highest possible quality – to export directly from the Browser.


Please rate the helpfulness of this tip.

Click on a star to rate it!

… for Codecs & Media

Tip #503: Why Timecode Starts at 01:00:00:00

Larry Jordan – LarryJordan.com

It all comes down to finding what you seek.

A sample timecode setting displayed as: Hours, Minutes, Seconds and Frames.

Topic $TipTopic

Back in the old days of video tape, all programs originating in North America (and, perhaps, elsewhere) started at timecode hour 01. A tradition that often continues today for broadcast, mostly out of habit. Why?

NOTE: Programs originating in Europe, I discovered many years ago, tended to start at hour 10. This made it easy to quickly see which part of the world a program originated from.

Back in the days of large quad videotape machines, each of which could easily cost a quarter-of-a-million dollars, the tape reels were 15-inches in diameter and weighed up to 30 pounds. The tape flew through the system at 15 inches per second – all to create a standard-definition image!

Setting up a quad tape system for playback required tweaking each of the four playback heads on the machine and adjusting them for alignment, color phase, saturation and brightness. (It was these machines that first taught me how to read video scopes.)

The problem was that getting this much iron moving fast enough to reliably play a picture took time. Eight seconds of time.

So, the standard setup for each tape required recording:

  • 60 seconds of bars and tone (to set video and audio levels)
  • 10 seconds of black
  • 10 seconds of slate
  • 10 seconds of countdown

If timecode started at 0:00:00:00 for the program, that would mean the setup material would start at 23:58:30:00. Since 23 hours is after 0 hours, sending the tape machine to seek the starting timecode – an automated feature that was used all the time in the high-speed, high-pressure turnaround of live news – means the tape deck would scan forward to the end of the tape.

To prevent this, all programs started at 1 hour (or 10 hours) with setup starting at 00:58:30:00.

And now you know.


Please rate the helpfulness of this tip.

Click on a star to rate it!

… for Codecs & Media

Tip #505: Why HDV Media is a Pain in the Neck

Larry Jordan – LarryJordan.com

Interlacing, non-square pixels, and deep compression make this a challenging media format.

Topic $TipTopic

HDV (short for high-definition DV) media was a highly-popular, but deeply flawed, video format around the turn of the century.

DV (Digital Video) ushered in the wide acceptance of portable video cameras (though still standard definition image sizes) and drove the adoption of computer-based video editing.

NOTE: While EMC and Avid led the way in computerized media editing, it was Apple Final Cut Pro’s release in 1999 that converted a technology into a massive consumer force.

HDV was originally developed by JVC and supported by Sony, Canon and Sharp. First released in 2003, it was designed as an affordable recording format for high-definition video.

Their were, however, three big problems with the format:

  • It was interlaced
  • It used non-square pixels
  • It was highly! compressed

If the HDV media was headed to broadcast or for viewing on a TV set, interlacing was no problem. Both distribution technologies fully supported interlacing.

But, if the video was posted to the web, ugly horizontal black lines radiated out from all moving objects. The only way to get rid of them was to deinterlace the media, which, in most cases, resulted in cutting the vertical resolution in half.

In the late 2000’s Sony and other released progressive HDV recording, but the damage to user’s perception of the image was done.

NOTE: 1080i HDV contained 3 times more pixels per field than SD, yet was compressed at the same data rate. (In interlaced media, two fields make a frame.)

The non-square pixels meant that 1080 images were recorded at 1440 pixels horizontally, with the fatter-width pixel filling a full 1920 pixel line. In other words, HDV pixels were short and fat, not square.

As full progressive cameras became popular – especially DSLR cameras with their higher-quality images, HDV gradually faded in popularity. But, even today, we are dealing with legacy HDV media and the image challenges it presents.

Please rate the helpfulness of this tip.

Click on a star to rate it!

… for Random Weirdness

Tip #477: How to Test the Lenses You Buy

Larry Jordan – LarryJordan.com

It is better to test your lens than find a problem during a shoot.

(Image courtesy of pexels.com)

Topic $TipTopic

The team at PetaPixel and Michael the Maven have an interesting article and YouTube video on the importance of testing your lenses. Here’s the link. This is an excerpt.

You may not be aware that no two lenses are exactly the same. Why? Sample variation. Performance can vary widely from edge to edge or from wide to tight.

Here’s a quick way to test your lenses: Set your camera on a tripod in front of a flat, textured surface like a brick wall and snap photos at various apertures: wide open, f/2.8, f/4 and f/8. Feel free to add in f/5.6 if you’re feeling comprehensive. If you’re testing a zoom lens, we recommend repeating this process at various focal lengths as well.

Try to get the sensor as parallel to the wall as possible, and inspect each photo from the center out to the edges. It should be immediately obvious if you have a really bad lens at any particular focal length.

Then, as a bonus test, shoot some power lines against a blue sky and see if the lens is producing any dramatic chromatic aberration, which will show up as color fringing at the high-contrast edges between the black wires and the blue sky.


Please rate the helpfulness of this tip.

Click on a star to rate it!

… for Codecs & Media

Tip #474: DNxHR vs. ProRes

Larry Jordan – LarryJordan.com

These two codecs are directly comparable, but not the same.

Topic $TipTopic LowePost summarized the differences between Avid’s DNx and Apple’s ProRes codecs. Here’s the link. This is an excerpt.

The Avid DNxHR and Apple Prores codec families are designed to meet the needs of modern, streamlined post-production workflows.

Both the DNxHR and ProRes families offer a variety of codecs for different compressions, data rates and file sizes. Some with just enough image information needed for editing, others for high-quality color grading and finishing, and lossless ones for mastering and archiving.

Codec facts

  • DNxHR 444, ProRes 4444 and ProRes 4444 QC are the only codecs with embedded alpha channels.
  • DNxHR 444 and ProRes 4444 XQ are the only codecs that fully preserve the details needed in HDR- (high-dynamic-range) imagery.
  • Both codec families are resolution independent, but bitrate will vary depending on if you output a proxy file or a higher resolution file.
  • Both codec families can be wrapped inside MXF or MOV containers.

An important difference, however, is that some of the major editing and finishing systems available lacks support for ProRes encoding for Windows. This means Windows users can read a ProRes encoded file, but in some cases cannot export one. For this reason, many post-production facilites have abandoned ProRes and implemented a full DNxHR workflow.


Please rate the helpfulness of this tip.

Click on a star to rate it!

… for Codecs & Media

Tip #483: Adobe Supports ProRes on Mac and Windows

Larry Jordan – LarryJordan.com

Adobe announced full support for ProRes on Windows.

Topic $TipTopic

At the start of 2019, Adobe announced expanded support for ProRes, on both their Mac and Windows software. Here’s the link. ProRes has long been popular on Mac-based editing systems, including those from Adobe. But, its support on Windows has been much weaker. That changed with this announcement from Adobe.

Apple ProRes is a codec technology developed by Apple for high-quality, high-performance editing. It is one of the most popular codecs in professional post-production and is widely used for acquisition, production, delivery, and archive. Adobe has worked with Apple to provide ProRes export to post-production professionals using Premiere Pro and After Effects. Support for ProRes on macOS and Windows helps streamline video production and simplifies final output, including server-based remote rendering with Adobe Media Encoder.

With the latest Adobe updates, ProRes 4444 and ProRes 422 export is available within Premiere Pro, After Effects, and Media Encoder on macOS and Windows 10.


Please rate the helpfulness of this tip.

Click on a star to rate it!

… for Apple Motion

Tip #467: Render Settings Improve CPU Performance

Larry Jordan – LarryJordan.com

These render options allow us to avoid overloading the CPU.

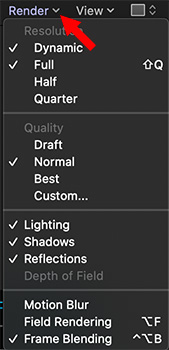
Render options in the Render menu of the Canvas.

Topic $TipTopic

(This is an excerpt from the Motion Help files.) Choose the render quality and resolution of the canvas display, and enable or disable features that can impact playback performance. When an option is active, a checkmark appears beside the menu item. If a complex project is causing your computer to play at a very low frame rate, you can make changes in this menu to reduce the strain on the processor.

The Render pop-up menu displays the following items:

  • Dynamic: Reduces the quality of the image displayed in the canvas during playback or scrubbing in the Timeline or mini-Timeline, allowing for faster feedback. Also reduces the quality of an image as it is modified in the canvas. When playback or scrubbing is stopped, or the modification is completed in the canvas, the image quality is restored (based on the Quality and Resolution settings for the project).
  • Full: Displays the canvas at full resolution (Shift-Q).
  • Half: Displays the canvas at half resolution.
  • Quarter: Displays the canvas at one-quarter resolution.
  • Draft: Renders objects in the canvas at a lower quality to allow optimal project interactivity. There’s no anti-aliasing.
  • Normal: Renders objects in the canvas at a medium quality. Shapes are anti-aliased, but 3D intersections are not. This is the default setting.
  • Best: Renders objects in the canvas at best quality, which includes higher-quality image resampling, anti-aliased intersections, anti-aliased particle edges, and sharper text.
  • Custom: Allows you to set additional controls to customize rendering quality. Choosing Custom opens the Advanced Quality Options dialog. For more information, see Advanced Quality settings.
  • Lighting: Turns the effect of lights in a project on or off. This setting does not turn off lights in the Layers list (or light scene icons), but it disables light shading effects in the canvas.
  • Shadows: Turns the effect of shadows in a project on or off.
  • Reflections: Turns the effect of reflections in a project on or off.
  • Depth of Field: Turns the effect of depth of field in a project on or off.
  • Motion Blur: Enables/disables the preview of motion blur in the canvas. Disabling motion blur may improve performance.

Note: When creating an effect, title, transition, or generator template for use in Final Cut Pro X, the Motion Blur item in the View pop-up menu controls whether motion blur is turned on when the project is applied in Final Cut Pro.


Please rate the helpfulness of this tip.

Click on a star to rate it!

… for Codecs & Media

Tip #451: Audio Compression for Podcasts

Larry Jordan – LarryJordan.com

You can compress audio a lot, without damaging quality.

Topic $TipTopic

If you are compressing audio for podcasts, where it’s just a few people talking, you can make this a very small file by taking advantage of some key audio characteristics.

To set a baseline, an hour of 16-bit, 48k uncompressed stereo audio (WAV or AIF) is about 660 MB. (1 minute of stereo = 11 MB, 1 minute of mono = 5.5 MB).

If we are posting this to our own web site, streaming it live where bandwidth requirements make a difference, or posting it to service that charges for storage, we want to make our file as small as possible, without damaging quality. Here’s what you need to know.

Since people only have one mouth, if all they are doing is talking, not singing with a band, you don’t need stereo. Mono is fine.

This reduces file size by 50%.

NOTE: Mono sounds play evenly from both left and right speakers placing the sound of the audio in the middle between them.

According to the Nyquist Theorem, dividing sample rate by 2 determines maximum frequency response. Human speech maxes out below 10,000 Hz. This means that compressing at a 32K sample rate retains all the frequency characteristics of the human voice. (32 / 2 = 16K Hz, well above frequencies used for human speech.)

This reduces file size by another 33%.

Without doing any compression, our 660 MB one hour audio file is reduced to about 220 MB.

Finally, using your preferred compression software, set the compression data rate to 56 kbps. This creates about a 25 MB file for a one-hour show. (About 95% file size reduction from the original file.)

And for podcasts featuring all-talk, it will sound great.


Please rate the helpfulness of this tip.

Click on a star to rate it!