… for Apple Final Cut Pro X

Tip #1171: Light Wrap Makes Keys Believable

Larry Jordan – LarryJordan.com

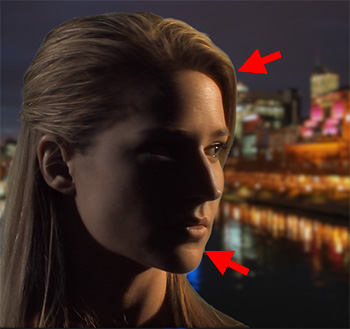
Light Wrap won’t fix a bad key, but it will make a good key blend better with the background.

Light Wrap applied to a key, with the Mode set to Overlay.

Topic $TipTopic

Buried in a folder at the bottom of the Keyer effect is Light Wrap. This makes the edges of a key look more organic by blending them with the background. Learn more.

The trickiest part of any key are the edges. Edges are what make a key work or fail. Light Wrap blends the colors at the edge of a foreground object with the colors in the background when creating a chroma-key (green-screen key). Light Wrap is turned off by default.

Once you’ve created the cleanest key you can, go to the bottom of the Keyer effect and open the Light Wrap folder.

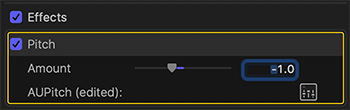
As you increase Amount, the colors of the background will blend with the edges of the foreground. This tends to make the two shots look more related. I generally set Amount to 50, but you can enter higher numbers by typing them in.

NOTE: This effect is subtle, not dramatic. The goal is to make the foreground look to be part of the background, not to apply a noticeable color change.

I generally leave both Intensity and Opacity at 100%. But, I also change the Mode from Normal to Overlay. Both of these options make edges less noticeable.


Please rate the helpfulness of this tip.

Click on a star to rate it!

… for Apple Final Cut Pro X

Tip #1172: Apple Updates Final Cut Pro X, et al.

Larry Jordan – LarryJordan.com

New versions are mostly bug fixes, with support for Big Sur and Apple silicon.

Spiffy new logos for Motion (top), Final Cut (right) and Compressor (bottom).

Topic $TipTopic

On Thursday, Nov. 12, Apple updated their suite of video applications to support improved performance and efficiency on Mac computers with Apple silicon, as well as support for Big Sur.

At the same time, all three applications sport new icons, illustrated in the screen shot.

NOTE: The new versions of Final Cut, Motion & Compressor can be installed on systems running either Big Sur or Catalina. GarageBand was also updated, but requires Big Sur for installation.

FINAL CUT PRO X (v.10.5)

In addition to support for Apple silicon, the latest version of Final Cut Pro 10.5 also enables users to:

  • Accelerate machine learning analysis for Smart Conform using the Apple Neural Engine on Mac computers with Apple silicon
  • Create a copy of your library and automatically transcode media to ProRes Proxy or H.264 at various resolutions to reduce file sizes and speed up editing.

This update to Final Cut Pro X also includes:

  • Export HLG high-dynamic-range projects with Dolby Vision 8.4 metadata for optimized playback on Apple devices.
  • Fixes an issue in which LUTs were not available in optimized or proxy clips.
  • Improves appearance of HDR thumbnails in the browser and timeline.
  • Improves reliability when previewing built-in sound effects in the browser.
  • Fixes an issue in which audio waveforms would not update in the inspector after adding a filter or making a volume change.
  • Fixes an issue in which chapter markers were not available when sharing.
  • Improves reliability when creating proxy media from non-square pixel interlaced clips.
  • Improves stability when applying stabilization and color balance during import.
  • Fixes an issue in which audio sync could drift when retiming clips.
  • Improves reliability with Social Media content positioning when using Smart Conform to switch between vertical and horizontal frame sizes.
  • Improves reliability when using onscreen Crop controls in the viewer.
  • Fixes an issue in which copying stills between libraries would result in duplicate files.
  • Includes built-in support for Avid DNxHR® and Avid DNxHD® decoding and playback.

NOTE: Here’s a link to the Final Cut Pro X Release Notes from Apple.

MOTION (v.5.5)

In addition to support for Apple silicon, the Motion 5.5 update includes:

  • Export HLG high-dynamic-range projects with Dolby Vision 8.4 metadata for optimized playback on Apple devices.
  • Improves stability when clicking in an empty canvas on on a Mac Pro with two AMD Radeon Pro Vega II Duo GPUs and a Blackmagic eGPU Pro.
  • Improves stability when manipulating groups of keyframes selected across multiple parameters.
  • Improves stability using the Stroke filter when selecting a stroke type in the HUD.
  • Fixes an issue in which the Poke filter center is offset from the onscreen control.
  • Improves stability when deleting layers after removing a marker.
  • Includes built-in support for Avid DNxHR® and Avid DNxHD® decoding and playback.

NOTE: Here’s a link to the Motion Release Notes from Apple.

COMPRESSOR (v. 4.5)

In addition to support for Apple silicon, the Compressor 4.5 update includes:

  • Export HLG high-dynamic-range projects with Dolby Vision 8.4 metadata for optimized playback on Apple devices.
  • Fixes an issue where audio sync could drift when changing the frame rate of a clip.
  • Fixes an issue where creating a BluRay disc from a DV-PAL source would fail.
  • Includes built-in support for Avid DNxHR® and Avid DNxHD® decoding and playback.

NOTE: Here is a link to the Compressor Release Notes from Apple.


Please rate the helpfulness of this tip.

Click on a star to rate it!

… for Apple Final Cut Pro X

Tip #1147: A Faster Way to Apply LUTs

Larry Jordan – LarryJordan.com

Adjustment layers are created in Motion and affect all clips below them.

The Custom LUT effect with a custom LUT applied to an adjustment layer.

Topic $TipTopic

Normally, we apply LUTs (color Look-Up Tables) to an individual clip. But, recently, a reader suggested a faster and better option – use an adjustment layer.

You may be familiar with adjustment layers in Photoshop. These are special layers that, when you apply an effect to them, change the look of all the clips below them.

Premiere has adjustment layers, but FCP X doesn’t… officially. However, they are easy to create in Motion.

NOTE: Here’s a tutorial that explains how.

The benefit to adjustment layers is that we can apply a LUT to the adjustment layer to change the look of all the clips under it. This makes it extremely easy to create a look for an entire project and, by tweaking just one setting, affect a whole flock of clips at once.

Apply an adjustment layer above your clips in the timeline, then apply Effects Browser > Color > Custom LUT to the adjustment layer.

Next, in the Inspector, apply the LUT you want. (See screen shot.)

NOTE: This effect won’t allow you to apply camera LUTs, but does allow applying any creative LUT you want.


Please rate the helpfulness of this tip.

Click on a star to rate it!

… for Apple Final Cut Pro X

Tip #1148: Adjust List View Columns and Layout

Larry Jordan – LarryJordan.com

List View displays all kinds of media statistics – you get to pick what you want to see.

Control-click any List view column header to display new columns.

Topic $TipTopic

List view, in the Final Cut Pro X Browser, is the place to look for all kinds of useful statistics about your media. Here are three tricks that make using List view a lot more useful.

TRICK #1

Drag any column header – except the name column – horizontally to change the order in which they display information. (This is similar to Numbers or Excel.)

TRICK #2

Drag the vertical line separating any column header to make it wider or narrower. (Again, like Numbers and Excel.)

TRICK #3

Control-click any column header to select the columns you want to display.

NOTE: The six organizational options at the top of this list may also make your organizing faster and easier.


Please rate the helpfulness of this tip.

Click on a star to rate it!

… for Apple Final Cut Pro X

Tip #1153: A Faster Way to Apply Keywords

Larry Jordan – LarryJordan.com

When importing, keywords can be automatically applied based on folder names.

A composite image: Files organized into folders (left), From Folders checkbox in Media Import, Keywords assigned in Browser (right).

Topic $TipTopic

Keywords are a fast, flexible and powerful way to organize clips in the Browser. However, applying them can be time-consuming. There’s a faster way. Organize those clips that are not copied from a camera card, into folders.

NOTE: For camera card files, rename the folder that contains the camera card files, without renaming the media files themselves.

In the Media Import window, check Keywords > From Folders (see screen shot).

Then, when the clips are imported, keywords are automatically assigned to each clip based on its folder name.

NOTE: If you select a folder that contains other folders (see screen shot) all folder names are assigned as keywords.


Please rate the helpfulness of this tip.

Click on a star to rate it!

… for Apple Final Cut Pro X

Tip #1133: Adjust the Pitch of a Musical Clip

Larry Jordan – LarryJordan.com

Pitch can be adjusted without affecting timing or duration.

The Pitch audio effect, setting a musical clip 1/2 step lower.

Topic $TipTopic

Ed R. asked:

I have a karaoke song and want to lower the pitch. In other words change the key to a half step lower. I know I use the PITCH in audio, but how do I know what numbers are a half step lower?

In the Effects Browser, search for the Audio > Pitch effect, then add it to your clip.

In the Inspector, adjust the numerical slider. Every whole number represents 1/2 step in musical pitch.


Please rate the helpfulness of this tip.

Click on a star to rate it!

… for Apple Final Cut Pro X

Tip #1134: Use EQ to Enhance Voice Clarity

Larry Jordan – LarryJordan.com

Adjusting frequencies is the best way to improve the clarity of human speech.

This screen shot shows typical settings for a male voice in the Fat EQ filter.

Topic $TipTopic

Human hearing spans from 20 – 20,000 Hz; a ten-octave range. Human speech is a subset of this: from roughly 200 – 8,000 Hz.

Vowels are low frequency sounds, which give a voice its character, warmth and sexiness. Consonants are, generally, high frequency sounds, which make speech intelligible.

NOTE: For example, the difference between hearing an “F” or an “S” is whether the hiss is present. If you hear it, you hear an “S.” If not, you hear an “F.” And that hiss is around 6,200 Hz.

So, if you want to warm up a voice and make it more intelligible, select your dialog clips and apply: Effects Browser > Audio > EQ > Fat EQ filter.

Select the clip, open the Inspector, then click the small icon to the right of the Fat EQ title (top red arrow)

Then, make the following adjustments.

Improve Speech Clarity

GENDER FREQ. dB Q
Men 200 Hz 2-4 1
Men 3200 Hz 3-6 dB 1
Women 400 Hz 2-4 1
Women 4200 Hz 3-6 1

Please rate the helpfulness of this tip.

Click on a star to rate it!

… for Apple Final Cut Pro X

Tip #1135: Boost and Smooth Dialog Levels

Larry Jordan – LarryJordan.com

The Limiter effect raises softer audio levels without raising louder levels. It works magic with dialog.

The Limiter effect with typical settings applied.

Topic $TipTopic

Probably the most powerful audio filter for dialog is the Limiter effect. Here’s how to use it.

The Limiter filter dynamically raises softer audio levels without raising louder levels. It works magic with dialog – and does it in real-time! To apply it:

  • Select the dialog clip(s) you want to adjust.
  • Apply Effects Browser > Audio > Levels > Logic > Limiter. (There are several iterations, use the one in the Logic group.)
  • Click the small icon to the right of the name to reveal the settings panel (top red arrow).
  • Set Output Level to -3 dB.
  • Set Release to any number larger than 500.
  • Adjust Gain (lower right arrow) until you see about 1.5 – 3 dB levels in the Reduction meter (left red arrow).

And that’s it.

The difference this makes in adjusting levels is just magic. Most of the time, you won’t need to use audio keyframes at all.

BIG NOTE: If you apply multiple audio filters to the same clip, the Limiter filter MUST always be at the bottom of the effects list to prevent distortion.


Please rate the helpfulness of this tip.

Click on a star to rate it!

… for Apple Final Cut Pro X

Tip #1109: Oversize Your Compound Clips

Larry Jordan – LarryJordan.com

Compound clips do not need to match the frame size of your project

The text, in an overlarge compound clip, travels over the mountain shot in the project.

Topic $TipTopic

There’s no rule that says compound clips need to be the same frame size as your project. In fact, there’s a benefit when they aren’t.

In the screen shot, the 800-point Harrington text is contained in a large compound clip (2133 x 1200 pixels), which is edited into and stacked above the background clip in a 720p timeline.

NOTE: There’s no magic to these numbers, I’m just letting you know what I used.

By adding keyframes, it is easy to have the text travel through the frame.

NOTE: While this example uses text, a compound clip can contain text, clips, or a mixture of both.

The key idea here is to provide more animation options using a compound clip which is larger than the project frame size.


Please rate the helpfulness of this tip.

Click on a star to rate it!

… for Apple Final Cut Pro X

Tip #1114: A Simple Way to Add Depth to Text

Larry Jordan – LarryJordan.com

Rotating text or images on the Y-axis is a fast way to add the illusion of depth.

Square-on text (top). Text rotated 45° on the Y-axis using the Text Inspector.

Topic $TipTopic

An easy way to add depth to text is to rotate it on the Y-axis. (See screen shot.)

While Final Cut does not support 3D rotation of most objects, it does support 3D rotation of text.

In this screen shot, the text clip (700 point Harrington) was rotated 45° on the Y-axis in Text Inspector > Rotation.

Even better, this rotation is keyframeable, so you can animate this rotation while the rest of the clip is playing.

EXTRA CREDIT

The text size slider only goes to 300 points or so. To create larger text, enter a number in the field, rather than drag the slider.


Please rate the helpfulness of this tip.

Click on a star to rate it!