… for Apple Final Cut Pro X

Tip #1214: Unlock the Timeline Index

Larry Jordan – LarryJordan.com

CommandPost provides hundreds of shortcuts and features for Final Cut Pro, After Effects and the Finder.
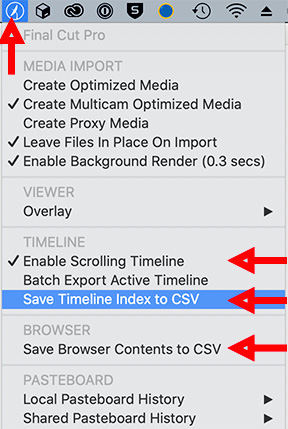
The CommandPost menu.

Topic $TipTopic

Here’s a very handy free utility that I use in every edit. It’s called CommandPost. One of my favorite features is that it unlocks the data stored in the Timeline Index.

CommandPost is a free and open source native macOS application that acts as a bridge between control surfaces, and software that doesn’t natively support control surfaces, such as Apple’s Final Cut Pro X and Adobe After Effects.

CommandPost requires macOS Sierra 10.12.1 or later (including macOS Mojave, Catalina & Big Sur). It also supports Final Cut Pro 10.4.4 and later (including Final Cut Pro 10.4.10).

There are many features that make this worth using in Final Cut, here are my three favorites:

  • Scrolling timeline!!
  • Export the contents of the currently active panel in the Timeline Index
  • Multiple and shared clipboards.

There are many other features for both FCP X and the Finder that make CommandPost an essential utility. It’s one I use every time I open Final Cut.

Website: https://commandpost.io.


Please rate the helpfulness of this tip.

Click on a star to rate it!

… for Apple Final Cut Pro X

Tip #1222: Fix a Warbling Music Track

Phil Cutting

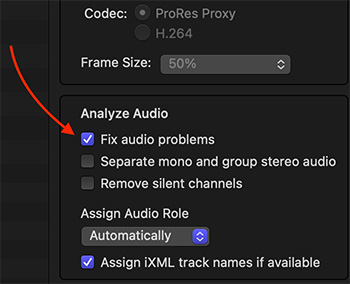
Checking this checkbox makes things worse…!

UNCHECK “Fix Audio Problems” to minimize audio artifacts during import.

Topic $TipTopic

Phil Cutting suggested this tip.

For years I suffered strange audio artifacts on music tracks imported for FCP. I assumed it was a damaged file until I noticed I had Fix Audio Problems checked in the Import Media window.

As soon as I unchecked it, the problem went away!

Larry adds:

Good to know. As a general rule, I DO check both Separate Mono… and Remove Silent Channels. I find these simplify importing dual-channel mono audio.


Please rate the helpfulness of this tip.

Click on a star to rate it!

… for Apple Final Cut Pro X

Tip #1223: Create a Default Effect – FAST!

Larry Jordan – LarryJordan.com

You can also create custom effects in Motion, then make them the default in FCP X.

Control-click any effect in the Effects browser to see this choice.

Topic $TipTopic

If you find yourself using the same effect over and over again, here’s a fast way to turn it into a keyboard shortcut.

  • Open the Effects browser.
  • Control-click the effect you want to make your default video effect and choose Make Default Video Effect.

From now on, whenever you need it, select the clip, or clips, to which you want to apply it and type Option + E

EXTRA CREDIT

There is a similar option for audio effects: Control-click and choose Make Default Audio Effect.

The keyboard shortcut for these is: Option + Cmd + E.


Please rate the helpfulness of this tip.

Click on a star to rate it!

… for Apple Final Cut Pro X

Tip #1193: New On-screen Controller for Compressor

Larry Jordan – LarryJordan.com

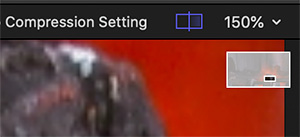
This “map” is a fast navigational aid to moving around inside a larger image.

The Zoom menu (150%) and the navigation map (white rectangle).

Topic $TipTopic

I’m not sure when this feature first showed up in Compressor, but it seems relatively new to me.

Once you’ve imported a clip into Compressor, if you zoom into the image in the Preview monitor so that it is bigger than the screen can display, a small “map” appears (see screen shot).

The white field represents the entire image. The darker portion represents the portion of the image that’s visible in the Viewer.

Grab the small, dark icon inside the white rectangle and drag it to reveal other portions of the image in the Viewer.

EXTRA CREDIT

This is similar to the “red box” that appears in Final Cut Pro X when the image in the Viewer is zoomed larger than the Viewer can display.

In both Compressor and Final Cut, to fit the zoomed image back into the Viewer either:

  • Type Shift + Z
  • Select Fit from the popup menu displaying the zoom percentage of the image (150% in the screen shot)

Please rate the helpfulness of this tip.

Click on a star to rate it!

… for Apple Final Cut Pro X

Tip #1212: What Does This Icon Do?

Larry Jordan – LarryJordan.com

Workflow extensions extend Final Cut to seamlessly work with other software.

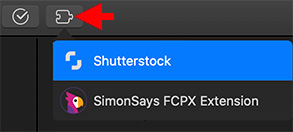
The Workflow Extensions menu in FCP X. This shows two extensions are installed.

Topic $TipTopic

In the top left corner of the Final Cut Pro X interface, you may see this icon (see screen shot). What does it do?

The icon indicated by the red arrow in the screen shot is the “Workflow Extension” menu for FCP X.

These are plug-ins that work inside Final Cut. Currently, Apple lists nine on its website:

  • APM Music
  • CatDV
  • EVC ShareBrowser
  • Frame.io
  • KeyFlow Pro
  • Primestream
  • Ripple Training
  • Shutterstock
  • Simon Says

Once an extension is installed, you access it from this menu.

Here’s a link to Apple’s ecosystem webpage to learn more.

EXTRA CREDIT

There are probably more extensions than Apple lists. If you know of others, please mention them in the Comments.


Please rate the helpfulness of this tip.

Click on a star to rate it!

… for Apple Final Cut Pro X

Tip #1213: Find & Delete Clips – Fast!

Larry Jordan – LarryJordan.com

The Timeline Index is a fast way to find just about anything in your timeline.

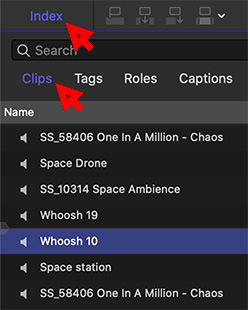
Timeline Index > Clips section with a selected audio clip.

Topic $TipTopic

The Timeline Index is an underutilized feature of Final Cut Pro X. But, if you take the time to explore it, you’ll find all kinds of interesting things it can do. Here’s a quick list.

With an edited project in the timeline, open the Timeline Index (Shortcut: Shift + Cmd + 2).

Click the Clips tab at the top.

Select any clip in the Index. This also selects it in the timeline and places the playhead at the start of the selected clip.

With the timeline clip selected, you can:

  • Solo the clip (Option + S)
  • Play the clip
  • Delete the clip
  • Apply an effect to the clip

The Timeline Index is a fast way to jump to any clip, title, or marker.

EXTRA CREDIT

If you can’t find a clip, use the search box at the top to track it down.


Please rate the helpfulness of this tip.

Click on a star to rate it!

… for Apple Final Cut Pro X

Tip #1188: Keyboard Shortcuts for Pasting Clips

Larry Jordan – LarryJordan.com

Six tips that move a clip from where it is to where you want it.

Topic $TipTopic

Warren Nelson suggested this tip:

I need to copy and paste a clip from the timeline to a layer above the timeline.

  • Using Cmd + V inserts the clip in the timeline.
  • I finally dug around and discovered that Option + V pastes the clip, copied from the timeline, at the playhead position above the timeline!

Cool tip, Warren! Here are four other shortcuts you can use to move clips from the Primary Storyline to a connected clip above it:

  • Edit > Lift from Storyline (Shortcut: Option + Cmd + Up arrow)
  • Edit > Overwrite to Primary Storyline (Shortcut: Option + Cmd + Down arrow)
  • Edit > Select > Up (Shortcut: Cmd + Up arrow) Selects the clip under the playhead on the higher layer.
  • Edit > Select > Down (Shortcut: Cmd + Down arrow) Selects the clip under the playhead on a lower layer.

Please rate the helpfulness of this tip.

Click on a star to rate it!

… for Apple Final Cut Pro X

Tip #1194: Sometimes, a Gap is More Than Black

Larry Jordan – LarryJordan.com

Gaps are black clips that serve a variety of functions – including acting a spacers.

A selected 3-second gap inserted into the Primary Storyline.

Topic $TipTopic

This is a simple thing, but I find myself using it in almost every project: adding a gap in my timeline.

Now, I know, gaps – which create flashes of black during playback – are anathema to most editors. As they should be – flashes of black generally indicate bad editing.

But, when I’m creating a rough cut, adding a gap makes for a nice spacer separating different sections of my edit, which means I can quickly find it again. I also use these to flag quotes, or where I was working when I take a break.

NOTE: Yes, I know, I could leave a marker. But I’m already using markers and gaps are a whole lot easier to see.

Because the magnetic timeline snaps the edges of clips together, creating a gap requires thinking differently. In fact, there are three ways to add a gap:

  • The Position tool (Shortcut: P). Select something, move it and Final Cut leaves a gap between where it was and where it is now. This works, but I need something faster.
  • Select a clip, then press the Forward delete key (on laptops, type Shift + Delete). This replaces the selected clip with a gap.
  • Or, my favorite, type Option + W (Menu: Edit > Insert Generator > Gap). This inserts a 3-second gap at the position of the playhead.

EXTRA CREDIT

A gap is actually a clip containing silent audio and black video. You can trim, move and delete gaps the same as any other clip.


Please rate the helpfulness of this tip.

Click on a star to rate it!

… for Apple Final Cut Pro X

Tip #1149: Audio Effects Stacking Order is Important

Larry Jordan – LarryJordan.com

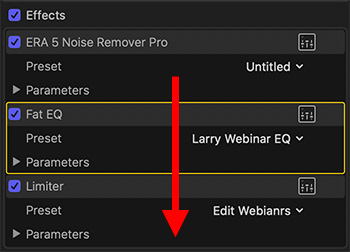
Audio effects process from top to bottom in Final Cut Pro X

Audio effects (just like video effects) process from top to bottom in the Inspector.

Topic $TipTopic

When adding effects to audio clips in Final Cut Pro X (or Motion), the order in which those effects are applied makes a difference. Here’s what you need to know.

Audio effects are processed from the top of the Inspector to the bottom. (See screen shot.)

The first effect to apply – if you need it – is noise reduction. Get rid of what you don’t want before you start shaping the sounds you do. Remember, your goal is to reduce noise, not eliminate it. If you want it gone, re-record in a studio.

NOTE: Noise reduction can often degrade the spoken voice. By processing noise first, you can then use effects farther down the “stack” to try to replace what noise reduction took away. This is why we reduce, not remove, noise.

Next, add any EQ or special effects you need to shape the sounds the way you want. You can add any reasonable number of filters here. You can always change the stacking order by dragging the name of the clip up or down.

Finally, at the bottom and ALWAYS last, apply either a compression or limiter filter. This makes sure that audio levels don’t exceed the level you specify. In Final Cut, I prefer to use Audio > Levels > Logic > Limiter.

NOTE: I should also mention that you don’t apply both a compression filter AND a limiter filter to the same track. Pick one or the other.


Please rate the helpfulness of this tip.

Click on a star to rate it!

… for Apple Final Cut Pro X

Tip #1152: Tips for a Better Chroma-Key

Larry Jordan – LarryJordan.com

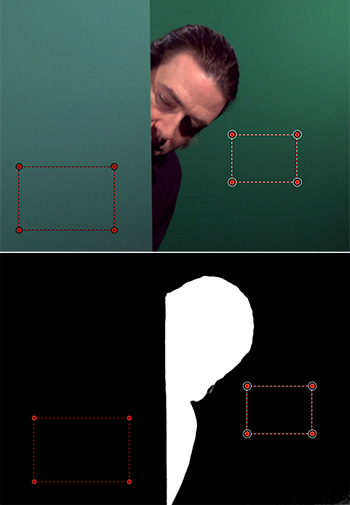
If you have multiple shades of green, use multiple Sample Color areas.

The source image (top) and the alpha channel results after adding two color section regions.

Topic $TipTopic

Chroma-keys, also called “green-screen keys,” allow us to remove a green (or any other color, actually) background and replace it with something more interesting. What you may not know, though, is that there is a hidden tool in Final Cut that makes selecting the correct shade of green a lot easier.

The top image in the screen shot illustrates the problem: there are two different shades of green in the background. To fix this, apply Keying > Keyer effect to the clip with a green background, then, go to the Video Inspector.

At the top of the Keyer effect are two controls:

  • Sample Color. This determines what color to “remove” (i.e. make transparent).
  • Edges. This helps determine where an edge is located, for those portions of an image where the edge is hard to see.

The trick, with Sample Color, is that you can apply more than one setting. For example, in the lower screen shot, one selection region was set for the foreground green, while a second was set for the background green.

What, at first, seemed like a very difficult key became easy when the second selection area was added.

While there is no limit to the number of selection areas you can add, the general rule is add as few as possible to select the color you want to make transparent.


Please rate the helpfulness of this tip.

Click on a star to rate it!