… for Apple Final Cut Pro X

Tip #1038: Apple Releases Bug Fix Updates

Larry Jordan – LarryJordan.com

Updates fix most of the bugs introduced with the 10.4.9 update.

Topic $TipTopic

Thursday last week, Apple released bug-fix updates to Final Cut Pro X, Motion 5 and Compressor 4. Apple also updated the ProVideo codecs.

The Final Cut update fixed the color flicker problem that first appeared in version 10.4.9, along with a variety of other bugs. It also, at least on my system, fixed the bug preventing voice-overs from actually recording.

One bug that was NOT fixed is the inability to export chapter markers from FCP X. Apple is still researching this.

Here’s the list of fixes from Apple’s release notes:

Final Cut Pro

  • Fixes an issue in which XAVC media from the Sony PXW-FX9 camera is not recognized
  • Fixes an issue where brightness levels shift when switching between Better Quality and Better Performance in the viewer
  • Fixes an issue in which effect keyframes are not added correctly when using onscreen controls
  • Improves stability when using the transform tool with multiple clips in the timeline
  • Improves reliability when exporting an FCPXML that contains Compound clips
  • Addresses an issue which could prevent sharing at certain resolutions
  • Fixes an issue in which sharing a Compound or Multicam clip from the timeline was disabled.

Motion

  • Fixes an issue in which XAVC media from the Sony PXW-FX9 camera is not recognized

Compressor

  • Fixes an issue in which XAVC media from the Sony PXW-FX9 camera is not recognized

EXTRA CREDIT

Here’s the complete list of features and fixes in every version of Final Cut 10.4.

Updates to Final Cut, Motion and Compressor are free and available in the Mac App Store. The ProVideo updates are free and available in System Preferences > Software Update.


Please rate the helpfulness of this tip.

Click on a star to rate it!

… for Apple Final Cut Pro X

Tip #1040: New! Stabilize 360° Video

Larry Jordan – LarryJordan.com

360° Video stabilization is a single button – nothing to adjust.

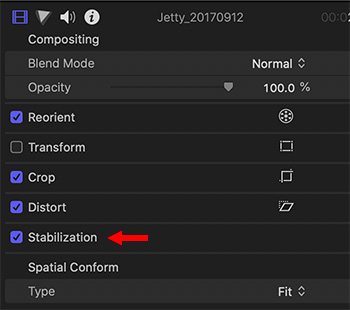
The Stabilization checkbox in the Video Inspector.

Topic $TipTopic

New with the 10.4.9 update is the ability to stabilize 360° video which involves clicking a single button – there’s nothing to adjust.

To stabilize your footage, select it in the timeline (you can’t do this in the browser), then go to the Video Inspector and check the Stabilization checkbox.

Done.

EXTRA CREDIT

Unlike normal film, 360° video can easily cause motion sickness, especially when an audience member is wearing a headset.

The best way to shoot 360 is to use a tripod. For those situations where you can’t, stabilizing footage is essential.


Please rate the helpfulness of this tip.

Click on a star to rate it!

… for Apple Final Cut Pro X

Tip #1041: New! See What You Are Missing

Larry Jordan – LarryJordan.com

Smart Conform allows you to see the portion of an image being trimmed – and adjust it.

(Image courtesy of Model Railroad Builders (www.franandmileshale.com)
The white button displays the hidden portions of an image.

Topic $TipTopic

Smart Conform is new with the 10.4.9 update, which is a quick way to reframe existing clips for the different aspect ratios of social media.

NOTE: Here’s a tutorial that covers this in detail.

However, there’s a very cool button that makes Smart Conform much easier to use. (See screen shot.)

After you trim a clip using Smart Conform, look in the top right corner of the Viewer. When you click the white button indicated by the red arrow, Final Cut displays a dimmed version of the entire image which allows you to see what will be cut from the frame.

Using the Transform > Position settings in the Video Inspector, you can adjust the X position to move the image horizontally. Or keyframe the X position if you need framing to change during playback.


Please rate the helpfulness of this tip.

Click on a star to rate it!

… for Apple Final Cut Pro X

Tip #1016: Caution: Color Flickering in FCP X 10.4.9

Larry Jordan – LarryJordan.com

FCP X 10.4.9 seems to create color flickering during grading.

Topic $TipTopic

I have received multiple reports this last week from editors reporting color shifts or color flickering when editing camera native media in Final Cut Pro X 10.4.9. This problem did not exist in Final Cut 10.4.8.

As one editor reported:

We have found the following:

  • The jumpiness happens as the clip is being color corrected with or without a camera LUT applied
  • There is no difference whether the timeline is set to “Better Performance” or “Better Quality;” the color levels still jump around
  • Transcoding the media to “proxy” and working with the proxy files eliminates the jumpiness during color correction

I reported the problem to Apple and they are looking at it. For now, until they figure out what’s going on:

  • If you haven’t upgraded to 10.4.9, don’t.
  • If you have, consider doing your color grades in proxy mode until this issue is resolved.

EXTRA CREDIT

Please add a comment if you’ve experienced similar problems. I will forward your comments to Apple.


Please rate the helpfulness of this tip.

Click on a star to rate it!

… for Apple Final Cut Pro X

Tip #1017: Chapter Marker Export Option Missing

Larry Jordan – LarryJordan.com

The option to include chapter markers on export has disappeared in FCP X 10.4.9.

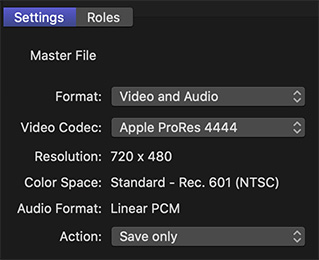
The Master File > Settings panel. The checkbox to export chapter markers is gone.

Topic $TipTopic

Another problem that surfaced with the 10.4.9 update to Apple Final Cut Pro X is that chapter markers can no longer be exported – at least on my system.

As you can see from the screen shot, when exporting a master file, there’s no checkbox to include chapter markers in the export. And, not surprisingly, if I include chapter markers in my project, they don’t export.

This problem did not exist in the 10.4.8 version of Final Cut.

For now, if you need chapter markers, don’t upgrade to 10.4.9.

EXTRA CREDIT

Chapter markers can be included in both QuickTime movies and MPEG/4 movies. I use them in all my webinar downloads and streams, not just DVDs.

I’ve contacted Apple about this problem and they are looking into it.


Please rate the helpfulness of this tip.

Click on a star to rate it!

… for Apple Final Cut Pro X

Tip #1018: New! Adjust ISO for ProRes RAW

Larry Jordan – LarryJordan.com

New ISO and white point settings are now available for ProRes RAW in FCP X 10.4.9.

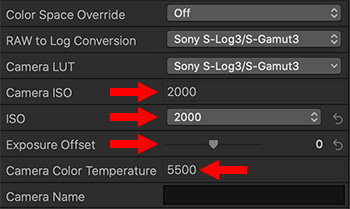
Info Inspector > Settings. These new settings (red arrows) only appear for ProRes RAW.

Topic $TipTopic

A new feature in the 10.4.9 update to Final Cut Pro X is the ability to adjust ISO and, for some cameras, the white point. Apple now supports changing the ISO setting (essentially, video gain) and white point for ProRes RAW media when edited natively.

NOTE: These settings only appear for ProRes RAW media and don’t appear when FCP X is in proxy mode.

To access these, select a ProRes RAW clip in the timeline (not the browser), then go to the Info Inspector and switch the menu at the bottom left from Basic to Settings. The red arrows in the screen-shot indicate the new settings with this update:

  • Camera ISO. The ISO setting at which the media was recorded.
  • ISO. A menu allowing you to change the ISO setting from 50 to 25,600.
  • Exposure Offset. This slider provides finer control in adjusting the ISO. The range is one stop lower to one stop higher.
  • Camera Color Temperature. The white point setting at which the video was recorded.

EXTRA CREDIT

For some cameras, Final Cut also supports changing the white point. Here is the current list of cameras supporting these new features.


Please rate the helpfulness of this tip.

Click on a star to rate it!

… for Apple Final Cut Pro X

Tip #997: A Faster Way to Jump

Larry Jordan – LarryJordan.com

Click the timecode then enter the timecode where you want to jump the playhead.

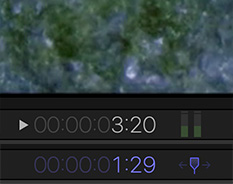
Click the timecode (top) then enter a timecode to “jump” the playhead.

Topic $TipTopic

As projects get bigger, finding faster ways to move around means you can get more done in less time. Here’s a cool trick.

Click directly on the timecode numbers at the bottom of the Viewer, then enter the timecode where you want to move the playhead.

Press Return and the playhead jumps there instantly.

EXTRA CREDIT

Enter timecode as HHMMSSFF, without punctuation.

Type +, followed by a number and Return, and the playhead will add that duration to the current playhead location and move right.

Type , followed by a number and Return, and the playhead will subtract that duration to the current playhead location and move left.

If you enter a number greater than your frame rate, FCP X will automatically calculate the correct duration.


Please rate the helpfulness of this tip.

Click on a star to rate it!

… for Apple Final Cut Pro X

Tip #998: Slip Your Way to Better B-roll

Larry Jordan – LarryJordan.com

The Slip tool in action, changing content without changing position or duration.

Topic $TipTopic

There’s a tool hidden in Final Cut that offers a faster way to select the best section of B-roll for your projects. We all know how to trim the edges of a clip. But, Final Cut also allows us to trim the content of a clip – using the Slip tool. Here’s how.

  • Select the Trim tool (Shortcut: T).
  • Click in the middle of a timeline clip and drag left or right.
  • As you do, the content of the clip changes, but not its duration or location in the timeline.

I use this technique constantly to quickly select the portion of a clip I want to use for B-roll and edit it to the timeline.

I then trim the edges of the clip to set its position and duration exactly the way I want.

Finally, I use the Slip tool (which is what we are doing when we drag the Trim tool in the middle of a clip – we are “slipping” the content) to select a different portion of the clip.

Slipping allows me to select the best portion of a clip after first setting its timing.


Please rate the helpfulness of this tip.

Click on a star to rate it!

… for Apple Final Cut Pro X

Tip #1001: The Little Red Box

Larry Jordan – LarryJordan.com

To quickly reset a zoomed-in image, type Shift + Z.

The red box helps you navigate around a zoomed-in Viewer image.

Topic $TipTopic

Ever wonder what that red box is that appears periodically on the right side of the Viewer? Well, here’s the answer.

The red box appears whenever you are zoomed into an image in the Viewer (not the timeline) such that the entire image can’t be displayed.

The red box acts as a positioning control to move about the image. Drag inside the box to change the portion of the image displayed in the Viewer.

To remove the red box, type Shift + Z (which fits the entire image in the Viewer) or click the percent menu at the top right corner of the Viewer and change the percentage to Fit.


Please rate the helpfulness of this tip.

Click on a star to rate it!

… for Apple Final Cut Pro X

Tip #980: Final Cut Adds Custom Overlays

Larry Jordan – LarryJordan.com

Overlays provide custom framing display options.

A Viewer image with an overlay showing 16:9, 4:3 and 1:1 grids.

Topic $TipTopic

A new feature in the 10.4.9 update to Final Cut Pro X is custom overlays. These are PNG or TIFF graphics that can be superimposed on clips in the Viewer to help frame shots – especially for different aspect ratios.

In Photoshop, or the graphics app of your choice, create the image you want to import. While you can use any graphic, I recommend using a grid, because this will be placed over all Viewer images. Make sure the background is transparent, because, again, this will be supered over other images.

Save the image in a location you can find later.

  • Open Final Cut and go to the View menu in the top right corner of the Viewer.
  • Choose Custom Overlay > Add Custom Overlay and select the image you just created.
  • From the same menu, choose Show Custom Overlay and choose the transparency percentage you want to use.

NOTE: In the screen shot, the white grids indicate framing for 16:9, 4:3 and 1:1. Transparency is set to 75%.

Overlays can be anything you want. Keep in mind, however, that these won’t output. If you need to include them in your project the images need to be in the timeline.

EXTRA CREDIT

To turn off the overlays, uncheck Show Custom Overlays.


Please rate the helpfulness of this tip.

Click on a star to rate it!