… for Apple Final Cut Pro X

Tip #471: Create Visual Effect Keyframes Automatically

Larry Jordan – LarryJordan.com

The Range tool allows quickly setting keyframes for a variety of effects.

Using the Range tool to select a range for keyframing a visual effect.

Topic $TipTopic

You may know that we can set audio level keyframes quickly by selecting a range within a clip, then dragging the audio level line up or down. But did you also know you can use this same trick for visual effects? Here’s how.

  • Apply a video effect, such as a blur, to a clip.
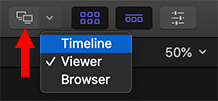
  • Select the clip and choose Clip > Video Animation.
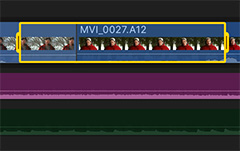
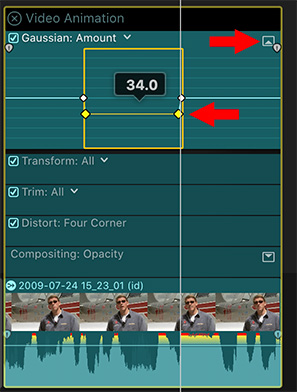
  • Double-click the disclosure triangle for the effect you want to adjust. (Top arrow)
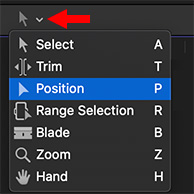
  • Using the Range tool (shortcut: R), select the range where you want to automate the effect. (Bottom arrow)
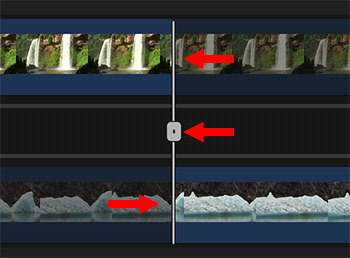
  • Drag the setting line up or down. Keyframes are automatically created!

EXTRA CREDIT

To hide the Video Animation, choose Clip > Video Animation, again.


Please rate the helpfulness of this tip.

Click on a star to rate it!

… for Apple Final Cut Pro X

Tip #472: What Are Auditions in Final Cut Pro X?

Larry Jordan – LarryJordan.com

Auditions allow for quickly reviewing different clips to pick the one you like.

To create an audition, drag a Browser clip on top of a Timeline clip.

Topic $TipTopic

This tip first appeared in an Apple KnowledgeBase article. Here’s a link to learn more about Auditions.

In Final Cut Pro, you can organize related clips into sets, called auditions, from which you can choose one clip to use. You can create an audition composed of different clips to try out multiple takes, or you can create an audition composed of multiple versions of the same clip to preview different effects.

An audition’s filmstrip displays the currently selected clip, called the pick. All other clips in the audition are referred to as alternates. You can open an audition to see the selected clip and the alternates.

Auditions allow you to preserve alternate edits without affecting the other clips in the timeline. When you’re not reviewing the clips in an audition, the audition functions like an individual clip. You can trim an audition, apply transitions between auditions and other clips, and add keywords and markers.

After you’ve reviewed the clips in the audition and decided which one works best in your project, you can finalize the audition, which converts it into an individual clip in the timeline. The pick retains the audition’s position in the timeline and all keywords and markers applied to the audition.


Please rate the helpfulness of this tip.

Click on a star to rate it!

… for Apple Final Cut Pro X

Tip #490: What is Range Check?

Larry Jordan – LarryJordan.com

Range Check flags excessive white levels or chroma (color) saturation.

The View menu in the top right corner of the Final Cut Viewer, showing Range Check options.

Topic $TipTopic

Have you ever wondered what “Range Check” does in the View menu? It’s actually really useful – it flags excessive white and chroma (color) saturation levels. Here’s what you need to know.

If you are posting media to the web, virtually any gray-scale or chroma value will be fine. The web is very forgiving.

But, not so broadcast, cable or digital cinema. Here, because of technical constraints, white levels can not exceed 100% and chroma levels can’t exceed certain amounts of saturation.

What Range Check does is flag – using a moving series of red lines (see screen shot) – areas of the frame that exceed white level limits (Luma), excessive saturation (Chroma) or both (All).

To fix this problem, either adjust your color grading or apply Effects > Color > Broadcast Safe.


Please rate the helpfulness of this tip.

Click on a star to rate it!

… for Apple Final Cut Pro X

Tip #440: Secrets of the Range Tool

Larry Jordan – LarryJordan.com

Ranges make it easy to set and In and Out.

A range selected in the Final Cut Pro X timeline.

Topic $TipTopic

The Range tool (shortcut: R) is one of those tools in Final Cut that could be useful, but isn’t as useful as it could be. Still, it can help you to quickly set an In and Out.

Select the Range tool from the Tool popup menu. Then, drag to select a region in the Timeline. What you’ve just done is set an In and an Out that applies to all layers within that range.

  • To change the duration, drag an edge – or –
  • Type Control + D and enter the revised duration using timecode
  • To cancel the range, type Option + X

The Range tool is very helpful in creating a back-time edit, which covered in Tip #481, or a 3-point edit, which is covered in Tip #482.

WHAT’S MISSING?

  • The ability to click in the middle of the range to move it without losing the duration.
  • The ability to select and move an edge using the keyboard.

For me, it’s often easier to just use the playhead and set the In and Out manually.


Please rate the helpfulness of this tip.

Click on a star to rate it!

… for Apple Final Cut Pro X

Tip #481: The Power of a Back-time Edit

Larry Jordan – LarryJordan.com

Back-time edits are used in situations where you care more about the end than the beginning.

Topic $TipTopic

A back-time edit is one where the Out of the clip in the Browser is matched to an Out in the timeline, then Final Cut calculates where to apply the In.

NOTE: A back-time edit doesn’t play a clip backwards, rather it determines the position of a clip based on the Out, rather than the In.

An example of using a back-time edit is sports, where you care more about the runner crossing the finish line than where they started running. To create a back-time edit:

  • Set at least an Out in a clip in the Browser
  • Set at least an Out in the Timeline, or use the Range tool to set both the In and Out.
  • Type Shift + D to back-time edit the clip into the Timeline
  • – or – type Shift + Q to back-time edit the clip on a higher layer.

NOTE: Setting an Out in the timeline always sets a range. When the edit is performed, the duration indicated by the range in the timeline determines the duration of the edit. The Browser In is ignored.

Experiment with this feature, you’ll discover all kinds of places where this can solve an editing challenge.


Please rate the helpfulness of this tip.

Click on a star to rate it!

… for Apple Final Cut Pro X

Tip #482: How to Create a 3-point Edit

Larry Jordan – LarryJordan.com

3-point edits provide precision without changing duration.

Topic $TipTopic

A 3-point edit is one where the duration of a range in the Timeline determines where a clip from the Browser will begin and end. These are used in an already-edited project where you need to insert a shot, without changing the duration of the overall sequence.

Here’s how to create one:

  • Set at least an In for a clip in the Browser.
  • Use the Range tool to set an In and Out in the Timeline.
  • Type D to perform an overwrite edit in the timeline equal to the Range and matching the In of the Browser clip to the In of the timeline.
  • Type Q to perform the same edit, but place the new clip on a higher layer.

The benefit to a 3-point edit is precision. You can precisely control where a clip starts and where it ends, without changing the overall duration of your project. And this technique makes creating them very fast.


Please rate the helpfulness of this tip.

Click on a star to rate it!

… for Apple Final Cut Pro X

Tip #437: Secrets of the Skimmer

Larry Jordan – LarryJordan.com

The skimmer has a hidden feature.

Type Control – Y to reveal the skimmer info panel.

Topic $TipTopic

The Skimmer in Final Cut Pro X allows us to quickly review clips in the Browser. But, did you know it has a hidden feature that’s just a keystroke away? It does.

Type Control – Y.

This displays the skimmer info panel, displaying the name of the clip and the timecode location of the skimmer. This makes controlling the skimmer much more precise.


Please rate the helpfulness of this tip.

Click on a star to rate it!

… for Apple Final Cut Pro X

Tip #438: Secrets of the Precision Editor

Larry Jordan – LarryJordan.com

The Precision Editor is a great way to learn about trimming clips.

The Apple Final Cut Pro X Precision Editor.
An edit point opened for trimming in the Precision Editor of Final Cut Pro X.

Topic $TipTopic

The Precision Editor in Final Cut Pro is an incredibly useful teaching tool in Final Cut Pro. If you haven’t played with it, you are missing a treat. Here’s what it does.

To access the Precision Editor, double-click any edit point in the timeline. The Out-going clip is displayed on top.

The darkened portions of each clip are the “handles,” extra media that we need for trimming and transitions. Trimming ends when we run out of handles.

  • To trim the Out, drag the top white line.
  • To trim the In, drag the bottom white line.
  • To roll trim both clips, drag the middle white line.

This is the best illustration of trimming I’ve ever seen, making it understandable even to people who are new to editing. I use it in every class.

To close the Precision Editor, press the ESC key.

EXTRA CREDIT

The reason I don’t use the Precision Editor for my own trimming is that it does not allow me to trim audio separately from video; which is a technique I use all the time.

Still, from a teaching point of view, the Precision Editor is unequaled.


Please rate the helpfulness of this tip.

Click on a star to rate it!

… for Apple Final Cut Pro X

Tip #439: Tips on Using the Position Tool

Larry Jordan – LarryJordan.com

The Position tool allows you to move any clip anywhere – even to leave gaps.

The Tool palette in Final Cut Pro X.

Topic $TipTopic

When Final Cut Pro X was first released, editors were aghast that the Magnetic Timeline prevented them from leaving gaps in the timeline. Leaving aside the issue of why you might, or might not, want to leave gaps, the answer is that since the beginning, FCP X has had the ability to create gaps in the timeline. It just isn’t obvious. Here’s how.

To access the Position tool, click the small arrow to the right of the Arrow tool at the top center of the Timeline. You can also use the keyboard shortcut of P.

With the Position tool:

  • When you drag a clip, the clip doesn’t spring back. Instead a media block of black video, called a gap, is inserted between the end of the previous clip and the one you are moving.
  • When you trim clips, it leaves a gap.
  • When you drag one clip on top of another, the edge of the new clip overwrites the old clip.
  • When you move a clip, any opened space is filled with a gap. This means that using the Position tool does not change the overall duration of a project.

Over the years, as I work in both Final Cut and Premiere, I’ve learned that the Position tool emulates older editing interfaces where dragging creates gaps and one clip overwrites another.

Final Cut gives us the ability to choose how our clips behave when we move them.


Please rate the helpfulness of this tip.

Click on a star to rate it!

… for Apple Final Cut Pro X

Tip #392: How to Use a Second Display with FCP X

Larry Jordan – LarryJordan.com

The Secondary Monitor display menu only appears when you have a second monitor connected.

Topic $TipTopic

This tip is from an Apple KnowledgeBase article. This is an excerpt.

Final Cut is programmed to support two computer monitors. But, the controls are hidden. When you connect a second computer display to your Mac, controls appear that allow you to move the viewer, browser, or timeline to the second display.

Make sure that the second display is connected to your Mac and turned on. When they are, the Secondary Display button and pop-up menu appear in the toolbar at the top of the Final Cut Pro window. (See screen shot)

To choose which area of the Final Cut Pro interface you want to move to the second display, do one of the following:

  • Click the Secondary Display pop-up menu and choose Timeline, Viewer, or Browser.
  • Choose Window > Show in Secondary Display > [item].

The area you chose moves to the second display, and the other areas of the Final Cut Pro window are adjusted on the primary display.

NOTE: Video scopes can be displayed on a second monitor along with the Viewer. Scopes can’t be displayed separately.


Please rate the helpfulness of this tip.

Click on a star to rate it!