SyncSketch is a team-based review web-app focused on animation and VFX.
The SyncSketch logo.
SyncSketch started as a tool to help Animation tutors review student work but has since evolved into the media review tool of choice for a number animation, post-production, VFX and games studios.
Their website says the software provides:
Real-time Reviews
A VFX and animation-optimized player
Team oriented
Can be integrated into an animation pipeline
Secure, using SSL technology with AWS access priviledges
Web-based
The current version also provides integration with Autodesk Maya, Autodesk Shotgun, Unity and Python.
They have three versions: Free, Pro ($8 / month / user) and Enterprise (requires a minimum of 20 members).
Their website has a variety of video tutorials that explain the product in more detail.
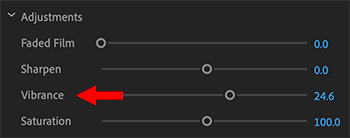
Vibrance also prevents over-saturation of highlights or shadows.
Vibrance settings in the Lumetri Color panel > Creative.
Ever wonder what the difference is between “vibrance” and “saturation?” Well, for video, the difference is significant.
SATURATION
Saturation uniformly increases the amount of all colors in an image, regardless of how saturated they already are. This can result in over-saturating (clipping) certain colors, or skin tones. This tends to make skin tones look too orange and unnatural.
VIBRANCE
Vibrance is a “smart-tool” which increases the amount of the more muted (less saturated) colors without adjusting the well-saturated colors. (Think of this as an audio limiter filter applied to saturation; soft passages are boosted, without changing the louder passages.) Vibrance also prevents skin tones from becoming overly saturated and unnatural.
Vibrance becomes especially helpful in not over-saturating highlights or shadows.
EXTRA CREDIT
The Vibrance setting is located in Lumetri Color > Creative.
Please rate the helpfulness of this tip.
Click on a star to rate it!
https://www.theinsidetips.com/wp-content/uploads/2019/09/Tips-Logo-700x150.jpg00Larry Jordanhttps://www.theinsidetips.com/wp-content/uploads/2019/09/Tips-Logo-700x150.jpgLarry Jordan2020-08-11 01:30:002020-08-11 01:30:00Tip #910: Vibrance vs. Saturation
AV1 will be a format we see used increasingly for web-based media.
AOMedia Video 1 (AV1) is an open, royalty-free video coding format designed for video transmissions over the Internet. It was developed as a successor to VP9 by the Alliance for Open Media (AOMedia).
The Alliance for Open Media (AOMedia) is a non-profit industry consortium for the development of open, royalty-free technology for multimedia delivery headquartered in Wakefield, Massachusetts. It adopts the principles of the development of open web standards for the creation of video standards that can serve as royalty-free alternatives to the hitherto dominant standards of the Moving Picture Experts Group (MPEG).
The governing members are Amazon, Apple, ARM, Cisco, Facebook, Google, IBM, Intel, Microsoft, Mozilla, Netflix, Nvidia, Samsung Electronics and Tencent. Its first project was to develop AV1, a new open video codec and format as a successor to VP9 and a royalty-free alternative to HEVC, which uses elements from Daala, Thor, and VP10.
The Alliance announced, on January 8, 2019, the release of a validated version 1.0.0 with Errata 1 of the specification. However, the spec still needs to be translated into shipping products.
In developing this open-source codec, the emphasis was on the encoding mechanism and making sure the codec was free of legal constraints. Consequently, the early version of AV1 was orders of magnitude slower than existing HEVC encoders. Much of the development effort was consequently shifted towards maturing the reference encoder; i.e. making it faster. In March 2019, it was reported that the speed of the reference encoder had improved greatly and was within the same order of magnitude as encoders for other common formats.
YouTube and Vimeo are already rolling out AV1. Netflix starting using AV1 in February, 2020. Facebook, Twitch and iQIYI are also rolling out support.
https://www.theinsidetips.com/wp-content/uploads/2019/09/Tips-Logo-700x150.jpg00Larry Jordanhttps://www.theinsidetips.com/wp-content/uploads/2019/09/Tips-Logo-700x150.jpgLarry Jordan2020-08-11 01:30:002020-08-11 01:30:00Tip #920: What is the AV1 Codec?
Transitions need to be used sparingly. Think of VR more as live theater than film.
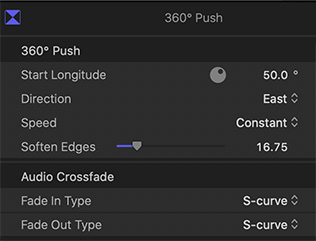
Note the difference in controls for a VR transition.
The key concept you need to understand about 360 VR video is that, because the video is a sphere, you need to edit as little as possible. However, you can still add transitions. Here’s how.
With normal video, most transitions start at the edge of the frame. But, with 360 VR, there is no edge – the entire image is a sphere. Moving in for a closeup on one side means moving away from a close-up on the other side of the sphere.
In traditional film, we bring the camera closer to the actor. In 360 VR, we bring the actor closer to the camera.
This “sphere-ness” also affects transitions. A traditional transition doesn’t understand that there’s an up or down to the image. This means that you need to pick transitions from the Transitions > 360° category.
Then, go to the Inspector and adjust the Longitude (starting point), Direction and Speed to get the effect you want.
EXTRA CREDIT
Remember, unlike traditional film, you can’t assume where the viewer will be looking. Since you are shooting a sphere, the viewer could be looking anywhere within it when your transition starts.
Soft edges are always a good idea.
Please rate the helpfulness of this tip.
Click on a star to rate it!
https://www.theinsidetips.com/wp-content/uploads/2019/09/Tips-Logo-700x150.jpg00Larry Jordanhttps://www.theinsidetips.com/wp-content/uploads/2019/09/Tips-Logo-700x150.jpgLarry Jordan2020-08-10 01:30:002020-08-10 01:30:00Tip #908: Add Transitions to 360 VR Video
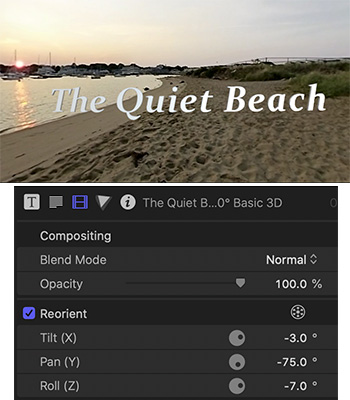
360 VR titles are positioned using the Reorient settings, not text positions.
The 360° Basic 3D title, Constantia font, positioned using Inspector > Reorient. (Image courtesy of Allynn Wilkinson.)
In traditional film, titles are fixed in relation to the frame. In 360 VR, they are locked to a specific position in the image. This means titles don’t “float,” they appear or disappear depending where in the VR sphere the viewer is looking.
This makes adding titles trickier because you can’t assume the viewer will actually see them if they are looking somewhere else.
Final Cut includes seven different 360° title templates. These are essentially the same, except for their built-in animation.
Unlike other titles, though, you position them using the Video Inspector > Reorient settings (see screen shot).
Keep in mind that if the viewer is looking somewhere else in the frame, they won’t see your title. For this reason keep titles on screen much longer than you would use for a “normal” film.
EXTRA CREDIT
It might help to think of titles more as “labels” than “titles.”
Please rate the helpfulness of this tip.
Click on a star to rate it!
https://www.theinsidetips.com/wp-content/uploads/2019/09/Tips-Logo-700x150.jpg00Larry Jordanhttps://www.theinsidetips.com/wp-content/uploads/2019/09/Tips-Logo-700x150.jpgLarry Jordan2020-08-10 01:30:002020-08-08 09:14:14Tip #909: Add a 360 VR Title
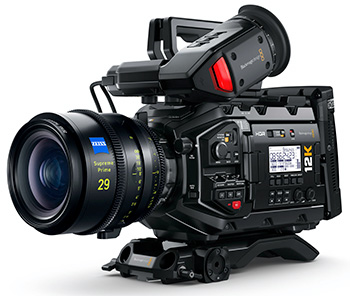
Last week, Blackmagic Design released a new version of the URSA Mini camera that shoots 12K video frames! Why???
As many of you know, I am not a fan of ever-larger frame sizes; or the massively huge files these formats create. However, recently, Simon Wyndham, writing for Red Shark News, wrote a thoughtful analysis of the thinking behind this camera.
The entire article is worth reading, including a discussion of why the camera supports Blackmagic RAW, but not ProRes or ProRes RAW, and the new way it uses to record raw sensor data that bypasses deBayering. Like I said, an article well worth reading.
However, the key behind Simon’s analysis for me was his thinking about 12 K images. Here’s an excerpt:
“Blackmagic Design didn’t really make the camera with the resolution it has so that you can film in 12K. You can do this perfectly easily of course if you want to, but the real reason why it exists is so that you can shoot exceptional 8K and 4K.
“It was famously said that the perfect resolution for a camera is 100MP (14K). Why? Because the human eye consists of 100 million rods and cones. The 80MP of the 12K URSA Mini is well on the way towards that ideal. At resolutions as high as this pixels become pretty much irrelevant. It becomes a point at which digital, for all intents and purposes, becomes analogue.
“Noise structure becomes incredibly fine, and with oversampled lower resolutions it becomes averaged out further. Subtly of detail and texture structure is picked up that you simply do not achieve with a native 4K or even 8K camera. At this sort of resolution, while aliasing technically still exists, it is visually reduced to nothing. It’s just too fine to see. High frequency edges become naturally smooth.
“Even on a 4K television, and in some instances an 8K one it is possible to see the edge structure on something like sharp white text on a dark background depending on the distance you sit. At ultra high resolutions these high frequency edges are totally smooth. And as we’ve mentioned many times before on RedShark, higher resolutions are not necessarily about more detail, but much more about edge smoothness.
“So primarily the 12K URSA Mini is not about actually filming 12K on a daily basis, but it is about filming extremely high quality oversampled lower resolutions.
“Do you need the extra resolution? No, you can work perfectly well with your existing 4K camera. But, and it’s a big but (no Shrek reference intended), we are in the business of producing the best pictures possible. And while high resolution isn’t the only arbiter of picture quality, it is an indisputable fact that it is most certainly an important one.”
Please rate the helpfulness of this tip.
Click on a star to rate it!
https://www.theinsidetips.com/wp-content/uploads/2019/09/Tips-Logo-700x150.jpg00Larry Jordanhttps://www.theinsidetips.com/wp-content/uploads/2019/09/Tips-Logo-700x150.jpgLarry Jordan2020-08-07 01:30:002020-08-02 16:11:06Tip #897: The Real Reason for a 12K Camera
One take means much more pressure on production – but the results are worth it.
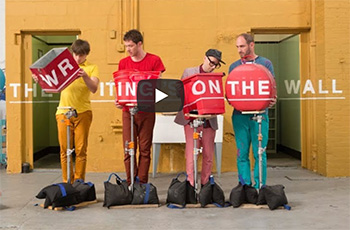
Screen shot from OK Go “The Writing’s on the Wall.”
The folks at MotionArray have compiled the Top Ten One-Take Music Videos. Because, why not? This article first appeared in MotionArray.com. This is an excerpt.
We often focus on the art of editing, but what about the art of not editing? What we mean here, is the very tricky art of directing and shooting a scene in a single take. And in this case, we’re taking a look at some of our favorite single take music videos.
Here’s their list. The link at the top provides more details and a link to each video. Enjoy debating your own top ten.
Lucas – Lucas with the Lid Off
Feist – 1, 2, 3, 4
Cibo Matto – Sugar Water
Interpol – No I in Threesome
Gary Jules – Mad World
OK GO – The Writing’s On The Wall
Bat For Lashes – What’s A Girl To Do
Weezer – Undone, The Sweater Song
Sia – Chandelier (One Take Version)
OK GO – Upside Down & Inside Out
Please rate the helpfulness of this tip.
Click on a star to rate it!
https://www.theinsidetips.com/wp-content/uploads/2019/09/Tips-Logo-700x150.jpg00Larry Jordanhttps://www.theinsidetips.com/wp-content/uploads/2019/09/Tips-Logo-700x150.jpgLarry Jordan2020-08-07 01:30:002020-08-07 01:30:00Tip #898: Top Ten Single Take Music Videos
Buy gear as you need it, not in anticipation of needing it.
Blackmagic URSA Mini 12K camera.
This article, written by Jourdan Aldredge, first appeared in PremiumBeat.com. This is an excerpt.
From 4K cameras and gimbals to editing software and computers, here’s a look at the essential gear you’ll need to start your own video production company.
While you’ll find lots of content online that insists you should immediately get your hands on a high-end camera, a couple of new drones, and some studio space — — I actually suggest starting small when it comes to cameras, gear, and equipment.
Larry adds: My philosophy is to buy your gear using client dollars, rather than your own, as much as possible.
Here is the essential gear Jourdan recommends:
Versatile 4K Hybrid Camera. Any video production company that wants to get work needs to have a 4K camera ready to go at a moment’s notice. Luckily, there are plenty of surprisingly affordable options.
Go-To Cinema Camera (Own or Rent). You can get more work — broadcast commercial shoots and the like — by offering clients a higher-end cinema camera option. However, I’d suggest renting high-end cameras until you’re certain you’ll need one consistently enough to warrant the investment.
Tripods, Gimbals, and Rigs. For those just starting out, I recommend investing in at least one: tripod, slider, handheld rig and gimbal/steadicam.
Three-Point Lighting Kit. Invest based on current needs, then expand. Specifically, start with a simple three-point lighting kit that’s functional, easy to move quickly, sturdy enough to not fall or break, and priced in a way that won’t limit your resources elsewhere.
Audio Recording Bundle. Audio needs vary drastically from shoot to shoot, but I’ve found that having these basics will cover the majority of your projects:
Multi-channel audio recorder
Shotgun boom mic
Boom mic pole
Boom mic stand
Wireless lav kit
Multiple headphones
Quality Editing Computer. If you’re offering full service (also called turnkey) video production that includes editing work, then I highly recommend putting most of your investment resources into your computer(s) and editing workflow. Apple computers — like the Apple Mac Pro, iMac Pro, and MacBook Pro — have never let me down.
Editing Software. There’s no wrong answer here. Adobe Premiere Pro, Apple Final Cut Pro X and DaVinci Resolve still rule the industry.
EXTRA CREDIT
In the article linked above, Jourdan provides specific gear suggestions, with links to learn more.
Please rate the helpfulness of this tip.
Click on a star to rate it!
https://www.theinsidetips.com/wp-content/uploads/2019/09/Tips-Logo-700x150.jpg00Larry Jordanhttps://www.theinsidetips.com/wp-content/uploads/2019/09/Tips-Logo-700x150.jpgLarry Jordan2020-08-07 01:30:002020-08-07 01:30:00Tip #899: Essential Gear for a Production Company
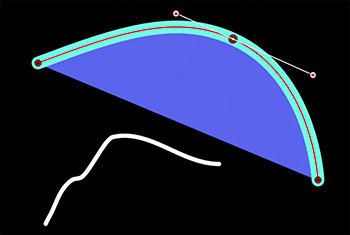
Curve control points are added by Option-clicking any line.
The cyan line was drawn by the Pen tools, the squiggle by the Paint Brush. Both were modified into curves using Edit Points.
Whether you draw a line with the Paint Brush or the Pen tool, once you’ve drawn the line, you can still make changes to it. Here’s how.
After you’ve drawn a line using either the Paint Brush or Pen tools, select the Edit Points tool.
NOTE: This is in the same menu as the Arrow (Select) tool.
Select the line you want to adjust in the Layers panel.
Then, Option-click with the Edit Points tool on the line where you want to add a curve and drag.
A curve is added.
EXTRA CREDIT
Drag the white Bezier control dots to change the shape of the curve.
Get different curve results by pressing Shift, Control, Option or Command while dragging a control dot.
Please rate the helpfulness of this tip.
Click on a star to rate it!
https://www.theinsidetips.com/wp-content/uploads/2019/09/Tips-Logo-700x150.jpg00Larry Jordanhttps://www.theinsidetips.com/wp-content/uploads/2019/09/Tips-Logo-700x150.jpgLarry Jordan2020-08-06 01:30:002020-08-01 10:24:26Tip #895: Add a Curve to a Line
There’s no perfect answer – but, at least, you have options.
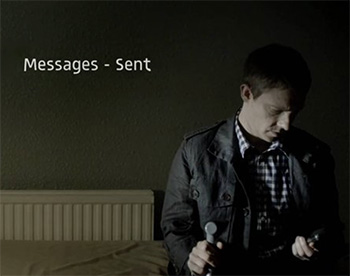
Image from “Sherlock” on the BBC.
This article, written by Rubidium Wu, first appeared in PremiumBeat.com. This is an excerpt.
Text messages are one of the main ways people communicate. And, as art imitates life, text messages have made their way into films and TV, which presents a problem for filmmakers — how to show a text message exchange in a way that doesn’t bore the audience.
Here are several ideas:
Method 1: Place Text on Screen. The first (and probably most popular way) to show a text message exchange is to shoot the phone itself. This is also how a lot of filmmakers show emails when the need arises. But it leaves you with a dated interface.
Method 2: Display Unfiltered Text On Screen. Rather than attempting on-screen OS representations, you can take the approach popularized by shows like Sherlock: Just display the message on the screen in plain, unfiltered text. (See screen shot.) This has the dramatic advantage of the above method, but it’s device agnostic — it works just as well for an early flip phone as it does for a future phone. However, this causes problems if you need to localize your film for multiple languages, as these titles are burned in.
Method 3: Use Subtitles. Why not, as some filmmakers have done, just insert a subtitle for the text message, as if it’s another character speaking? While this method doesn’t exactly scream “high production value,” it does help you avoid dated footage, allows you to see character reactions, and can be changed to any language.
EXTRA CREDIT
The article linked above includes more details, and a free template offer for After Effects users.
Please rate the helpfulness of this tip.
Click on a star to rate it!
https://www.theinsidetips.com/wp-content/uploads/2019/09/Tips-Logo-700x150.jpg00Larry Jordanhttps://www.theinsidetips.com/wp-content/uploads/2019/09/Tips-Logo-700x150.jpgLarry Jordan2020-08-05 01:30:002020-08-05 01:30:00Tip #900: Putting Text Message on Screen
We may request cookies to be set on your device. We use cookies to let us know when you visit our websites, how you interact with us, to enrich your user experience, and to customize your relationship with our website.
Click on the different category headings to find out more. You can also change some of your preferences. Note that blocking some types of cookies may impact your experience on our websites and the services we are able to offer.
Essential Website Cookies
These cookies are strictly necessary to provide you with services available through our website and to use some of its features.
Because these cookies are strictly necessary to deliver the website, refuseing them will have impact how our site functions. You always can block or delete cookies by changing your browser settings and force blocking all cookies on this website. But this will always prompt you to accept/refuse cookies when revisiting our site.
We fully respect if you want to refuse cookies but to avoid asking you again and again kindly allow us to store a cookie for that. You are free to opt out any time or opt in for other cookies to get a better experience. If you refuse cookies we will remove all set cookies in our domain.
We provide you with a list of stored cookies on your computer in our domain so you can check what we stored. Due to security reasons we are not able to show or modify cookies from other domains. You can check these in your browser security settings.
Google Analytics Cookies
These cookies collect information that is used either in aggregate form to help us understand how our website is being used or how effective our marketing campaigns are, or to help us customize our website and application for you in order to enhance your experience.
If you do not want that we track your visit to our site you can disable tracking in your browser here:
Other external services
We also use different external services like Google Webfonts, Google Maps, and external Video providers. Since these providers may collect personal data like your IP address we allow you to block them here. Please be aware that this might heavily reduce the functionality and appearance of our site. Changes will take effect once you reload the page.
Google Webfont Settings:
Google Map Settings:
Google reCaptcha Settings:
Vimeo and Youtube video embeds:
Other cookies
The following cookies are also needed - You can choose if you want to allow them:
Privacy Policy
You can read about our cookies and privacy settings in detail on our Privacy Policy Page.