… for Visual Effects

Tip #345: Add Perspective

Larry Jordan – LarryJordan.com

Perspective makes your text stand-out.

This text perspective was created in Premiere using the Corner Pin effect.

Topic $TipTopic

If your NLE does not support adjusting text in 3D space, there’s an easy way to create the effect of text receding into the distance.

In Final Cut, its called Distort. In Premiere, you can use either Basic 3D or the Corner Pin effect. Older NLEs will probably only support corner pinning.

What corner pinning does is allow you to move each corner of a text or video clip and stretch it so that which is closest to the “camera” is wide, while that which falls into the distance is narrow.

3D rotation allows you to rotate a clip along its X (horizontal), Y (vertical) or Z (depth) axis. 3D is easier to use, but corner pinning provides far more bizarre effects, like a clip getting extruded through a bottle.

There’s no “magic number” on where to set values, use what looks good to your eyes. This screen shot, for instance, was created in Premiere using Corner Pin, the Stencil font and a bit of tweaking.

EXTRA CREDIT

You can animate this effect using keyframes.


Please rate the helpfulness of this tip.

Click on a star to rate it!

… for Visual Effects

Tip #339: Inexpensive Green-screen Kits

Larry Jordan – LarryJordan.com

Do-It-Yourself is possible, but this kit is better.

This illustrates the contents of the Linco lighting kit.

Topic $TipTopic 
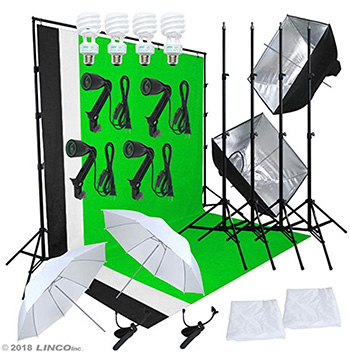
While there are tons of articles on the web about creating Do-It-Yourself green screen kits, what you save in money, you more than waste in post-production trying to pull a clean key from a cheap background. Instead, consider a green-screen background kit.

Here are three to look at.

There are many others to choose from. With these three, though, for less than $150, you get everything you need to create and light a background.

While the Emart kit is the least expensive, what I like about the other two kits is that they include softlights for the talent, as well.

The key to a successful key is an absolutely smooth and flat-lit background. Then, use separate lights to light the talent. Any of these kits can help.


Please rate the helpfulness of this tip.

Click on a star to rate it!

… for Visual Effects

Tip #335: Remove Black Backgrounds & Blend Clips

Larry Jordan – LarryJordan.com

Blend modes are a great way to combine effects.

Smoke swirling over a fire. Both are effects and both use the Screen blend mode.

Topic $TipTopic

While many effects, such as those from HitFilm or Red Giant, include a transparent background, called the “Alpha Channel,” other effects don’t.

If you need to remove a black background when adding light-based effects, such as smoke, fire, gun flashes, and sparks, add the effect on top of the video as desired, and then apply the Screen blend mode.

This trick also works when applying light leaks from companies such as Light Leak Love and Rampant Design Tools.

NOTE: Be careful using the Add blend mode. While OK for web work, this creates white levels that exceed broadcast, cable and digital theater specs. I recommend against using it.


Please rate the helpfulness of this tip.

Click on a star to rate it!

… for Codecs & Media

Tip #348: Codecs – Explained (Part 2)

Larry Jordan – LarryJordan.com

Lossy is smaller, Lossless is better

Topic $TipTopic

As we learned in Tip #347, there are two types of codecs: lossless and lossy. In this tip, I want to explain the difference. For this, we’ll turn to a Wikipedia article.

LOSSLESS

Lossless codecs are often used for archiving data in a compressed form while retaining all information present in the original stream. If preserving the original quality of the stream is more important than eliminating the correspondingly larger data sizes, lossless codecs are preferred. This is especially true if the data is to undergo further processing (for example editing) in which case the repeated application of processing (encoding and decoding) on lossy codecs will degrade the quality of the resulting data such that it is no longer identifiable (visually, audibly or both). Using more than one codec or encoding scheme successively can also degrade quality significantly. The decreasing cost of storage capacity and network bandwidth has a tendency to reduce the need for lossy codecs for some media.

LOSSY

Many popular codecs are lossy. They reduce quality in order to maximize compression. Often, this type of compression is virtually indistinguishable from the original uncompressed sound or images, depending on the codec and the settings used. The most widely used lossy data compression technique in digital media is based on the discrete cosine transform (DCT), used in compression standards such as JPEG images, H.26x and MPEG video, and MP3 and AAC audio. Smaller data sets ease the strain on relatively expensive storage sub-systems such as non-volatile memory and hard disk, as well as write-once-read-many formats such as CD-ROM, DVD and Blu-ray Disc. Lower data rates also reduce cost and improve performance when the data is transmitted.


Please rate the helpfulness of this tip.

Click on a star to rate it!

… for Codecs & Media

Tip #347: Codecs – Explained (Part 1)

Larry Jordan – LarryJordan.com

Always something new to learn about codecs.

Topic $TipTopic

I’ve used the term “codec” for years. Still, there’s always something new to learn. For example, according to Wikipedia, “A codec is a device or computer program which encodes or decodes a digital data stream or signal. Codec is a portmanteau of coder-decoder.”

NOTE: A “portmanteau” is a linguistic blend of words, in which parts of multiple words or their phonemes (sounds) are combined into a new word. (Right, I didn’t know that either.)

“In the mid-20th century,” Wikipedia continues, “a codec was a device that coded analog signals into digital form using pulse-code modulation (PCM). Later, the name was also applied to software for converting between digital signal formats, including compander functions.

“In addition to encoding a signal, a codec may also compress the data to reduce transmission bandwidth or storage space. Compression codecs are classified primarily into lossy codecs and lossless codecs.

NOTE: See Tip #348 for a description of lossy vs. lossless.

“Two principal techniques are used in codecs, pulse-code modulation and delta modulation. Codecs are often designed to emphasize certain aspects of the media to be encoded. For example, a digital video (using a DV codec) of a sports event needs to encode motion well but not necessarily exact colors, while a video of an art exhibit needs to encode color and surface texture well.
Audio codecs for cell phones need to have very low latency between source encoding and playback. In contrast, audio codecs for recording or broadcast can use high-latency audio compression techniques to achieve higher fidelity at a lower bit-rate.”

Many multimedia data streams contain both audio and video, and often some metadata that permit synchronization of audio and video. Each of these three streams may be handled by different programs, processes, or hardware; but for the multimedia data streams to be useful in stored or transmitted form, they must be encapsulated together in a container format; such as MXF or QuickTime.

Here’s the original Wikipedia article.


Please rate the helpfulness of this tip.

Click on a star to rate it!

… for Codecs & Media

Tip #346: Compressor is Not Faster in Catalina

Larry Jordan – LarryJordan.com

No speed improvements for H.264 or HEVC in Catalina

In all tests, average compression speeds in Catalina are slower than Mojave. (Shorter bars are faster.)

Topic $TipTopic

One of the new features in macOS Catalina is a revised graphics engine called Metal 2. Both Final Cut Pro X and Compressor were recently upgraded to support it.

Last week, I did an initial test comparing the speed of Apple Compressor running in macOS Mojave vs. Catalina. I ran these tests on the same computer (an i5) using the same data files and same compression settings using Apple Compressor. The Mojave tests used Compressor 4.4.5. The Catalina tests used Compressor 4.4.6.

NOTE: Additional tests indicate that H.264 compression is faster on iMac Pros and Mac Pros which use the T-2 chip. As well, compression speeds vary depending upon the number and type of applications open at the time of compression.

The short answer is that the latest version of Apple Compressor running on Catalina is slightly slower across all tests than Compressor running on Mojave. I will look at compression results using Adobe Media Encoder in the next Codec Tip Letter.

EXTRA CREDIT

Here’s the full article.


Please rate the helpfulness of this tip.

Click on a star to rate it!

… for Adobe Premiere Pro CC

Tip #286: Slicing and Dicing

Larry Jordan – LarryJordan.com

Active tracks become important when cutting clips.

Active tracks are those where the blue buttons on the right side are enabled.

Topic $TipTopic

In addition to the Razor tool, which cuts individual timeline clips wherever you click it, there are two keyboard shortcuts which can cut multiple clips at the same time at the position of the playhead. But they don’t behave the same way.

On the left side of the Timeline are two columns of blue buttons. The ones on the right indicate active tracks (blue is active, gray is not).

Put the playhead where you want to cut a stack of clips, then:

  • Type Cmd – K and only clips on active tracks are cut, as illustrated in this screen shot.
  • Type Shift – Cmd – K and all clips are cut, whether they are on an active track or not.

Cool.


Please rate the helpfulness of this tip.

Click on a star to rate it!

… for Adobe Premiere Pro CC

Tip #281: Enable On-Screen Image Adjustments

Larry Jordan – LarryJordan.com

Moving elements by dragging is MUCH faster!

Effect Controls panel detail in Adobe Premiere Pro CC.
Click “Motion” to enable modifying elements in the Program Monitor.

Topic $TipTopic

This is a very cool tip that I didn’t discover until I’d been using Premiere for several years.

Premiere provides the ability to resize, move and scale elements on screen in the Program Monitor, but you need to turn this feature on. And THAT is not easy to find. Here’s how.

  • Select a clip in the Timeline.
  • Click the word Motion in the Effect Controls panel.
  • A blue box surrounds the selected elements in the Program Monitor.
  • Drag a white dot to resize. Dragging a corner preserves the aspect ratio.
  • Click near, but outside, a corner to rotate the element
  • Click and drag inside the box to move the element.

To exit this mode, deselect the clip.

EXTRA CREDIT

  • Press the Shift key to constrain movement to horizontal or vertical directions.
  • Press the Command key to display guidelines.
  • Press Shift and Command to quickly center an object vertically or horizontally.

Please rate the helpfulness of this tip.

Click on a star to rate it!

… for Adobe Premiere Pro CC

Tip #280: Adjustment Layers are Magic

Larry Jordan – LarryJordan.com

Adjustment Layers are a fast way to change multiple clips all at once.

The New Item menu in Adobe Premiere Pro CC.
Create a new Adjustment Layer using the New Item menu in the Project panel.

Topic $TipTopic

An Adjustment Layer is a special kind of video clip that is placed above one or more clips in the Premiere timeline to which, when you apply an effect, those effects apply to every video clip under the adjustment layer.

If you’ve worked with adjustment layers in Photoshop, these work the same way, except they apply to layers of video, rather than layers in a still image.

To create an adjustment layer, click the New Item icon in the lower right corner of the Projects panel (blue in this screen shot) and select Adjustment Layer from the menu.

The next menu allows you to specify the size and timebase for the clip. For most situations, accept the defaults.

Then, watch what happens as you add different effects to this new clip. Remember, an adjustment layer ONLY affects clips that are stacked below it in the timeline.

NOTE: A good place to start using adjustment layers is to use one to create a consistent color look for all your clips.


Please rate the helpfulness of this tip.

Click on a star to rate it!

… for Apple Final Cut Pro X

Tip #334: What is Continuous Playback?

Larry Jordan – LarryJordan.com

This is a fast way to screen multiple clips.

Continuous playback simplifies screening multiple clips.

Topic $TipTopic

Continuous playback allows you to quickly review clips in the Browser without constantly selecting them and pressing Play.

When this setting is chosen, multiple event clips play without interruption (rather than stopping at the end of each clip).

  • Click the clip icon in the top right corner of the Browser and check Continuous Playback.
  • Once that’s checked, put your playhead in any Browser clip and press play.

When the first clip finishes, playback immediately continues with the next clip.

EXTRA CREDIT

Remember, you can add markers to any Browser clip by pressing M. This allows you to flag key sections during initial screening.


Please rate the helpfulness of this tip.

Click on a star to rate it!