… for Adobe Premiere Pro CC

Tip #298: 2 Tricks to Moving Clips

Larry Jordan – LarryJordan.com

These two tricks save time when moving clips.

Swapping a clip from one location to another. The moved clip can be placed on any track.

Topic $TipTopic

Once we have a rough cut complete, it is often necessary to move or replace clips in the timeline. Here are two tricks that make that easier.

SWAP CLIPS

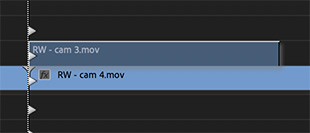
To move a clip to a new position, press and hold both Command and Option. Drag the clip so the In of the clip you are moving is at its new location. While you would generally place it on the same track that it came from, you can actually place the swapped clip on any track.

As soon as you let go of the mouse, the clip shuttles into its new position and the clips to its right scurry down to fill the gap.

REPLACE CLIP

To replace a clip without losing any transitions or effects applied to it:

  • Select the clip in the timeline you want to replace
  • Drag the new clip from the Project panel on top of the existing clip while pressing Option (Alt).

Please rate the helpfulness of this tip.

Click on a star to rate it!

… for Apple Final Cut Pro X

Tip #449: Display Scopes on a Second Computer Monitor in FCP X

Larry Jordan – LarryJordan.com

A second computer monitor is a big help when editing video.

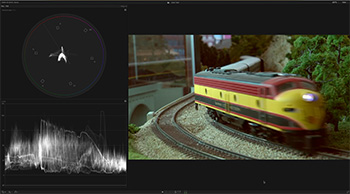
Video scopes displayed vertically on a second computer monitor running FCP X.

Topic $TipTopic

Tip #392 showed how to use a second computer monitor attached to your Mac when editing with Final Cut Pro X. One of the benefits of using a second monitor is that it allows us to display both a larger video image in the Viewer and much larger video scopes. Here’s how.

NOTE: Displaying Final Cut Pro X to a second monitor is always full-screen; you can’t scale the interface.

  • Display the Viewer on the second monitor.
  • Type Cmd+7 to display video scopes. (They appear on the second monitor along with the Viewer.)
  • Go to the View menu in the top right corner of the video scopes and change them to a vertical alignment (top row, second box).

Depending upon the size of your monitor, you can display a 4K image full screen, and still have room for the scopes.

Cool.


Please rate the helpfulness of this tip.

Click on a star to rate it!

… for Apple Final Cut Pro X

Tip #406: What’s the Best Way to Backup a Project?

Larry Jordan – LarryJordan.com

There are two options to backup a project. Which is best?

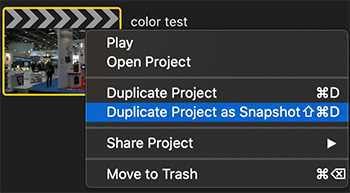
Duplicate Project is faster, Duplicate Project as Snapshot is a better choice.

Topic $TipTopic

One of the big benefits of Final Cut Pro X is its ability to instantly save whenever you do something. Which is fine, most of the time. But, what if you want to make a protection copy of just a single project? Now you have two options:

  • Duplicate Project.
  • Duplicate Project as Snapshot.

Which do you use? Duplicate Project as Snapshot. (To view this menu, Control-click the Project image or name in the Browser.)

These each create an identical protection copy until you are using multicam or compound clips. When you duplicate a project as a snapshot, Final Cut Pro embeds copies of compound or multicam “parent” clips in the duplicate, so any changes to other instances of those clips do not affect the duplicate.

If you work on projects that contain compound clips and multicam clips, you can use the Duplicate Project as Snapshot command to create a self-contained backup version of a project that includes referenced compound clips or multicam “parent” clips. Changes you make to other instances of the compound clips or multicam clips do not affect the versions in the duplicate, so your project is protected from accidental changes.


Please rate the helpfulness of this tip.

Click on a star to rate it!

… for Apple Final Cut Pro X

Tip #392: How to Use a Second Display with FCP X

Larry Jordan – LarryJordan.com

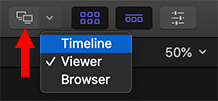
The Secondary Monitor display menu only appears when you have a second monitor connected.

Topic $TipTopic

This tip is from an Apple KnowledgeBase article. This is an excerpt.

Final Cut is programmed to support two computer monitors. But, the controls are hidden. When you connect a second computer display to your Mac, controls appear that allow you to move the viewer, browser, or timeline to the second display.

Make sure that the second display is connected to your Mac and turned on. When they are, the Secondary Display button and pop-up menu appear in the toolbar at the top of the Final Cut Pro window. (See screen shot)

To choose which area of the Final Cut Pro interface you want to move to the second display, do one of the following:

  • Click the Secondary Display pop-up menu and choose Timeline, Viewer, or Browser.
  • Choose Window > Show in Secondary Display > [item].

The area you chose moves to the second display, and the other areas of the Final Cut Pro window are adjusted on the primary display.

NOTE: Video scopes can be displayed on a second monitor along with the Viewer. Scopes can’t be displayed separately.


Please rate the helpfulness of this tip.

Click on a star to rate it!

… for Random Weirdness

Tip #424: 3 Tips for Lighting Different Skin tones

Larry Jordan – LarryJordan.com

Different skin tones require changes to our lighting.

Image courtesy of Pexels.com.

Topic $TipTopic

This article, wriiten by Rubidium Wu, first appeared in PremiumBeat. This is an excerpt.

Lighting different skin tones in the same scene is really tough. Here are some tricks to consider.

If the talents’ skin tones are different, but not radically so, you can usually get away with placing the darker skinned person closer to the key light, keeping the light close to the talent. Because of the inverse square law, exposure falls off quickly when it’s near a source of light, then more slowly as it gets further away.

Zones of Light. By bringing in a flag or cutter close to the actor so that more of the key hits the darker skinned actor than the lighter skinned actor, you effectively create two zones of lighting — one brighter than the other. The actors will need to stay on their marks, if they’re to be correctly lit.

Negative Lighting. If you’re outdoors, or utilizing some other source of bright light, you can use exposure for the darker skin, and use scrims or negative fill to take light away from the brighter skin. This is a trick also used by corporate headshot photographers who want to stop white shirts from being overexposed. They put a double net scrim (which takes away a stop of light) on its own C-stand (or light stand), and use it to shade the bright area. If the scrim is close enough to the light, it won’t create a visible shadow in the shot.

Fill. It’s no good to light just one side of your talent’s face. You also need to light the darker side so that it doesn’t fall off into dark shadow.
The fill light doesn’t need to be as big as the key, it just needs to be more controlled. I’ve had the most success using a 1×1 or 2×1 with a 45 degree grid. This means you can aim it at just the location you want, and it should fill only the area you need lighter. You may have to pan the light away so that no light is hitting the lighter skin, and you may also need to add more negative fill off camera so that the light, once it’s lit your desired area, doesn’t bounce everywhere and bring up the levels over the whole room.

Please rate the helpfulness of this tip.

Click on a star to rate it!

… for Random Weirdness

Tip #423: 7 Reasons to Add Narration

Larry Jordan – LarryJordan.com

Narration adds power, speeds action and consolidates back-story.

Narration adds power, speeds action and consolidates back-story. (Image courtesy of pexels.com.)

Topic $TipTopic

This article, written by Jourdan Aldredge, first appeared in PremiumBeat. This is an excerpt.

For filmmakers, narration is truly a powerful tool — voice-over narration helps us understand what we’re seeing. Regardless of where you are in production, here are seven reasons you should consider using voice-over narration in your project.

  • Beef Up Your Narrative. Adding narration can be a great way to beef up your narrative to turn a section from a weakness into a strength.
  • Accelerate Exposition. Set things up much more quickly than otherwise possible.
  • Add Depth to a Character.
  • Lay Out the Broad Strokes. Especially with sequels, this helps jump start the action by quickly filling in the back-story.
  • Make Your Film More Active.
  • Add Humor to Your Scenes. Similar to making films more active, adding voice-over narration can also add more humor to your scenes.
  • Raise Issues of Reliability. If you are looking to add narration to your project, it’s also worth considering making it less than reliable. An unreliable narrator can cause a very drastic thematic response when the truth is revealed to the audience.

Please rate the helpfulness of this tip.

Click on a star to rate it!

… for Random Weirdness

Tip #422: 4 Tips to Researching Your Topic

Larry Jordan – LarryJordan.com

All documentaries benefit from as much research as possible.

Research is essential to any documentary. (Image courtesy of Pexels.com.)

Topic $TipTopic

This article, written by Tanner Shinnick, first appeared in PremiumBeat. This is an excerpt.

Research is essential to any documentary. Strong research ensures a successful and captivating documentary film. Here are some resources to consider as you research your own projects.

Academic Research Papers.
Academic research papers are wonderful tools for documentarians. Chances are that there are academic research papers out there about your topic. A simple Google search or thumbing through references on Wikipedia can uncover many of them.

Larry adds: Recently, I’ve started using Bookends as a research and bibliography database. It can be very helpful in finding and organizing academic sources.

Newspapers.
I find newspapers extremely valuable documentary research resource. If the paper you’re looking for isn’t digitized, you could always visit the publication’s local library where you can view the slides or microfilm.

First-Hand Accounts.
Research interviews can uncover a lot of information about a subject or topic. By simply allotting time to chat with key subjects about a topic, you can uncover valuable information that may not be available online or in books.

Archival Footage or Photos.
AStrong research ensures a successful and captivating documentary film.rchival footage or photos can provide contextual visual information to your film.Here are some resources to consider.


Please rate the helpfulness of this tip.

Click on a star to rate it!

… for Apple Motion

Tip #434: Create Smoother Gradients in Apple Motion

Larry Jordan – LarryJordan.com

The default gradient settings in Motion are not that good. These are better.

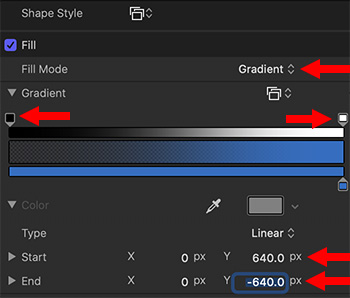
Changing Start and End to equal, but opposite, values creates a much smoother gradient.

Topic $TipTopic

This tip was suggested by a comment from Mark Spencer to Tip #93.

In that original tip, I wrote that the gradients in Motion are not particularly smooth; rather, I recommended that you create smooth gradients in Photoshop, then import them into Motion. While this works, Mark pointed out that we can create much smoother gradients if we “play with the numbers.”

For instance, in this screen shot, I’ve created a gradient where the same color (lower blue bar) fades from transparent to fully opaque (top white bar).

The problem is that the default settings for a gradient create a very abrupt change.

To fix this:

  • Twirl down the small arrow to the left of the word “Gradient”
  • Change both the Start and End values to equal, but opposite, larger numbers.

For example, to create a smooth gradient that fills the frame, change Start to a positive value equal to 1/2 the horizontal width of your project and End to a negative value equal to 1/2 the width of your project. In this screen shot, I created a smooth gradient for a 1280 x 720 project. Half of 1280 is 640.


Please rate the helpfulness of this tip.

Click on a star to rate it!

… for Apple Motion

Tip #433: Why Display Alpha Channels

The alpha channel displays the transparency in a clip.

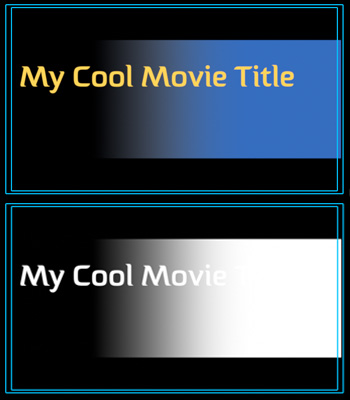
The top image is in color, the lower image shows its transparency.

Topic $TipTopic

One of the options in the top right corner of the Motion Viewer is the ability to display the alpha channel of the current project. (You’ll find it in the menu under the color square.) But, why would you need this?

The alpha channel, like the red, blue and green channels, displays the amount of transparency associated with each pixel. For instance, in this screen shot, does the gradient in the top, color, image fade to black or transparent? It’s impossible to tell.

However, when you look at the bottom image, which displays transparency, it is easy to see that the image fades from solid black (transparent) to solid white (opaque). (Shades of gray represent differing amounts of translucency.)

Remember, the alpha channel doesn’t show color, it shows transparency.


Please rate the helpfulness of this tip.

Click on a star to rate it!

… for Apple Motion

Tip #432: Create Your Own Templates in Motion

Larry Jordan – LarryJordan.com

Templates allow you to speed repetitive tasks.

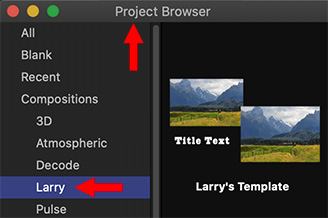
Templates are listed on the left side of the Project Browser in Motion.

Topic $TipTopic

If you find yourself creating the same projects over and over in Motion, here’s fast way to create a template to speed your work.

When you are creating the same thing over and over, only to vary one small detail – for example, the text – a template can save you time and improve your accuracy.

Here are the steps:

  • Create a new Motion project (or open an old one).
  • Make all the changes you want, including adding all media, effects and text.
  • When it is done, choose File > Publish Template.
  • Give your template a name and, ideally, a new Category. In my screen shot, I created a category called “Larry” which is the location where I store all my unique templates.
  • If you want to use this template in Final Cut Pro X, also check Publish as Final Cut Generator.

Once you’ve created a template, it will always be available on the left side of the Project Browser when you first start Motion. Double-click it to open.

Done.


Please rate the helpfulness of this tip.

Click on a star to rate it!