… for Codecs & Media

Tip #646: When Does Video Compression Use the GPU?

Larry Jordan – LarryJordan.com

Most editing codecs use the GPU, most web codecs do not.

Topic $TipTopic

One of the never-ending debates is how to configure the “best” computer. While this question is unanswerable in general, when it comes to video compression, here’s what you need to know.

CPUs, in general, provide linear calculations – one calculation after the other.

GPUs, in contrast, provide parallel calculations – multiple calculations occurring at the same time.

  • GOP-based codecs benefit most from linear – CPU – calculations due to the structure of the GOP. If you need to create H.264 materials, the faster the CPU, the faster compression will complete.
  • I-frame codecs, on the other hand, benefit from the GPU because different frames can be calculated at the same time, then stitched together for the final movie.

This ability of I-frame codecs to use the GPU to accelerate render and export speeds is one of the reasons they are recommended for editing.


Please rate the helpfulness of this tip.

Click on a star to rate it!

… for Adobe Premiere Pro CC

Tip #624: Not All Captions Look Alike


Captions are designed for simplicity, not fancy formatting.

SRT Caption formatting controls in Apple Final Cut Pro X.

Topic $TipTopic

When you import SRT files and XML files that have open caption data in them, Premiere Pro automatically converts these files to CEA-708 CC1 closed caption files. You can then edit these files and burn in the captions as subtitles while exporting using Premiere Pro or Adobe Media Encoder.

However, SRT closed captions are designed for readability and flexibility, not formatting. The Federal Communications Commission’s rules about closed captioning include details about caption accuracy, placement, and synchronicity. They don’t say anything about formatting. Avoid problems – read this.

Captions are designed for readability and flexibility – you can turn them on or off, or choose between languages. Captions are not designed to be styled. All captions, except SCC, are designed to be stored in sidecar files. These are separate files from the media, but linked to it.

SCC captions, which can be embedded in the video itself — well, one language at least – are limited to two lines per screen each with only 37 characters per line. They also require a frame rate of 29.97 fps (either drop or non-drop frame). Yup, limited.

SRT captions are more flexible. SRT captions are known for simplicity and ease-of-use, especially when compared to other formats, many of which used XML-based code. It was adopted by YouTube as a caption format in 2008.

SRT captions only supports basic formatting changes including: font, color, placement and text formatting. HOWEVER, there is no clear standard for these style changes. Even if you apply them to your captions there is no guarantee that the software playing your movie will know how to interpret them.

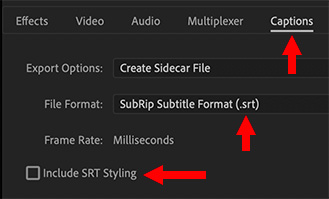
For this reason, when exporting SRT files using File > Export > Media (screen shot), turn off Include SRT Styling for best playback results on other systems.


Please rate the helpfulness of this tip.

Click on a star to rate it!

… for Apple Final Cut Pro X

Tip #640: Faster Freezes in Final Cut

Larry Jordan – LarryJordan.com

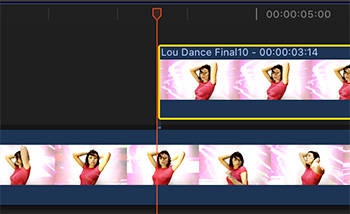
This creates freezes from both the Browser and Timeline.

A match frame freeze added at the position of the timeline.

Topic $TipTopic

You can always create a hold frame (Shift + H) in a clip. But, a hold frame is locked into the clip that created it. A freeze frame is a stand-alone piece of media that can be moved anywhere. Here’s a fast way to add freeze frames to the timeline in Final Cut Pro X.

  • Position the playhead on the frame you want to freeze in the timeline.
  • Type Shift + F. This creates a match frame for the same clip in the Browser.
  • Type Option + F. This adds a freeze frame of the frame under the playhead in the Browser on a layer above the Primary Storyline in the timeline.

NOTE: The duration of the freeze is based on the Still Image duration in Preferences > Editing.

EXTRA CREDIT

  • To add a freeze frame from any clip in the Browser, position the playhead on the Browser frame you want to freeze, then type Option + F.
  • To freeze a frame in the Timeline and add it to the Primary Storyline, position the timeline playhead on the frame you want to freeze and type Option + F.

Please rate the helpfulness of this tip.

Click on a star to rate it!

… for Apple Final Cut Pro X

Tip #639: All vs. any

Larry Jordan – LarryJordan.com

Any is inclusive, All is exclusive.

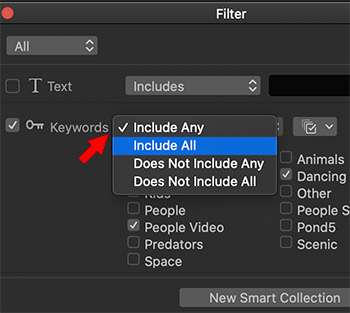
The Search Filter dialog, showing options for keyword searches.

Topic $TipTopic

When searching for files using keyword search you have two main options: “Any” and “All.” Here’s what they mean.

When using keyword search – which is a great way to organize and find clips and ranges within a clip – there are four key search options. Here’s what they mean.

  • Any. This displays every clip that contains even one of the search criteria. For example, the screen shot displays clips that contain either “People Video” or “Dancing.”
  • All. This displays every clip that contains all the search criterial. For example, this displays only clips that contain both “People Video” and “Dancing.”
  • Does Not Include Any. This displays every clip that does not contain even one of the search terms. For example, this displays all clips that do not contain either “People Video” or “Dancing.”
  • Does Not Include All. This only displays clips that do not contain all search criteria. For example, this would not show clips that contain both “People Video” and “Dancing,” but would show clips that contain one of these.

EXTRA CREDIT

Search results are displayed instantly, as soon as you select them. Experiment with these on your own media and discover how they can help you find the clip you need when you need them.


Please rate the helpfulness of this tip.

Click on a star to rate it!

… for Apple Final Cut Pro X

Tip #638: Store One Clip in Multiple Events

Larry Jordan – LarryJordan.com

This tip gives you options…!

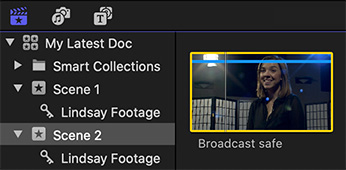
The same clip of Lindsay in stored in two different events.

Topic $TipTopic

Here’s a fast – but hidden – way to store the same clip in more than one event. This is a very useful technique to help organize shots that may span multiple scenes.

Normally, Final Cut only allows storing a clip in one Event. If you drag it into a different event, the clip is moved from one event to the other.

However, if you select a clip (or group of clips ), start to drag it into a new event, then, while dragging, press and hold the Option key until you drag them into a new event, you’ll copy the clip into the new event.

This process does not duplicate media, it only copies the link to the media; which means that you are not using extra storage to make a copy. Also, these to copies are not clones. Whatever you do to one clip does not affect the other.

NOTE: This works best if you start to drag, then press and hold the Option key until the clips are fully dragged into the new event.


Please rate the helpfulness of this tip.

Click on a star to rate it!

… for Random Weirdness

Tip #631: Get Freelance Work From Video Marketplaces

Larry Jordan – LarryJordan.com

Find work in tough times using a video marketplace.

Topic $TipTopic

This article first appeared in MotionArray.com. This is an excerpt.

We are living in an on-demand video economy during very challenging times. Here are four companies that can help you find work.

  • Veed.me. At Veed.me, clients set up project pages outlining their needs including a timeline, budget, description, and references. Budgets can range from hundreds to several thousand dollars. As a video producer, you set up an account and sort through the various project options. Once you find one you like, you can submit a pitch, add files, and discuss with the prospective client.
  • Videopixie. Videopixie is another marketplace arranging clients with producers, but they expand the offering to include animators, editors, and colorists.
  • Video Brewery. Another marketplace highlighting both live-action creators and animators is Video Brewery. Using a slick interface with lots of details for clients, Video Brewery helps walk potential customers through the project-building process. From the creator side, it’s important to note that Video Brewery isn’t an open marketplace where anyone can sign up. They are trying to moderate who is in their catalog, so you must submit an application with relevant work to be invited in. This makes it a little harder initially, but once chosen, you can rest assured knowing there will be less clutter for potential clients to sort through when choosing a partner.
  • Tongal. Tongal takes a slightly different approach to the above marketplaces by incorporating a contest model with their projects. With Tongal, all of the community has a chance to make money on any given project, but they are competing against the rest of the community.

These are just a few of the many video marketplaces popping up on the web for freelancers. It doesn’t hurt to create profiles on all of them as a way to expand your network and reach new potential clients. There is work to be had, you just have to be ready when the client wants your help!


Please rate the helpfulness of this tip.

Click on a star to rate it!

… for Random Weirdness

Tip #630: 5 Tips About iPhone Gimbals

Larry Jordan – LarryJordan.com

Stabilizers compensate for side-to-side movements, but you need to walk gently.

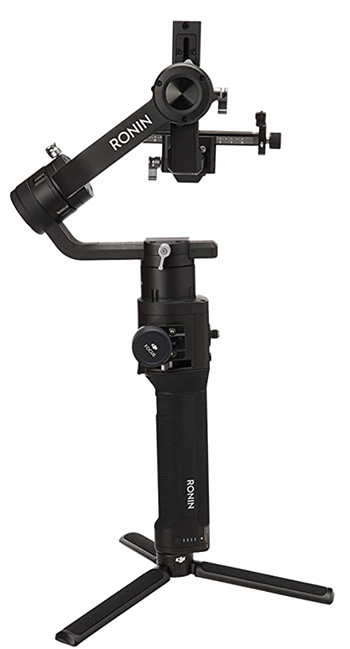
Image courtesy of DJI.
A DJI Ronin-S camera stabilizer.

Topic $TipTopic

This article, written by Rubidium Wu, first appeared in PremiumBeat.com. This is an excerpt.

Here’s a look at the capabilities of an iPhone gimbal and how to incorporate it into your next project.

  1. Get Smooth Footage. The iPhone X (and above) have powerful stabilization built into their video modes. This smoothes out bumps and judder by itself.
  2. A Certain Kind of Shake. The three-axis motors in a gimbal eliminate the shake that comes from humans made of soft, pliable material — like muscle. They don’t eliminate the up-and-down movement that comes from walking. We don’t usually notice this movement because our brain cancels it out. However, it shows up in footage — gimbal or not.
  3. Different Levels. The most basic iPhone gimbal simply stabilizes the footage. More sophisticated versions give power to the camera, connect via Bluetooth, and use their own apps to shoot footage and communicate with the iPhone.
  4. Varying Models. Newer phones won’t fit in some older gimbals because each one is designed for a specific iPhone and the position of its camera. The wide-angle lens on the iPhone 11 Pro is so wide, it catches the arm of some older gimbals in its field of view.
  5. Live Dangerously. Most gimbals need a case-less iPhone for a proper fit. That means that when you’re doing the most adventurous things with your phone, it’s the most vulnerable. Be sure you have everything backed-up (and possibly insured) before you do anything too extreme.

Please rate the helpfulness of this tip.

Click on a star to rate it!

… for Random Weirdness

Tip #629: What Makes a Video Tripod Different?

Larry Jordan – LarryJordan.com

Video camera tripods are different – and the difference is in the head.

Tripods and fluid heads make the all the difference in creating usable shots.

Topic $TipTopic

This tip first appeared in Adorama.com. This is a summary.

What exactly is a video tripod, and how does it differ from one that’s used primarily for shooting still pictures? Basically, it’s what’s on top that counts—namely the head that’s affixed atop the legs by means of a mounting screw. The most common and popular video head configuration is the pan/tilt head that’s controlled by one or two extending arms that allow you to easily move the attached camera horizontally (panning) and vertically (tilting) to follow the action.

However, if you expect to shoot smooth, professional looking video without the dreaded herky-jerky “home movie” effect, you must be able move the head very smoothly, evenly, and fairly slowly in either direction as the camera is recording the action.

Not surprisingly, achieving this natural-looking fluid motion consistently requires a fluid head, which provides an effective damping mechanism in the form of a viscous substance like grease or oil contained in a restricted reservoir or channel that’s integral with the head’s panning and/or tilting mechanisms. Without getting into the technical weeds, suffice it to say that there are two main types of fluid heads—fluid-effect heads, and true fluid heads.

  • Fluid-effect heads are simpler, less expensive, and generally provide a fixed amount of damping to smooth out and slow down the panning and tilting action. Fluid-effect heads are more than satisfactory for general use and will yield noticeably better videos than you can get with the typical 3-way pan/tilt head found on a still photography tripod.
  • True fluid heads are more complex in design and construction, more expensive, and provide a range of damping adjustments to suit specific shooting situations. For example, you can set them to provide less damping and more responsiveness when shooting fast moving action, or more damping when you’re using long telephoto lenses and want to pan more slowly. Virtually all professionals and many serious videographers opt for the enhanced performance and flexibility of a true fluid head and consider the extra cost well worth it.

Other features found on video tripods include extended platforms designed to accommodate and position a variety of video rigs for optimal balance, illuminated bubble levels, leg strut supports for added stability, a variety of ball heads that can be locked inn position for panning, and accessory dollies for moving the entire tripod to track the action. Crutch-style legs, once the hallmark of cinematography and video tripods, are still found on some pro-aimed units, but carbon fiber and aluminum legs with flip locks or twist collars now predominate.

EXTRA CREDIT

The article continues with a look at ten different tripods and fluid heads that videographers might consider when upgrading their gear.


Please rate the helpfulness of this tip.

Click on a star to rate it!

… for Apple Motion

Tip #628: Cool, Pre-Built 3D Lighting Effects

Larry Jordan – LarryJordan.com

Lights can create very interesting backgrounds – especially with particles.

The Diagonal Left lighting setup, colored with blue and red lights and one light converted to Spot.

Topic $TipTopic

Motion has extensive lights and lighting controls available within the app. In fact, they are one of the few elements in Motion that fully exist in 3D space. But, while powerful, they also require an understanding of 3D space, which is confusing to many.

Here’s a way to get started with 3D lights, without causing your brain to explode.

In this example, we’ll apply lights to a particle cloud.

  • Create a new project.
  • Drag Library > Particle Emitters > Smoke > Rising Smoke into the center of the Viewer.
  • Click the 3D icon just to the left of the lock icon in the Layer’s panel to convert the layer from 3D to 3D.
  • Go to Object > New Light Setup and apply any set of lights you like.
  • Select any light in the Layers panel, go to Inspector > Light and change its color, or type, or, anything. Watch what happens.

The particle system provides a cloud that picks up every light. Play and see what you discover.

EXTRA CREDIT

Each light can be animated for movement, color and direction. This is a great way to create a background for an infographic.


Please rate the helpfulness of this tip.

Click on a star to rate it!

… for Apple Motion

Tip #627: Use Replicators for Repeating Effects

Larry Jordan – LarryJordan.com

Replicators duplicate and animate objects.

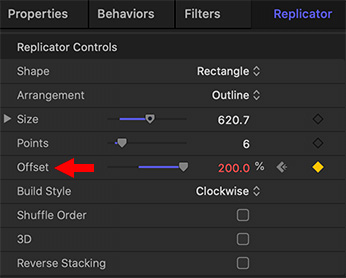
Replicator controls, along with keyframes for Offset.

Topic $TipTopic

This is a tip where I’m giving you a recipe, but you will need to figure out the ingredients.

Replicators are a little-used behavior in Motion. Replicators take elements, which could be anything from a simple line to a logo, duplicate it and, depending upon the settings you apply, animate it.

You can see examples of these in Library > Replicators.

However, you can also create your own:

  • Import a logo or use elements from the Library.
  • Click the Replicate button in the top right of the Motion interface.
  • Go to Inspector > Replicator and play with the Replicator Controls.
  • One way to animate this is to apply two keyframes to Offset. Put the first keyframe at the start of the project and the last keyframe on the last frame of the project. If the Offset amount is a multiple of 100%, the animation will seamlessly loop as the project repeats.
  • For other animation, apply Behaviors > Replicator > Sequence Replicator.

The controls are simple – but, depending upon what you are replicating, the results could be very interesting!


Please rate the helpfulness of this tip.

Click on a star to rate it!