… for Apple Final Cut Pro X

Tip #625: How to Easily Edit SRT Captions

Larry Jordan – LarryJordan.com

It is easy to make minor corrections to SRT caption files.

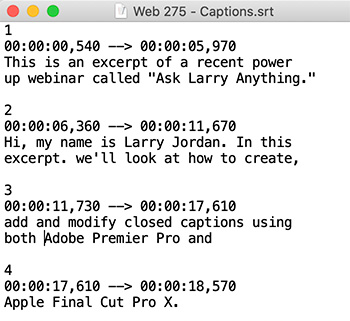
This is what an SRT caption text file looks like, viewed in Text Edit.

Topic $TipTopic

SRT captions are text files which are both easy to read and easy to edit. These text files can be opened in any text editor, such as Text Edit or BBEdit.

The format of the text inside the file is very specific:

  • Caption number. This must be on the top line and a unique, sequential number.
  • Timecode. This indicates the start and end of the caption, with the last set of numbers set off by a comma and representing milliseconds.
  • Caption text. This is one or two lines of text. Notice that this text file does not support significant text formatting.

As long as your text lines don’t run too long, you can easily correct spelling or punctuation errors.

EXTRA CREDIT

While you can correct timing in this file, Final Cut makes timing adjustments easier within their respective programs.


Please rate the helpfulness of this tip.

Click on a star to rate it!

… for Apple Final Cut Pro X

Tip #623: Not All Captions Look Alike

Larry Jordan – LarryJordan.com

Captions are designed for simplicity, not fancy formatting.

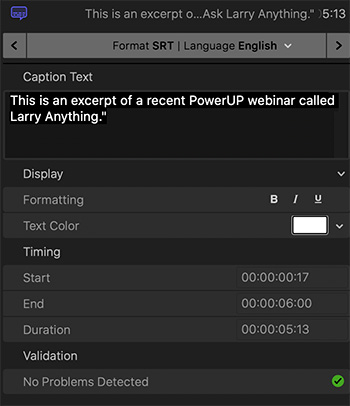
SRT caption formatting controls in Apple Final Cut Pro X.

Topic $TipTopic

SCC and SRT closed captions are designed for readability and flexibility, not formatting. The Federal Communications Commission’s rules about closed captioning include details about caption accuracy, placement, and synchronicity. They don’t say anything about formatting. Avoid problems – read this.

Captions are designed for readability and flexibility – you can turn them on or off, or choose between languages. Captions are not designed to be styled. All captions, except SCC, are designed to be stored in sidecar files. These are separate files from the media, but linked to it.

SCC captions, which can be embedded in the video itself — well, one language at least – are limited to two lines per screen each with only 37 characters per line. They also require a frame rate of 29.97 fps (either drop or non-drop frame).

Yup, limited.

SRT captions are more flexible. SRT captions are known for simplicity and ease-of-use, especially when compared to other formats, many of which used XML-based code. It was adopted by YouTube as a caption format in 2008.

SRT only supports basic formatting changes including: font, color, placement and text formatting. HOWEVER, there is no clear standard for these style changes. Even if you apply them to your captions there is no guarantee that the software playing your movie will know how to interpret them.

The basic rule is: If you need text with style, use titles. If you need to enable or disable text on screen, use captions – but don’t expect much style control.


Please rate the helpfulness of this tip.

Click on a star to rate it!

… for Apple Final Cut Pro X

Tip #622: Two Ways to Import Captions

Larry Jordan – LarryJordan.com

Importing XML brings in the entire project. Importing captions just brings in captions.

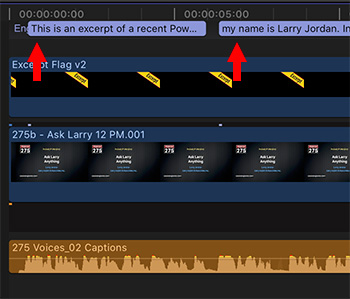
SRT captions imported into a Final Cut project timeline.

Topic $TipTopic

Recently, I was writing a tutorial on how to create, add and modify closed captions for Final Cut Pro X and I discovered this cool trick.

Final Cut supports SCC (CEA-608), SRT and iTT captions; each with different forms of formatting control. (See Tip # 623.)

  • When importing iTT captions, which are most often stored in a XML file, use File > Import > XML.
  • When importing SRT or SCC captions, use File > Import Captions.

When importing XML files, the entire project will be imported, including captions, media and timeline. When importing SRT captions, this will just import the captions themselves and place them on the timeline.


Please rate the helpfulness of this tip.

Click on a star to rate it!

… for Random Weirdness

Tip #619: Five Tips to Better Stock Media

Larry Jordan – LarryJordan.com

The secret is in how you do your search.

Image courtesy of Pond5.com.

Topic $TipTopic

This article, written by Terin Izil, first appeared in Pond5.com. This is an excerpt.

Stock video sites have millions of clips. So why does it feel like you’re getting the same five clips over and over? Here’s a few tips to keep your results fresh and help you find exactly what you’re looking for.

Keywords Are Key

Start by writing down your main keyword and a list of secondary keywords. Keep your main keyword, but rotate in the secondary ones to see different results. Good words to include on that secondary list include: aerial, establishing shot, timelapse, hyperlapse, handheld, loop, and cinemagraph.

Follow Artists You Like

Like someone’s style? Check out the rest of their portfolio.

A Visually Similar Search is Worth 1,000 Words

This is especially helpful if you are trying to match shots or styles.

Filter, Filter, Filter

If you’re looking for a needle in a haystack (or even if you’re not), it helps to weed out the results that don’t belong. If you know the resolution, number of people, or if you want commercial or editorial, you can easily narrow down the results with a filter.

Then Filter Again by Budget

You might not know your exact budget, but you can probably figure out what your maximum is. Set a filter to that so you don’t see anything unrealistic for your project.


Please rate the helpfulness of this tip.

Click on a star to rate it!

… for Random Weirdness

Tip #618: Five Free Script-writing Programs

Larry Jordan – LarryJordan.com

No better time than now to start writing your script.

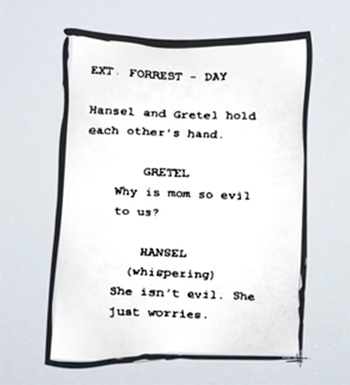
Image courtesy of DramaQueen.com

Topic $TipTopic

This article, written by Robbie Janney, first appeared in PremiumBeat.com. This is an excerpt.

Need to write a script with little to no budget? Here are some great, free alternatives to the higher-priced Hollywood standards.

Final Draft is the darling of the film industry, used by almost every professional screenwriter in the industry. The program creates fast character and scene reports so your first AD and line producers can start building budgets and schedules. But, you might not be able to afford it with all its bells and whistles. You need something free!

Here are some options:

EXTRA CREDIT

The blog linked at the top has details on each program, plus illustrated tutorials.


Please rate the helpfulness of this tip.

Click on a star to rate it!

… for Random Weirdness

Tip #617: Benefits of a Tilt/ShiftLens

Larry Jordan – LarryJordan.com

Tilt/shift lenses modify depth of field, perspective and focus.

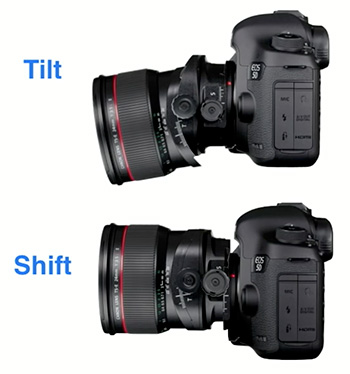
The two modes of a Tilt/Shift lens: tilting (top) and shifting.

Topic $TipTopic

Traditional lenses project a circular image onto a rectangular sensor to create an image. Normally, that circular image is fixed in its location to the sensor. However, a tilt-shift lens allows us to modify where that circular image lands in relation to the sensor.

By tilting the lens, you change the center of that imaging circle, which can straighten the lines that appear to converge in the distance. The camera body remains in the same position, but the tilt shift adjusts the lens’ perspective. That makes tilt shift lenses a big help for architectural photography. Walls that are straight may actually look crooked because of the lens’ perspective; tilt shift lenses can change that perspective, making those walls straight again.

Tilt shift lenses also allow for greater control over an image’s depth of field. Traditionally, anything the same distance from the camera as the subject will appear in focus—that’s because those objects lie on the same focal plane. On a normal lens, the focal plane is parallel to the camera. Tilt the lens, and the focal plane tilts as well, becoming a diagonal line, instead of one that’s parallel to the camera. This creates the appearance of a much deeper depth of field than shooting a traditional lens at the same aperture. With the focal plane as a diagonal, it’s possible to have two objects that are parallel to one another, with one item in focus and another not.

EXTRA CREDIT

These lenses are also great for shooting panoramic shots. Here’s an illustrated blog, plus a tutorial video from CreativeLive that showcases tilt-shift lenses.


Please rate the helpfulness of this tip.

Click on a star to rate it!

… for Apple Motion

Tip #606: Motion: Password Protect Still Frame Exports

Larry Jordan – LarryJordan.com

Secure PDFs are far smaller than media stills and excellent for emailing.

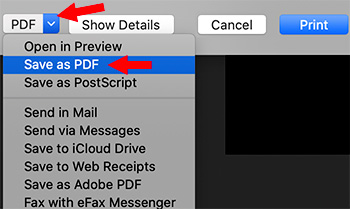
Select Save as PDF from the Print menu to create a secure PDF of a still frame.

Topic $TipTopic

It’s easy to export a still frame of a project using File > Share > Save Current Frame. But… what if you need to password protect that still frame so that only the people who need to see it can see it?

Simple. Watch.

What we are going to do is print a PDF of the current frame.

  • Choose File > Page Setup to set the page size.
  • Choose File > Print to print the current frame under the playhead.
  • In the Print window, choose Save as PDF from the PDF menu.
  • In the PDF window, click Security Options.
  • In the Security Options window, enable the level of security you need, then assign a password.
  • Click OK to accept all settings.
  • Give the file a name and storage location and click Save.

Done.


Please rate the helpfulness of this tip.

Click on a star to rate it!

… for Apple Motion

Tip #605: Add Motion Blur to Animation

Larry Jordan – LarryJordan.com

Smooth animation and reinforce movement with Motion Blur.

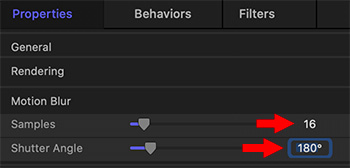
In Inspector > Properties for a Project set Samples and Shutter Angle.

Topic $TipTopic

Motion Blur smoothes animation and reinforces the illusion that an object is moving. Once your animation is complete, here’s what you need to do.

  • Select the project at the top of the Layers panel.
  • In Inspector > Properties set Samples to 16 and Shutter Angle to 180°
  • Finally, at the top right corner of the Viewer, in the Render menu, turn Motion Blur on.

NOTES

  • Increasing the shutter angle increases the amount of the blur.
  • Increasing the samples increases the quality of the motion blur, but also increases render time.

You won’t be able to play this in realtime unless you render the project, or export it and play the resulting movie.

EXTRA CREDIT

Here’s the YouTube video this article was based on.


Please rate the helpfulness of this tip.

Click on a star to rate it!

… for Apple Motion

Tip #604: Fill Elements Fast in Motion

Larry Jordan – LarryJordan.com

Fill adds color or gradients to any selected element.

The original shape is on top, the filled gradient is on the bottom.

Topic $TipTopic

The Fill filter replaces an element in Motion with either a solid color or gradient. To use it:

  • Import or add any element that has an alpha channel (transparency). In this screen shot, I used a gadget called “Atom 01.”
  • Add Filters > Stylize > Fill
  • Go to Inspector > Filters and switch Color to Gradient, then pick your style or color range. In the screen shot, this is the Candy Corn style.

EXTRA CREDIT

Here’s the YouTube video this article was based on.


Please rate the helpfulness of this tip.

Click on a star to rate it!

… for Visual Effects

Tip #615: Node vs Layer Compositing

Larry Jordan – LarryJordan.com

Nodes scale better, while layers are faster.

Topic $TipTopic

There are two radically different digital compositing workflows: node-based compositing and layer-based compositing.

Node-based compositing represents an entire composite as a procedural map, intuitively laying out the progression from source input to final output. (This is, in fact, the way all compositing applications internally handle composites.)

Node-based compositing interface allows great flexibility, including the ability to modify the parameters of an earlier image processing step “in context” (while viewing the final composite). Node-based compositing packages often handle keyframing and time effects poorly, as their workflow does not stem directly from a timeline, as do layer-based compositing packages. Software which incorporates a node based interface include Natron, Blender, Blackmagic Fusion, and The Foundry’s Nuke.

Layer-based compositing represents each media object in a composite as a separate layer within a timeline, each with its own time bounds, effects, and keyframes. All the layers are stacked, one above the next, in any desired order; with the bottom layer usually rendered as a base in the finished image.

Layer-based compositing is very well suited for rapid 2D and limited 3D effects such as in motion graphics, but becomes awkward for more complex composites entailing numerous layers.

Nodes or Layers: Which is better?

To be honest, there is no right or wrong answer. They both can achieve the same effects. Software preference will factor greatly into your decision. The more that you use one software type, the more you will become accustomed to that system. Just remember that layers are not great for huge projects with many items and effects; likewise, projects with little footage and few effects are sometimes not the most efficient for nodes. What it really boils down to is personal preference. A great rule of thumb is go big and go nodes or keep it small and stick with layers.

EXTRA CREDIT

Here’s a nice article, written by Wéland Bourne, explaining the differences between these two systems and comparing different effects software.

Please rate the helpfulness of this tip.

Click on a star to rate it!