… for Random Weirdness

Tip #1010: BMD: ISO Recording for Live Streams

Larry Jordan – LarryJordan.com

ATEM Mini: Live, 4-camera switching with ISO, for less than $900 (US).

(Image courtesy of BlackmagicDesign.com.)

Topic $TipTopic

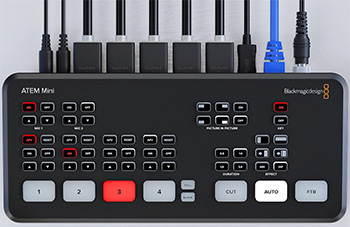
Blackmagic Design recently released the ATEM Mini switcher. While designed for live streaming using up to four cameras, there’s a significant hidden feature in the high-end system.

With ATEM Mini, you can switch live between four high-quality video camera inputs, or connect a computer for PowerPoint slides or gaming consoles. The built in DVE allows picture-in-picture effects, as well as a variety of other visual effects.

The USB webcam output of the ATEM Mini connects to any computer and looks just like a built-in webcam so you can use any streaming software while the ATEM Mini Pro model adds live streaming and recording to USB disks.

There are three different models, with the ATEM Mini Pro ISO adding recording of up to 5 separate H.264 video streams in real time! That’s a clean feed of all inputs and plus the live program! A DaVinci Resolve project file is also saved so you can open your live production to adjust edits, change shots, remix audio and add color correction.

Pricing starts at $295 (US).

Here’s the link to learn more.


Please rate the helpfulness of this tip.

Click on a star to rate it!

… for Random Weirdness

Tip #1006: NewBlue FX: Live-Streaming Software

Larry Jordan – LarryJordan.com

NewBlue Stream is software designed to simplify live streaming with advanced graphics.

(Screen shot courtesy of NewBlueFX.com)

Topic $TipTopic

The folks at NewBlueFX announced a new program specifically designed for live streaming, with graphics integration: NewBlue Stream.

Here’s how NewBlue describes it: “Our philosophy with NewBlue Stream is simple – make it as easy as possible to produce live broadcasts, give you tools to make them engaging and interactive, and do it in one elegant solution that’s priced right. The result is a lightweight streaming and broadcast solution paired with dynamic, data-driven graphics that you won’t find anywhere else.”

NewBlue is a long-time effects developer – especially on Windows – with strong credentials for effects and titles.

“Cast stunning and technically sophisticated live video productions with multiple audio and video inputs, switching, and an unlimited number of programmable, data-driven, 3-D animated graphics, including lower thirds, crawls, motion bugs, transitions, titling, and more.”

The system provides image capture, content creation, and streaming; supporting Facebook Live, YouTube Live, Twitch, and any RTMP end point.

The software supports Windows and Mac. Pricing starts at $13.99 per month and a 14-day free trial is available.

EXTRA CREDIT

Here’s the link to learn more.


Please rate the helpfulness of this tip.

Click on a star to rate it!

… for Random Weirdness

Tip #1000: Are Your Skills a Craft – or a Commodity?

Larry Jordan – LarryJordan.com

The future is coming, whether we like it or not. Today, we need to prepare for it.

(Production image courtesy of Pexels.com.)

Topic $TipTopic

This article, written by Simon Wyndham, first appeared in RedSharkNews.com. This is a summary.

In recent months there has been a talk about the types of jobs that are under threat from automation. Whether or not a computer could ever become artistic is one question, but for many of us, the market saturation of video producers has had quite an effect on rates.

Technology has made it simpler to become involved in production. It is virtually impossible to buy a camera now that, with the right use, can’t produce a picture good enough to use for at least basic company videos and promos.

The other side of this coin is that as more people are enabled to create great imagery, the more crowded the marketplace becomes. With all the technical articles and videos available online, lighting diagrams from famous DP’s and the like, the latest breed of filmmakers is more knowledgeable than ever.

Every year there are thousands of students released into the wider world of work, fresh from studying video and film production. They all want a piece of the pie. In days gone by, I could usually pick apart most student productions like a child pulling legs off an insect. Not so much now. And these are the people who are now entering the job market.

This will only get worse. It isn’t a matter of “if” you will be replaced or made surplus to requirement, it is a question of “when.”

Even if the full edit process retained the use of humans for fine-tuning, if the main bulk of an edit can be created in seconds, where does that leave our hourly rates? Would there even be a demand for enough quantities of video from each individual producer to make it worthwhile given the speeds now involved? When we take into account that an AI could respond to requests for video to look like a specific film, or have a specific pace or look, then things do not look very rosy for the future of human editors.

EXTRA CREDIT

The full article, depressing though it is, is worth reading. We each need to spend time planning how to cope with the impact of technology.


Please rate the helpfulness of this tip.

Click on a star to rate it!

… for Apple Motion

Tip #1012: Create a “Ripple in Time”

Larry Jordan – LarryJordan.com

As with all filters, apply this, then tweak it. Pick what looks good to you.

Keyframe settings for Filters > Distortion > Fun House.

Topic $TipTopic

Here’s another Motion filter that’s fun to play with – especially if you are creating a science fiction story where things are moving through time.

  • Import a clip into Motion, then select it in the Layers panel.
  • Apply Filters > Distortion > Fun House.
  • Position the playhead in the mini-timeline where you want the effect to start, then set a keyframe for Inspector > Filters > Fun House > Center so that X = -1200 and Y = 0.
  • Position the playhead where you want the effect to end; this looks best if the duration of the effect is short.
  • Then, change the X value to 1200, Y = 0.

You may need to tweak the values for Center depending upon the size of your project. In general, though, you want this effect to go quickly – 1-2 seconds – as well as start and end well offscreen.

EXTRA CREDIT

I also liked changing the Width for this filter to 300… just because.


Please rate the helpfulness of this tip.

Click on a star to rate it!

… for Apple Motion

Tip #1011: Create Unique Backgrounds FAST!

Larry Jordan – LarryJordan.com

The Parallelogram Tile filter creates unique backgrounds from stills or video.

The Parallelogram Tile effect applied to a shot of a city street at night.

Topic $TipTopic

Motion has a filter that can create a unique, visually-interesting background out of any still or video clip. Here’s how to use it.

  • Import a still image or video clip, then select it in the Layers panel.
  • Apply Filters > Tiling > Parallelogram Tile.
  • In Inspector > Filters adjust Center > Y and Acute Angle to create an image that doesn’t look overly rectangular.

If this filter is applied to a video, the image will change as the video changes.

If this filter is applied to a still image, you can animate it by selecting the Parallelogram Tile filter in the Layers panel, then keyframing Center > Y. Slower moves look better. Adding a Gaussian Blur will also help.

EXTRA CREDIT

If you want to be especially daring, apply an Oscillate parameter behavior to Center > Y.


Please rate the helpfulness of this tip.

Click on a star to rate it!

… for Apple Motion

Tip #999: Change the Direction of a Gradient

Larry Jordan – LarryJordan.com

The Inspector controls colors, the onscreen tool controls direction.

Control-click an element in the Viewer to edit a gradient.

Topic $TipTopic

I was asked recently how to change the direction of a gradient in Motion. It is easy to do, but not easy to find. Here’s how.

  • Select an element with a gradient in the Layers panel.
  • Control-click the element in the Viewer and choose Edit Gradient. (See screen shot.)
  • Use the on-screen controls to change gradient direction, the distance between the colors and the colors themselves.

It’s easy, once you know how.

EXTRA CREDIT

Use the Gradient color controls in Inspector > Image > Fill to change the colors in the gradient itself.


Please rate the helpfulness of this tip.

Click on a star to rate it!

… for Visual Effects

Tip #1009: Getting Started with After Effects

Larry Jordan – LarryJordan.com

After Effects is intimidating. This article can help get you started.

(Image courtesy of PremiumBeat.com)

Topic $TipTopic

This article, written by Joe Frederick, first appeared in PremiumBeat.com. This is a summary.

Adobe After Effects is an exceptionally versatile piece of software. If you’re just starting out with it in 2020, here are five things to learn ASAP.

  1. Terminology. Before I started my motion graphics journey, my experience was limited to Final Cut Pro X. That meant I was faced with a whole new set of terms upon opening After Effects the first time, some of which were attached to features and concepts I knew by other names in other programs. For instance, a Project in FCPX is a Sequence in Premiere Pro is a Composition in AE.
  2. Keyframes. Keyframes mark the point in time where you specify a value for a layer property. Using them effectively is a linchpin of motion graphics work.
  3. Motion Blur. Motion blur is an absolute game-changer! When animating an asset, it’s important to prevent said asset’s movements from looking mechanical, twitchy, and, well, like it was slapped together in a computer program. That’s where motion blur comes in.
  4. Dynamic Link. If you’re planning to work with both Adobe Premiere Pro and After Effects on the same project, then you’re going to love this. Thanks to the dynamic link, you can avoid all of that potentially confusing, definitely time-sucking nonsense and import your AE comps straight into Premiere.
  5. Pre-Composing. If you’re used to terms like “nesting” or “compound clip,” you’ll be familiar with creating pre-compositions. Simply select the layers of your choice, right-click, and select Create Pre-composition in order to put these layers into their own mini comp. They’ll now be represented in your main timeline by just one layer. If you double-click this layer, you can go into it to make changes that’ll now be visible when you return to your main composition.

The link above has additional tutorial videos, images and links for more information.


Please rate the helpfulness of this tip.

Click on a star to rate it!

… for Visual Effects

Tip #1008: Industry Spotlight: Identity Visuals

Larry Jordan – LarryJordan.com

An interview with Zac Dixon, Creative Director of Identity Studio.

The Identity Studios logo.

Topic $TipTopic

This first appeared in MotionArray.com. In this article, MotionArray highlights a smaller studio that is working hard to create amazing work as they build a client base and a sustainable business.

Identity Visuals is just that kind of studio. In the words of Zac Dixon, creative director: “Identity Visuals started up when my co-founder Samuel Cowden and I moved to Nashville in the summer of 2012. In the beginning, it was just the two of us working on whatever work we could get on the first floor of Samuel’s apartment. A few months in we hired our first two team members and eventually moved out of Sam’s place into our first tiny studio on Music Row.”

He goes on to describe projects created by Identity Studios, as well as provide example images and videos.

The link above takes you to the interview.


Please rate the helpfulness of this tip.

Click on a star to rate it!

… for Visual Effects

Tip #1007: Maxon Announces New Software

Larry Jordan – LarryJordan.com

Maxon One: Cinema 4D, Red Giant, RedShift all on one subscription.

(Image courtesy of Maxon.com.)

Topic $TipTopic

Last week, Maxon announced the availability of Cinema 4D Release 23 (R23). The next generation of Maxon’s professional 3D software delivers powerful enhancements to its animation and UV workflows, character animation toolset, and the inclusion of Magic Bullet Looks technology.

R23 Feature Highlights

  • New Character Animation Tools: Includes new Character Solver and Delta Mush workflows as well as a new Pose Manager and Toon/Face Rigs.
  • Animation Workflow: Better Keyframing, Filters for the Timeline and Attributes Manager, and more.
  • UV Workflows: All the powerful UV editing capabilities introduced in Cinema 4D S22 (the subscription-only upgrade) plus new tools geared toward UV workflows for hard-surface models.
  • Magic Bullet Looks Integration: Easily apply one of over 200 preset film looks, import LUTs, or work with individual tools for color correction, film grain, chromatic aberration and much more.
  • Scene Nodes: Scene Nodes allows users to explore massive Distributions and Procedural Modeling in advance of the further Cinema 4D core engine development for optimal creativity and experimentation.

R23 will be available on September 9th for subscription holders and will be available as an upgrade for perpetual license holders.

BUT WAIT, THERE’S MORE!

The big news is that Maxon also announced Maxon One, their new subscription offering that provides Cinema 4D, Redshift for C4D and Red Giant Complete all for one low price.

  • Cinema 4D subscription: $59.92/month (billed annually)
  • Maxon One subscription: #99.92/month (billed annually)

EXTRA CREDIT

Here are the links:


Please rate the helpfulness of this tip.

Click on a star to rate it!

… for Codecs & Media

Tip #1015: Media Planning Guidelines

Larry Jordan – LarryJordan.com

Guidelines to plan and use media more efficiently.

Topic $TipTopic

As you plan your next project, here are some media guidelines to help you think about your media and the storage necessary to support smooth playback and editing:

  • If deadlines are extremely tight AND you are not adding a lot of effects, you can edit H.264 or HEVC directly in your NLE. Otherwise, transcode all highly-compressed media into an easier-to-edit intermediate format, such as ProRes, DNx or GoPro Cineform.
  • Always shoot the frame rate you need to deliver. Changing frame rates after production is complete almost always looks “jittery.”
  • Image quality is not lost in transcoding (converting) a highly-compressed video format into ProRes.
  • If the media was shot by a camera, transcode into ProRes 422.
  • If the media was created on a computer, transcode into ProRes 4444.
  • If the media was shot in log or raw formats, edit it natively and do the rough cut using proxies.
  • Proxies are your friend. Use proxies to create a rough cut when using HDR or raw media; or frame sizes larger than 4K.
  • Color grading high-quality 4K HDR media can require over 500 MB / second of data bandwidth! Make sure your storage is fast enough.
  • Always have a reserve budget for more high-performance storage. You’ll need it.
  • Always allow time to test your entire workflow from capture to final output before starting production. It is much easier to find and fix problems when not staring at a looming deadline. “I didn’t have time to test!” is never a good excuse.

Yes, there are exceptions to these rules, but not in most cases.

EXTRA CREDIT

Here’s an article I wrote that goes into more detail for each of these.


Please rate the helpfulness of this tip.

Click on a star to rate it!