… for Visual Effects

Tip #1765: Surviving a QNAP Ransomware Attack

Larry Jordan – LarryJordan.com

Robbie writes: “Please learn from our misfortune.”

Robbie Coblentz’s QNAP server.

Topic $TipTopic

This article, written by Robbie Coblentz, first appeared in ProVideoCoalition.com. This is a summary.

I’m heading to a shoot and my phone rings. It’s Jake, my senior producer.

“Boss, I think we’ve been hacked.”

And with that starts a loooong week of recovery, troubleshooting, and formatting. Our QNAP actually had been hacked.

Quick background. I have a small video production company that produces commercials, brand films, and TV programming.

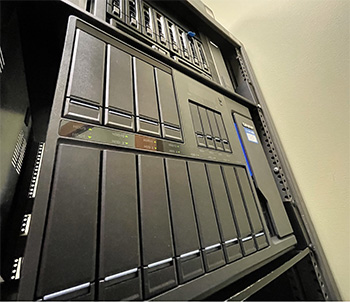
We are a PC-based shop, with all machines connected to 48TB NAS via a closed 10 gig ethernet network. The NAS, a QNAP TS1685, is stocked with 4TB drives and striped into a RAID 6 configuration. That gives us 40 TB of usable space with the safety net of being able to survive 2 drive failures. The QNAP services four edit suites and a few other computers for browsing and offloading

The QNAP has four 1-gig ethernet ports and a single 10-gig Ethernet port. The 10-gig port services the edit suites. One of the single gig ports connected to our traditional network and was outward-facing to the internet. That was part of the problem.

Up until now, my backup strategy was based around the idea that a hardware failure was the most likely — and dangerous — problem we would face.

Typically, we have at least four copies of all footage shot.

We burn footage cards on an iMac via ShotPut Pro to a bare hard drive (copy 1) along with a copy to a locally attached RAID 5 (copy 2). Then, the footage is loaded into an active project folder on the NAS (copy 3). Once the bare drive (copy 1) reaches capacity, we make an LTO copy (copy 4). When the project is complete, we archive to another bare drive (copy 5) for mastered projects. When that drive is full, it gets an LTO copy (copy 6). The RAID 5 and NAS copies get deleted once everything is mastered off.

We make a Chronsync backup of the NAS every night using an older RAID system to give a near-line-identical copy. Technically, that would be the seventh temporary copy. In this case, 7 wasn’t our lucky number.

The Chrosync backup was made after the hack had occurred, so the ransomed files copied over the last known good copy. And we didn’t have archiving on.

So if you are keeping score at home, that’s a bunch of copies of the footage, but only one copy of projects, image, animation, and music files — all typically smaller than 20 MB. That was our Achilles heel.

Read the full article as Robbie describes how they recovered, how his backup strategy changed and how they are moving forward.

You don’t need to be a big company to get hacked. You just need to connect your servers to the Internet.

Here’s the link.


Please rate the helpfulness of this tip.

Click on a star to rate it!

… for Visual Effects

Tip #1763: The AR Elephant in the Ballroom

Larry Jordan – LarryJordan.com

AR allows you to move the camera.

Image courtesy of BBC “Strictly Come Dancing.”

Topic $TipTopic

TVBEurope reports that UK-based Strictly Come Dancing has introduced augmented reality into this year’s series. Here’s a detailed look at what they did.

It’s not been easy to bring the ballroom back in the year of the pandemic, and the production team deserve all the plaudits they’ve received for their hard work to get the show on air. Strictly’s production team has been particularly innovative by bringing augmented reality into the mix. From the racing cars in week one, to the elephant that appeared during Bill Bailey’s Quickstep, augmented reality has featured every week during the live shows.

The use of AR has been a real team effort, involving both the lighting and audio teams, as well as companies, Mo-Sys and Potion Pictures. While this year is the first time AR has been employed in the show, it’s something the team has been considering for a while. “We’ve previously used perspective in the floor to create the illusion that the dancers are standing on top of a lighthouse or wedding cake, or skyscraper,” explains Potion Pictures’ managing director David Newton, who also serves as the show’s graphics designer.

“That’s been really effective but the big drawback is you can’t move the camera.”

Newton was asked by Strictly’s producers to look into the possibility of AR, and chose to use Unreal Engine as they were already starting to use it for real time rendering. “Mo-Sys’s name kept coming up in relation to AR and camera tracking, and Epic Games said Mo-Sys have a plugin that works great with their software and we were comfortable with using Unreal so it all sort of added up.”

Using AR looks great on screen, but there’s always the possibility that the couples will end up dancing right through it. How do the team ensure that doesn’t happen? Newton cites Clara Amfo’s recent jive, which featured an AR record player. “The first draft of the record player had it much further down stage, we thought the original starting position was going to be camera right. So we sort of changed how a record player works to actually have the arm on the other side. But it all changed, and it went further upstage and there were a few more meetings about where it was going to go, what colour it should be, what side the arm was going to be, how many letters of complaint we would get if the records spun in the wrong direction,” he laughs.

As well as the graphics, Strictly’s lighting is a key component of the augmented reality employed in the show. David Bishop, the show’s lighting director, says it’s been interesting to explore the relationship between lighting and AR. “In my mind there are two routes with AR, you have to either make something that is real, and therefore it has to appear on the screen as being absolutely real, or you have to make something that’s very clearly an ethereal dimension and isn’t meant to be real,” explains Bishop. “For example, if you’re inside an AR-created house, as we’ve used this series, and there’s a light bulb inside then the person that’s standing inside that house needs to be lit as though it’s coming from that fake light. That means I have to find a real light in the same direction, which sort of does the same job.

Bishop continues: “The tricky thing about that is that our spot ops can’t see the things they’re trying to point the lights at. So they’d be pointing the spotlight in one direction and then I would be saying left a bit, down a bit. It’s that sort of workflow that’s become quite new to us but it is absolutely key, getting the lighting angles right is what’s making the AR even more believable, and that’s certainly something that’s improved throughout the series.”

Read the full article here.


Please rate the helpfulness of this tip.

Click on a star to rate it!

… for Visual Effects

Tip #1761: Boris FX Offers Three New Tutorials

Larry Jordan – LarryJordan.com

Three free tutorials covering a panoply of effects software.

Image courtesy of BorisFX.com

Topic $TipTopic

The team at Boris FX recently released three new free video tutorials covering Particle Illusion, Sapphire’s Builder Effect and Mocha Pro Silhouette.

Combine 3D Particles & Text in After Effects

John Dickinson shows how Continuum 2021.5’s new Particle Illusion features allow you to easily integrate 3D particles with After Effects 3D text. Includes AE project file to follow along.

Here’s the link.

Stylized Text Effects Using Sapphire Builder Effect.

Ben Brownlee jumps into Sapphire’s Builder Effect to share an insider tip. Use the Quick Text Effect preset (new to 2021) to transform simple boring text to striking. 

Here’s the link.

LIVE STREAM: Mocha Pro + Silhouette for Nuke Compositors

Dan Smith, CraftyApes senior compositor and author of NUKE Codex: Nodes within Nodes, joins the Boris FX team to show how he uses Mocha Pro and Silhouette to supercharge his compositing workflow inside Nuke. (Live Stream – July 7)

Here’s the link.


Please rate the helpfulness of this tip.

Click on a star to rate it!

… for Codecs & Media

Tip #1764: Vimeo Guide to Embedding Videos

Larry Jordan – LarryJordan.com

Embedding video is better than linking. This guide shows how.

Image courtesy of Vimeo.com.

Topic $TipTopic

Vimeo recently published a guide, written by Martha Kendall, to embedding videos for a variety of websites. Here’s how to get this free report.

Titled: “How to Embed Videos: Tutorials for Websites From WordPress to Wix,” Kendall writes: “Embedding your videos is a simple way to enhance SEO, save bandwidth, and ensure swoon-worthy playback. So, we put together a guide to help you embed across a slew of sites like YouTube, Wix, Shopify, and so much more.”

“At this point, we’re all probably aware of the power of video for marketing — especially when it comes to ecommerce sites. What you might not know, however, is how to get video onto your site in a way that extends average site duration, boosting conversions in the process.

If that’s the case for you, then you’ve come to the right place. This guide has all the answers you’ll need for learning how to embed video on your site.”

Here’s the link.


Please rate the helpfulness of this tip.

Click on a star to rate it!

… for Codecs & Media

Tip #1762: Top 5 Content Production Challenges

Larry Jordan – LarryJordan.com

Quantum seeks to show how StorNext simplifies the post process.

I’m sure we all color grade on the edge of a cliff overlooking the ocean at sunset. (Image courtesy of Quantum.)

Topic $TipTopic

Jumping into the “how will we get back to work” fray, Quantum has published a free e-book called “Top 5 Production Challenges Addressed.”

Quantum writes: “Consuming high-resolution video content grew over 60% last year, and demand will only keep increasing. To rise to the challenge, you need post-production and content management tools that enable cross-team collaboration and real-time editing — so you can get more content out to the world faster. That’s why we compiled the top five video production workflow issues that could be holding you back.”

Their top 5 challenges are:

  1. Workflows are increasingly complex.
  2. Content and project archives get very large.
  3. It’s hard to ‘stand up’ new collaborative teams quickly.
  4. Managing large systems is complex.
  5. Some storage platforms don’t scale economically or adapt to your workflow.

Not surprisingly, they are recommending StorNext.

Here’s the link. No login is required.


Please rate the helpfulness of this tip.

Click on a star to rate it!

… for Codecs & Media

Tip #1760: Creating Video After Lockdown

Larry Jordan – LarryJordan.com

The future of media work looks increasingly hybrid.

Image courtesy of IPV.com.

Topic $TipTopic

IPV, developers of media asset management software, recently published a free report on how the media industry returns to work.

While the world is slowly getting back to normal, the way we work may be forever altered. In a recent study, Gartner said that 95% of the companies’ they surveyed are planning to stick to a hybrid work model for years to come.

Not only are employees asking for it, but it also saves companies’ money on overhead costs. This free report shows how video and creative teams moved to remote/hybrid work, and how you can stay that way long term, keeping your creatives happy whilst saving money.

This free report covers issues such as:

  • Home internet speeds, slowing down video editing processes.
  • Limited access to media files and footage from outside networks.
  • Poorly organized and unsearchable video file archives.
  • Creative slumps resulting from not being able to meet in-person or work physically together.
  • Security concerns and permission controls for files and media.

At its core, this report is about the role of media asset management (MAM) in changing video production workflows. After all, the right MAM tool can improve:

  • How archive material is accessed
  • How collaboration occurs
  • The type of metadata that can be generated
  • How teams review in-progress and completed material.

So, in looking at MAM tools, we will reveal how secure, cloud-based, multi-user collaboration is not only possible but actually relatively simple. We also take it all one step further — setting out a strategic vision for the very bright future of video production.

Subjects covered include:

  • Sports Broadcasting
  • Higher Education
  • Broadcasting
  • Retail
  • Publishing
  • And planning for the future

Here’s the link – the report is free and requires no login.


Please rate the helpfulness of this tip.

Click on a star to rate it!

… for Adobe Premiere Pro CC

Tip #1755: The Slip Tool is Under-rated

Larry Jordan – LarryJordan.com

The Slip tool adjusts the content of a shot, without changing location or duration.

The Program Monitor showing the In (left) and Out (right) frames during a Slip edit.

Topic $TipTopic

One of the most helpful tools in Premiere Pro is the Slip tool – yet it is often overlooked when working with B-roll. Here’s what it does.

The Slip tool adjusts the content of a shot, without affecting its location or duration.

Imagine you just added a B-roll clip to the timeline. You trimmed the In and Out so it precisely fits within the time you have. But, though this is the right duration, is it really the best content?

Most often, it isn’t.

Select the Slip tool (shortcut: Y), click in the middle of the B-roll clip and drag. (This is called a “Slip Trim.”)

Two images immediately appear in the Program Monitor: the In and Out frames of the clip. As you drag, these frames will change, allowing you to precisely adjust the contents of the shot.

I find myself using the Slip tool all the time to make sure the B-roll I just edited into the timeline has the right visuals for my sequence.


Please rate the helpfulness of this tip.

Click on a star to rate it!

… for Adobe Premiere Pro CC

Tip #1754: Webinar Showcases Premiere Beta Features

Larry Jordan – LarryJordan.com

Adobe begins a total revision of Premiere Pro.

Larry’s webinar illustrating the new features in Premiere Pro (beta).

Topic $TipTopic

Adobe introduced two major new features and two new redesigns in the latest beta release of Premiere Pro. These include:

  • New media import workflow
  • New sequence export workflow
  • Redesigned header bar and workspace menu
  • Redesigned Quick Export menu

I created a webinar to illustrate these new features. You’ll find it here.


Please rate the helpfulness of this tip.

Click on a star to rate it!

… for Adobe Premiere Pro CC

Tip #1753: New Quick Export (Premiere beta)

Larry Jordan – LarryJordan.com

Quick Export simplifies compressing and exporting sequences.

The new Quick Export menu in the beta version of Adobe Premiere Pro.

Topic $TipTopic

In the latest beta version of Adobe Premiere, Quick Export was updated to support creating new export presets.

In the current version of Premiere, Quick Export allows you to quickly select a compression preset and export the selected sequence. But it doesn’t allow you to easily create new presets.

The beta version does.

  • Click the Quick Export icon (top red arrow) in the top right corner of Premiere.
  • In the Preset menu, select More presets (lower red arrow). This displays a list of almost 100 compression presets you can use to export your sequence.
  • Click the Star icon to the left of the preset name, then click OK to add it to this list.

EXTRA CREDIT

Currently, all Match Source presets create H.264 files. The only way to create an uncompressed file is to create a custom preset using the beta version of Premiere.

This webinar – New Features in Adobe Premiere Pro (beta) – shows how that’s done.


Please rate the helpfulness of this tip.

Click on a star to rate it!

… for Apple Final Cut Pro X

Tip #1752: More Keyword Tips

Larry Jordan – LarryJordan.com

Keywords can organize hundreds of clips much more flexibly than building them into a timeline.

The Keyword Editor showing keyboard shortcuts for the first 9 keywords.

Topic $TipTopic

Keywords are a very flexible way to organize clips and clip segments. They are also very, very fast.

Tip #1751 presented the basics of creating keywords. Here are some more tips.

  • To add the same keyword to multiple clips, select the clips then add the keyword using the Keyword Editor (shortcut: Cmd + K).
  • To delete a keyword from one clip, select the clip, open the Keyword Editor and remove the keyword from the top line.
  • To delete a keyword from all clips to which it is applied, select the keyword in the Library List, then type Cmd + Delete.
  • To replace one of the keywords in the Keyword Editor, simply enter the new keyword in place of the old one.
  • To find all clips that contain at least one of multiple keywords, select multiple keywords in the Library List (this performs a Boolean “OR” search).
  • To apply keywords using keyboard shortcuts, make sure the keyword you want to apply is listed in the Keyword Editor (shortcut: Control + 1 – 9).

For more powerful searches, use the Search Filter. Here’s a tutorial from my website that illustrates this in more detail.


Please rate the helpfulness of this tip.

Click on a star to rate it!