… for Adobe Premiere Pro CC

Tip #283: AAF vs. EDL vs. OMF vs. XML Export

Larry Jordan – LarryJordan.com

Different applications require different export options.

Export options in Adobe Premiere Pro CC.

Topic $TipTopic

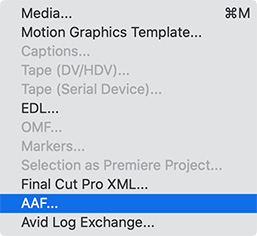
Most of the time, when the time comes to export our finished project, we select File > Export > Media. Sometimes, though, we need to move our project to a different program, say for color correction or audio mixing. Which export option should we choose?

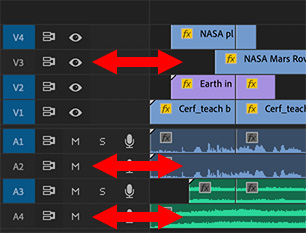
  • EDL. This is the oldest, and most limited, transfer format. It only supports 2 video tracks and 4 audio tracks. Unless you are working with VERY old software, this should not be your first choice.
  • OMF. This is an audio-only format. Unlike EDL, which simply points to your media, OMF includes all audio files in the OMF. This guarantees that your audio, along with your edits, will successfully transfer.
  • Final Cut Pro XML. This XML format is based on FCP 7. This is the best choice for moving projects to or from Final Cut Pro 7 or X; though FCP X requires conversion using a utility. Like EDL, this only points to your media. This is also the best choice for many 3rd-party media management systems.
  • AAF. This is the best choice for moving files from Premiere to Avid ProTools or Media Composer. An AAF contains links to audio and video files as well as editing decisions that are to be applied to the audio and video data.
  • Avid Log Exchange. This is the best format for moving Avid Media Composer bins into Premiere.

Please rate the helpfulness of this tip.

Click on a star to rate it!

… for Adobe Premiere Pro CC

Tip #287: What Do These Blue Boxes Do?

Larry Jordan – LarryJordan.com

Blue buttons simplify complex audio and video routing tasks.

The track header section of the Premiere timeline.

Topic $TipTopic

The Track Header on the left side of the Premiere timeline has two columns of blue buttons. Here’s what they do.

It is important to remember that there is no relationship between the two sets of buttons.

The blue buttons on the left side act as a “patch panel.” They determine which tracks from a clip in the Source Monitor or Project panel edit to specific tracks in the Timeline. For example, to edit audio only, turn OFF all blue buttons attached to video tracks.

The blue buttons on the right side determine which Timeline tracks are active. This affects copy/paste operations as well as selecting and cutting tracks.

  • To turn off a blue button click it.
  • To turn off, or on, all audio or all video buttons, Shift-click one of them.
  • To change the position of a button, drag it.

Please rate the helpfulness of this tip.

Click on a star to rate it!

… for Adobe Premiere Pro CC

Tip #288: How to Do a Match Frame Edit

Larry Jordan – LarryJordan.com

Match frame edits are a very fast way to find the source clip.

The Premiere Pro CC Source Monitor.
A Match Frame edit loaded into the Source Monitor, matching the In, Out and playhead.

Topic $TipTopic

Let’s say you are editing the video of a clip into the timeline, only to realize, later in your edit, that you also needed the audio. How do you fix this quickly?

The answer is a Match Frame edit.

  • In the timeline, put your playhead in the clip you want to locate and type F.

This opens the source clip into the Source Monitor, matching the position of the In, Out and playhead of the clip in the Timeline.

From there you can edit whatever you need back into the Timeline.


Please rate the helpfulness of this tip.

Click on a star to rate it!

… for Adobe Premiere Pro CC

Tip #280: Adjustment Layers are Magic

Larry Jordan – LarryJordan.com

Adjustment Layers are a fast way to change multiple clips all at once.

The New Item menu in Adobe Premiere Pro CC.
Create a new Adjustment Layer using the New Item menu in the Project panel.

Topic $TipTopic

An Adjustment Layer is a special kind of video clip that is placed above one or more clips in the Premiere timeline to which, when you apply an effect, those effects apply to every video clip under the adjustment layer.

If you’ve worked with adjustment layers in Photoshop, these work the same way, except they apply to layers of video, rather than layers in a still image.

To create an adjustment layer, click the New Item icon in the lower right corner of the Projects panel (blue in this screen shot) and select Adjustment Layer from the menu.

The next menu allows you to specify the size and timebase for the clip. For most situations, accept the defaults.

Then, watch what happens as you add different effects to this new clip. Remember, an adjustment layer ONLY affects clips that are stacked below it in the timeline.

NOTE: A good place to start using adjustment layers is to use one to create a consistent color look for all your clips.


Please rate the helpfulness of this tip.

Click on a star to rate it!

… for Adobe Premiere Pro CC

Tip #281: Enable On-Screen Image Adjustments

Larry Jordan – LarryJordan.com

Moving elements by dragging is MUCH faster!

Effect Controls panel detail in Adobe Premiere Pro CC.
Click “Motion” to enable modifying elements in the Program Monitor.

Topic $TipTopic

This is a very cool tip that I didn’t discover until I’d been using Premiere for several years.

Premiere provides the ability to resize, move and scale elements on screen in the Program Monitor, but you need to turn this feature on. And THAT is not easy to find. Here’s how.

  • Select a clip in the Timeline.
  • Click the word Motion in the Effect Controls panel.
  • A blue box surrounds the selected elements in the Program Monitor.
  • Drag a white dot to resize. Dragging a corner preserves the aspect ratio.
  • Click near, but outside, a corner to rotate the element
  • Click and drag inside the box to move the element.

To exit this mode, deselect the clip.

EXTRA CREDIT

  • Press the Shift key to constrain movement to horizontal or vertical directions.
  • Press the Command key to display guidelines.
  • Press Shift and Command to quickly center an object vertically or horizontally.

Please rate the helpfulness of this tip.

Click on a star to rate it!

… for Adobe Premiere Pro CC

Tip #286: Slicing and Dicing

Larry Jordan – LarryJordan.com

Active tracks become important when cutting clips.

Active tracks are those where the blue buttons on the right side are enabled.

Topic $TipTopic

In addition to the Razor tool, which cuts individual timeline clips wherever you click it, there are two keyboard shortcuts which can cut multiple clips at the same time at the position of the playhead. But they don’t behave the same way.

On the left side of the Timeline are two columns of blue buttons. The ones on the right indicate active tracks (blue is active, gray is not).

Put the playhead where you want to cut a stack of clips, then:

  • Type Cmd – K and only clips on active tracks are cut, as illustrated in this screen shot.
  • Type Shift – Cmd – K and all clips are cut, whether they are on an active track or not.

Cool.


Please rate the helpfulness of this tip.

Click on a star to rate it!

… for Adobe Premiere Pro CC

Tip #265: Smart Rendering in Premiere Pro CC

Larry Jordan – LarryJordan.com

This is a way to speed rendering and export.

The Video Preview section of Premiere's Sequence Settings window.
These Video Preview settings are critical to getting Smart Render to work.

Topic $TipTopic

I was exploring Adobe’s website for Premiere and discovered Smart Rendering. Smart rendering is, essentially, media optimization before and during editing. It allows you to create better quality output by avoiding recompression where possible. This isn’t a new feature, it first showed up in Premiere CS6. But, if you are outputting MXF files, you’ll need to turn it on.

Smart rendering cuts down on the processing of exporting even more by doing a bit more work up front. Any smart rendering workflow you can add prior to exporting will speed up your exporting process even more than improving hardware and working with optimized media.

Smart rendering works only if the source codec, size, frame rate, and bit rate match the export settings. Smart Rendering is supported for both MXF and QuickTime wrappers.

While you are editing:

  • Render any clips you have added an effect to whenever you get a free moment, ideally when you are taking a break.
  • Render the entire timeline before attempting to export.

Before exporting:

  • Change settings to export to the same codec you ingested and set previews to match it in the Export Settings dialog box.
  • Check the “Use Previews” checkbox in the Export Settings dialog box, as well. This ensures you are merely copying files rather than processing and encoding the files.

Adobe’s Kevin Monahan adds: “I should also point out that it is a much nicer editing experience when cutting with ProRes or the like, over Long GOP footage like H.264 or AVCHD. You drop fewer frames, and can view in a higher resolution with these intraframe codecs. You can even create proxies for them if you have an underpowered computer system and need better fluidity when editing.”

EXTRA CREDIT

Here’s a link that explains this in more detail.


Please rate the helpfulness of this tip.

Click on a star to rate it!

… for Adobe Premiere Pro CC

Tip #278: How to Burn-in Timecode

Larry Jordan – LarryJordan.com

Burned-in Timecode creates the perfect reference video for clients.

Timecode burned into a video.
Timecode is a label expressed as Hours:Minutes:Seconds:Frames.

Topic $TipTopic

Often, a client needs to review the current state of an edit. The easiest way to provide this is using burned-in timecode. Timecode is a label that uniquely identifies every frame in a video. No two frames in the same clip have the same timecode.

NOTE: Timecode should not be confused with time-of-day. While it can reflect the actual time of a recording, most of the time, it doesn’t.

To display timecode for a clip:

  • Select the clip
  • In the Effects panel, search for “Timecode” (Its located in the Video category.)
  • Drag the timecode effect onto the clip

Poof! Instant timecode.

Adjust size and position in the Effect Controls panel. Remember, your goal is visibility, not tastefulness.

EXTRA CREDIT

A better way to display timecode for an entire project is to add an adjustment layer. We’ll cover that in a later tip.


Please rate the helpfulness of this tip.

Click on a star to rate it!

… for Adobe Premiere Pro CC

Tip #279: A Faster Way to Enable Tracks

Larry Jordan – LarryJordan.com

Sometimes, doing something faster simply requires a shift in thinking.

The timeline track header in Adobe Premiere Pro CC.
When a box in the track header of Premiere Pro is blue, it is enabled.

Topic $TipTopic

The blue boxes in the timeline track headers in Premiere Pro CC have two very different functions: The blue boxes on the left control signal patching between the Source monitor and the timeline, while the blue boxes on the right determine active tracks. Both are essential to fast editing. Here’s a cool trick to disable, or enable, them.

NOTE: We have separate tips covering how these work.

In both groups, to disable or enable all the video boxes, or all the audio boxes, click any box while pressing the Shift key.

Poof.


Please rate the helpfulness of this tip.

Click on a star to rate it!

… for Adobe Premiere Pro CC

Tip #253: What is Comparison View?


This is an easy way to compare two shots for color, composition or content.

Comparison View in Adobe Premiere Pro CC.
The image on the left is the Reference still frame. The Source sequence is on the right.

Topic $TipTopic

Comparison View is a relatively new feature in Premiere that allows you to compare two different frames in the same sequence at the same time. The image on the left is called the Reference, while the one on the right is called the Source.

Once this view is setup, you can play or pause the sequence, but the Reference is always a still frame.

To use it:

  • Put the playhead on the frame you want to compare.
  • Click the Comparison View icon on the far right of the Program Monitor button bar.
  • The Comparison View screen appears (see screen shot).
  • Drag the blue dot under the left image to display any other image in the same timeline. (Or, enter the timecode for the frame you want to use.) This displays a Reference image.
  • Change how images are displayed by clicking on of the three icons just above the time ruler; horizontal, vertical or side-by-side.
  • Click the Shot or Frame Comparison button to switch between a reference frame and the current clip in its previous state when adjusting visual effects.
  • Click the Swap Sides button (two stacked arrows) to switch current frame to the left or right.

EXTRA CREDIT

Split screen shot comparison works with the Lumetri Scopes Waveform, making it useful for matching brightness levels precisely.


Please rate the helpfulness of this tip.

Click on a star to rate it!