… for Adobe Premiere Pro CC

Tip #337: Three Ways to Sync Audio to Video

Larry Jordan – LarryJordan.com

Double-system sound provides the best audio, but requires an extra step in post.

Recording a clapper slate is critical for all double-system audio syncing.

Topic $TipTopic

This article, written by Rachel Klein, first appeared in PremiumBeat. This is an excerpt.

Recording audio and video separately on set ensures you get the highest quality sound for your project. Using an external shotgun microphone and syncing your audio with a slate, snap, or a clap is essential.

Your three main options for syncing audio to video are Red Giant’s Plural Eyes software, Premiere Pro’s Merge or Synchronize options, or doing it manually.

  • Automatically. The best option by far (but with a price tag of $200) is Red Giant’s Plural Eyes. To synchronize, simply open Plural Eyes and click Add Media or drag your clips directly into the app. Next, hit the Synchronize button and watch the program do its thing. Successfully synced clips will show up in green, while clips with errors are red. If you get a red error, navigate to the Sync drop-down tab and make sure you’ve selected “Try Really Hard.”

    Once everything is synced, click Export Timeline and drag the exported project directly into Premiere Pro. As an added bonus, Plural Eyes also can help correct audio drift in your project.

  • Merge. To merge clips using Premiere, select the video and audio files you want to merge in the Project panel. Right-click the selected clips and choose “Merge Clips.”

    A menu will open up, allowing you to name your newly synchronized clip. Select “Audio” as your “Synchronize Point” and make sure to select “Remove Audio From AV Clip.” Hit OK and you’re all done.

  • Manually. Edit the audio and video clips into the timeline. Then, align the spike in the waveform of the clapper slate with the frame where the slate just closes.

Done.


Please rate the helpfulness of this tip.

Click on a star to rate it!

… for Adobe Premiere Pro CC

Tip #375: Tips for Better Auto-Reframing

Larry Jordan – LarryJordan.com

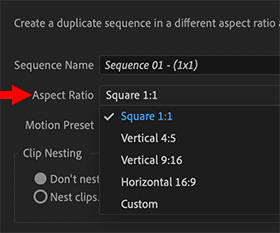
The Auto-Reframe dialog in Premiere Pro CC.

Topic $TipTopic

Auto Reframe intelligently identifies the actions in your video and reframes the clips for different aspect ratios. This feature is really handy for posting your video to different social media channels such as Instagram, YouTube, or Facebook.

You can use Auto Reframe to reframe sequences for square, vertical, and cinematic 16:9, or when cropping high-resolution content like 4K and beyond. Here are some best practice tips from Adobe:

  • Reframing can be adjusted: Auto-reframe applies Position keyframes to your video. Any of these can be changed, if Premiere guesses wrong on the framing.
  • Filming: Frame your videos with a little more space around the subjects so that you can repurpose the footage later for any medium.
  • Using text titles: Auto Reframe works best when titles are created using Premiere Pro.
  • Using still images: Auto Reframe does not work with still images. Reframe still images separately.
  • Apply Auto Reframe only once: Applying Auto Reframe multiple times (especially with nested clips) can cause unpredictable results – such as black bars on the sides of your videos. If you need to re-apply the Auto Reframe effect, make sure you apply it on the original clip.

EXTRA CREDIT

Here’s an Adobe support article that covers this feature in detail.


Please rate the helpfulness of this tip.

Click on a star to rate it!

… for Random Weirdness

Tip #422: 4 Tips to Researching Your Topic

Larry Jordan – LarryJordan.com

All documentaries benefit from as much research as possible.

Research is essential to any documentary. (Image courtesy of Pexels.com.)

Topic $TipTopic

This article, written by Tanner Shinnick, first appeared in PremiumBeat. This is an excerpt.

Research is essential to any documentary. Strong research ensures a successful and captivating documentary film. Here are some resources to consider as you research your own projects.

Academic Research Papers.
Academic research papers are wonderful tools for documentarians. Chances are that there are academic research papers out there about your topic. A simple Google search or thumbing through references on Wikipedia can uncover many of them.

Larry adds: Recently, I’ve started using Bookends as a research and bibliography database. It can be very helpful in finding and organizing academic sources.

Newspapers.
I find newspapers extremely valuable documentary research resource. If the paper you’re looking for isn’t digitized, you could always visit the publication’s local library where you can view the slides or microfilm.

First-Hand Accounts.
Research interviews can uncover a lot of information about a subject or topic. By simply allotting time to chat with key subjects about a topic, you can uncover valuable information that may not be available online or in books.

Archival Footage or Photos.
AStrong research ensures a successful and captivating documentary film.rchival footage or photos can provide contextual visual information to your film.Here are some resources to consider.


Please rate the helpfulness of this tip.

Click on a star to rate it!

… for Random Weirdness

Tip #424: 3 Tips for Lighting Different Skin tones

Larry Jordan – LarryJordan.com

Different skin tones require changes to our lighting.

Image courtesy of Pexels.com.

Topic $TipTopic

This article, wriiten by Rubidium Wu, first appeared in PremiumBeat. This is an excerpt.

Lighting different skin tones in the same scene is really tough. Here are some tricks to consider.

If the talents’ skin tones are different, but not radically so, you can usually get away with placing the darker skinned person closer to the key light, keeping the light close to the talent. Because of the inverse square law, exposure falls off quickly when it’s near a source of light, then more slowly as it gets further away.

Zones of Light. By bringing in a flag or cutter close to the actor so that more of the key hits the darker skinned actor than the lighter skinned actor, you effectively create two zones of lighting — one brighter than the other. The actors will need to stay on their marks, if they’re to be correctly lit.

Negative Lighting. If you’re outdoors, or utilizing some other source of bright light, you can use exposure for the darker skin, and use scrims or negative fill to take light away from the brighter skin. This is a trick also used by corporate headshot photographers who want to stop white shirts from being overexposed. They put a double net scrim (which takes away a stop of light) on its own C-stand (or light stand), and use it to shade the bright area. If the scrim is close enough to the light, it won’t create a visible shadow in the shot.

Fill. It’s no good to light just one side of your talent’s face. You also need to light the darker side so that it doesn’t fall off into dark shadow.
The fill light doesn’t need to be as big as the key, it just needs to be more controlled. I’ve had the most success using a 1×1 or 2×1 with a 45 degree grid. This means you can aim it at just the location you want, and it should fill only the area you need lighter. You may have to pan the light away so that no light is hitting the lighter skin, and you may also need to add more negative fill off camera so that the light, once it’s lit your desired area, doesn’t bounce everywhere and bring up the levels over the whole room.


Please rate the helpfulness of this tip.

Click on a star to rate it!

… for Visual Effects

Tip #338: How to Create Retro Looks

Larry Jordan – LarryJordan.com

These can be used in Premiere Pro, After Effects, Final Cut Pro X and Media Composer.

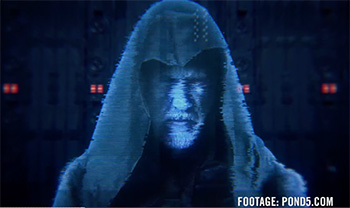
An image from a Red Giant tutorial on using Universe.

Topic $TipTopic

This tip – featuring Red Giant Universe effects – first appeared as part of a YouTube segment from Kelsey Brannan, showing how this can be created in Premiere Pro. However, these effects can be applied in recent versions of Final Cut Pro X, Avid Media Composer, and After Effects, as well.

Select the clips to which you want to apply a retro look.

NOTE: A “retro” look is one that makes your footage look like it was shot years ago, using older technology.

  • Search for Universe Stylize in your Effects browser.
  • Within the folder, select uni.retrograde
  • Inside uni.retrograde, browse the presets to view a selection of 8mm and 16mm scans
  • To give a bit more “stuttery” effect to movement, select 18 FPS
  • Adjust frame, vignette, grime, and color treatment settings to create a more realistic effect

EXTRA CREDIT

Here’s the link to Kelsey’s original video.

And here’s the link to learn more about Red Giant Universe.


Please rate the helpfulness of this tip.

Click on a star to rate it!

… for Visual Effects

Tip #435: Faster Still Image Rotoscoping

Larry Jordan – LarryJordan.com

The secret is to let Photoshop figure out where the edges are.

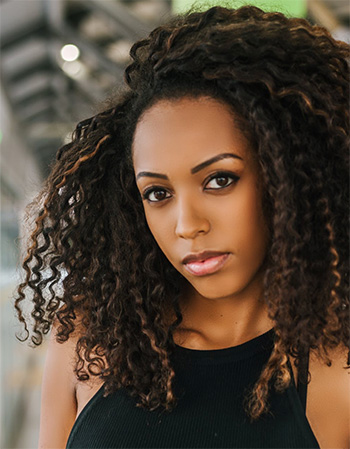
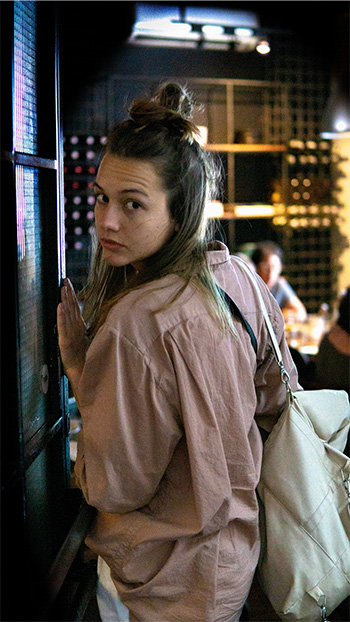
The girl was rotoscoped, then the color was removed from the background.

Topic $TipTopic

Rotoscoping allows you to select a portion of an image by tracing the edges of the subject you want to isolate. The problem is that rotoscoping is really, really tricky; especially when hair or other soft edges get involved.

While this tip involves Photoshop, I’ve used it constantly to extract images for my video projects.

  • Open the image you want to rotoscope in Photoshop.
  • Convert the image to a layer; click the small lock icon on the right side of the layer.
  • Choose Select > Subject. (I don’t know when this feature showed up, but it’s magical.)

Photoshop makes its best guess and selects what it thinks is the subject. At which point, you can do whatever you want with it.

EXTRA CREDIT

To create this screen shot:

  • Convert the image to a layer
  • Chose Select > Subject
  • Inverted the selection
  • Deleted the color from the selection

Took me 15 seconds. And, yes, I remember how hard this was in the past.


Please rate the helpfulness of this tip.

Click on a star to rate it!

… for Apple Final Cut Pro X

Tip #426: How to Add a 3rd-Party LUT to Final Cut Pro X

Larry Jordan – LarryJordan.com

FCP X supports any LUT in the CUBE or MGA format.

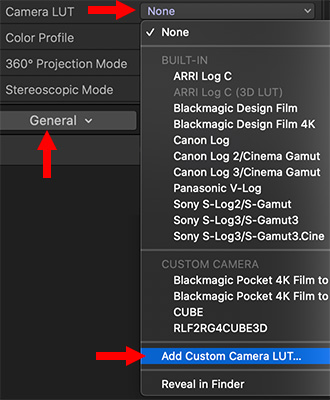
Applying a custom LUT using the Info Inspector inside Final Cut Pro X.

Topic $TipTopic

A LUT (Look-Up Table) is used to convert camera sensor data into an image worth looking at. LUTs are a part of the color grading process and much faster than adjusting color settings, then rendering a clip or a project.

While LUTs have been in still image photography for a long time, they are only recently making their way into video. While FCP X ships with a number of LUTs, here’s how to add custom LUTs to your system.

Once you’ve purchased and/or downloaded a custom LUT, you can import it into FCP X by selecting the Add Custom Camera LUT option. Remember, it must be in either .cube or .mga format. (CUBE formats tend to be more popular.)

NOTE: LUTs are NOT stored in the Final Cut Library file. This means that if you move the library, you will need to copy and move the LUTs separately. Store your LUTs in a place that will allow you to find them again.

EXTRA CREDIT

You can create your own LUTs using Photoshop, which we cover in Tip #427, or 3D LUT Creator.


Please rate the helpfulness of this tip.

Click on a star to rate it!

… for Random Weirdness

Tip #419: Shooting Exteriors at Night

Larry Jordan – LarryJordan.com

Think outside the box for night lighting

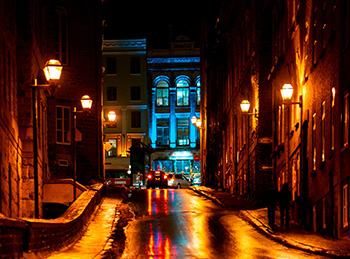
Shiny streets at night. (Image courtesy of Pexels.com)

Topic $TipTopic

This article, written by Noam Kroll, first appeared in PremiumBeat.com. This is an excerpt.

The nighttime exterior shot is one of the greatest challenges for filmmakers on a budget. Nighttime exteriors typically require a ton of powerful lights (and generators) to illuminate your scene, which naturally poses a problem if your budget is limited. This is especially the case for wide shots where there is such an expansive area that needs to be lit.

That said, one of the best and most effective tricks of the trade in this type of situation is very simple: water. For years filmmakers have been using water on streets, sidewalks, asphalts, etc. to create a more reflective surface. By evenly spraying the concrete surfaces in your shot, you’re able to brighten up your scene drastically.

Many filmmakers prefer the look of shiny streets at night.


Please rate the helpfulness of this tip.

Click on a star to rate it!

… for Random Weirdness

Tip #420: Shoot Better Vertical Video

Larry Jordan – LarryJordan.com

Vertical video is becoming an ever-more popular deliverable.

Topic $TipTopic

This article, written by Rubidium Wu, first appeared in PremiumBeat.com. This is an excerpt.

“Vertical” and “Cinematic” are two words that don’t belong together. But, all too often, we need to convert a 16:9 masterpiece into a 9:16 deliverable. How?

You have three options:

  1. The Post Method. In post-production, the video editor creates a 608 x 1080 center cut of the final production. The problem is that the framing feels claustrophobic and much of the image gets lost.
  2. Flip the Camera. A better solution is to flip the camera 90° and record a second take. This provides better framing, but requires more storage and more time spent editing, since you now have two separate programs to cut. This also assumes you get the same performance from your actors for each version.
  3. Stacked cameras. If you don’t have time for re-takes, you’ll need two cameras operating at the same time.

    If you don’t want to (or can’t) do additional takes, you’ll need to record horizontal and vertical versions simultaneously. This could mean having a second camera right next to your A camera that’s showing vertically, or to attach another camera to the main camera and roll on both at the same time.

    The best practice is to add another camera person to do the operating, and to sync the second camera via timecode so that the editor can edit both as one.

    Since clients are often reluctant to foot the bill for the extra manpower, attaching a camera to the side of the A camera’s cage works pretty well, if the operator doesn’t have to focus it during a shot and can keep the settings unified.

There’s no perfect solution, but at least you have options because vertical video will be with us for a long, long time.


Please rate the helpfulness of this tip.

Click on a star to rate it!

… for Apple Motion

Tip #402: Enable or Disable Layers in Motion

Larry Jordan – LarryJordan.com

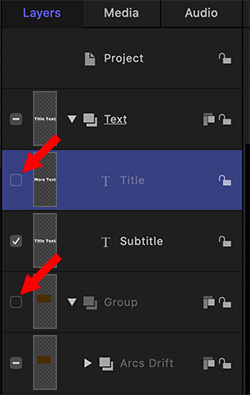
Disable a layer to make it invisible.

A disabled element (top) and group (bottom), both indicated by red arrows.

Topic $TipTopic

This article first appeared as an Apple KnowledgeBase article. This is an excerpt.

In the Layers list, you can enable or disable layers or groups to make them visible or invisible in the canvas without removing them from your composition. For example, if a large image layer obstructs other layers you want to adjust in the canvas, you can temporarily disable the offending layer. Similarly, you can disable effects objects—filters, behaviors, masks, and so on—to temporarily remove their effect on layers and groups.

Enable or disable objects:

When you disable an image layer or group, it becomes invisible in the canvas. When you disable an effects object (such as a behavior or filter), its effect is disabled.

Do one of the following:

  • In Motion, deselect the activation checkbox to the left of an object in the Layers list; indicated by red arrows in the screen shot.
  • Select an object, then choose Object > Active (or press Control-T).
  • Control-click an object, then choose Active from the shortcut menu.

When disabled, objects are dimmed in the Layers list. Disabled layers are hidden in the canvas; disabled effects objects no longer modify the group or layer they’re applied to. Disabled layer do not export.

NOTE: If you disable layers in a group, the enclosing group’s checkbox displays a dash instead of a checkmark, indicating that some layers are not visible.


Please rate the helpfulness of this tip.

Click on a star to rate it!