… for Random Weirdness

Tip #336: 5 Essential Tips for Editing Soundbites

Larry Jordan – LarryJordan.com

It takes a lot of work to make a soundbite sound natural.

Topic $TipTopic

This article, written by Jourdan Aldredge, first appeared in PremiumBeat.

Quality audio is the key to any interview. Yet, working with sound bites is always a challenge because they are filled with pauses, interruptions and awkward phrasing.

  • Look for the good stuff. Look for crisp, concise, and complete bites first. Then, go back and look for good bits that can be built into a complete sentence.
  • Remove ‘umms’ and pauses. Make sure you have B-roll to cover your edits, then delete the pauses, awkward beats and ripple edit everything back together.
  • Edit on valleys. When editing audio, always be sure to cut where the waveform is as small as possible.
  • Edit on similar syllables. If you must edit in a word, edit on similar syllables who’s waveform peaks are roughly the same level
  • Verify the soundbites. After the bites are edited, listen to them closely to make sure they still make sense and fit with the rest of the interview.

Please rate the helpfulness of this tip.

Click on a star to rate it!

… for Apple Motion

Tip #376: Use Walk 3D View to Position Cameras

Larry Jordan – LarryJordan.com

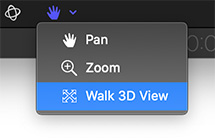
Walk 3D offers a more intuitive way to position a camera.

The Walk 3D View control in Apple Motion.

Topic $TipTopic

This first appeared in an Apple KnowledgeBase article.

The Walk 3D View tool lets you position a camera in 3D space as you would in a computer game, using a keyboard-and-mouse navigation method.

  • In Motion, select a camera, click and hold the view tools pop-up menu in the canvas toolbar, then choose Walk 3D View. The pointer changes to indicate that the Walk 3D View tool is active.
  • Use the Up, Down, Right, or Left Arrow keys to move the camera in 3D space; press and hold the Option key while using the arrow keys to move the camera more slowly. You can also drag in the canvas to orient the camera.

NOTE: The Walk 3D View tool is available only when Active Camera, Camera, or Perspective is selected from the Camera pop-up menu.


Please rate the helpfulness of this tip.

Click on a star to rate it!

… for Visual Effects

Tip #370: 4 Steps to Better Skin Tones in Resolve

Larry Jordan – LarryJordan.com

Quick steps to improve skin without damaging the rest of your color grade.

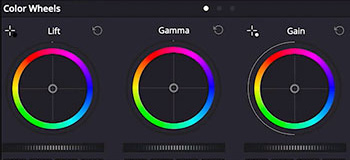
Color wheels in DaVinci Resolve.

Topic $TipTopic

This article, written by Rubidium Wu, first appeared in PremiumBeat.

In this tip, we’re going to use DaVinci Resolve to improve skin tones, without affecting other color edits. Here’s how.

  • Make a Mask. In a new node, select the qualifying tool, and drag it across the most even and representative part of the face. Increasing the clean white also helps a lot.
  • Unify Tone. Once you have the skin isolated, increase the contrast and look for yellow, red, or green areas that don’t fit with the overall skin tone. In the Curves menu, select Hue vs. Hue, then select those colors using the curve up or down to shift the problem colors back to the central color.
  • Pare Imperfections. In the color tab, adjust the slider marked MD for Midtone Density. Turning this down gets rid of contrast in the skin, effectively hiding imperfections.
  • Separate. The last step is to add another node, then hit Option+L to turn this into a layer mixer node. Dragging the blue alpha arrow of the skin mask to the input on the lower of the two mixed nodes means that your skin grade will “pass around” anything done in the latter nodes. This lets you cool down the background — or desaturate it — without also affecting the skin.

Done.


Please rate the helpfulness of this tip.

Click on a star to rate it!

… for Visual Effects

Tip #371: Changing Clip Frame Rates in Resolve


The trick is to duplicate your clip first.

Topic $TipTopic

This article, by Lewis McGregor, first appeared in PremiumBeat. Do you need two clips from the same video file to play at different frame rates in your DaVinci Resolve timeline – say to create slow-motion? Here’s how.

To change a video clip recorded at a higher frame rate to a lower frame rate to achieve slow motion in Resolve:

  • Right-click a media clip in the media pool (or timeline) and open the clip attributes.
  • Change the frame rate to match your project settings.

However, the problem is that you are changing the base attributes of the clip that exist within the media pool. To fix this, either:

  • Adjust the speed percentage of the second clip.
  • Duplicate the clip in the media pool, then change the clip attributes. By duplicating the media in the media pool, we are creating a new clip from Resolve’s perspective, which allows us to change the frame rate of the second clip without affecting the first clip.

Please rate the helpfulness of this tip.

Click on a star to rate it!

… for Apple Final Cut Pro X

Tip #366: How to Create Proxy Files After Import

Larry Jordan – LarryJordan.com

Proxy files improve performance and save storage space.

Topic $TipTopic

Proxy files transcode camera native media into Apple ProRes 422 Proxy. These provide high-quality files useful for offline editing at the original frame rate and aspect ratio, but at one-half the resolution. This increases editing performance while using considerably less storage space than optimized files.

Here’s how to create them after you imported your media.

  1. Control-click one or more clips in the Final Cut Pro browser, then choose Transcode Media.
  2. In the window that appears, select the Create optimized media checkbox, the Create proxy media checkbox, or both, then click OK.

NOTE: If the original camera format can be edited with good performance, the “Create optimized media” option is dimmed. The transcoding process may take a while, depending on the options you select. You can see the status of all the background processes currently running in the Background Tasks window.

EXTRA CREDIT

Here’s an Apple KnowledgeBase article. that explains proxy and optimized file formats in more detail.


Please rate the helpfulness of this tip.

Click on a star to rate it!

… for Random Weirdness

Tip #271: Examples of USB Connectors

Larry Jordan – LarryJordan.com

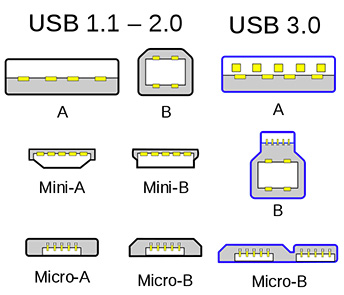
USB uses nine different connectors and five different speed settings.

The nine different connectors used by USB 1.1 through 3.0.

Topic $TipTopic

USB is known for all its different connectors. Recently, I was reading Wikipedia and discovered this illustration.

USB has nine different connectors and five different speeds. The addition of USB-C makes six different speeds.

The three sizes of USB connectors are the default or standard format intended for desktop or portable equipment, the mini intended for mobile equipment, and the thinner micro size, for low-profile mobile equipment such as mobile phones and tablets. There are five speeds for USB data transfer: Low Speed, Full Speed, High Speed (from version 2.0 of the specification), SuperSpeed (from version 3.0), and SuperSpeed+ (from version 3.1).

If you want to learn more, Wikipedia has a worthwhile article here.


Please rate the helpfulness of this tip.

Click on a star to rate it!

… for Apple Motion

Tip #344: Copy a Motion Preset to Another Computer

Larry Jordan – LarryJordan.com

Presets are easy to move from one computer to the next.

Motion presets are stored in the Library, not the Movies folder.

Topic $TipTopic

This first appeared as an Apple KnowledgeBase article.

Each custom project preset you create (such as Broadcast HD 720) is saved as a separate file in your computer’s /Users/username/Library/Application Support/Motion/Presets/ folder. If you create custom presets that you rely on, you can move them to other computers that have Motion installed.

  • In the Finder, open your custom preset files stored in: [ Home directory ]/Library/Application Support/Motion/Presets/.
  • Copy a custom preset file (which has a .preset filename extension) to the new computer and store it in: [ Home directory ]/Library/Application Support/Motion/Presets/.

NOTE: If the Library folder is hidden, switch to the Finder, press and hold the Option key, then choose Go > Library.


Please rate the helpfulness of this tip.

Click on a star to rate it!

… for Visual Effects

Tip #335: Remove Black Backgrounds & Blend Clips

Larry Jordan – LarryJordan.com

Blend modes are a great way to combine effects.

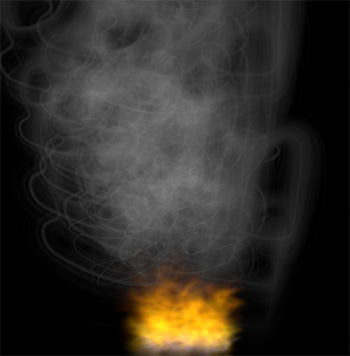
Smoke swirling over a fire. Both are effects and both use the Screen blend mode.

Topic $TipTopic

While many effects, such as those from HitFilm or Red Giant, include a transparent background, called the “Alpha Channel,” other effects don’t.

If you need to remove a black background when adding light-based effects, such as smoke, fire, gun flashes, and sparks, add the effect on top of the video as desired, and then apply the Screen blend mode.

This trick also works when applying light leaks from companies such as Light Leak Love and Rampant Design Tools.

NOTE: Be careful using the Add blend mode. While OK for web work, this creates white levels that exceed broadcast, cable and digital theater specs. I recommend against using it.


Please rate the helpfulness of this tip.

Click on a star to rate it!

… for Visual Effects

Tip #345: Add Perspective

Larry Jordan – LarryJordan.com

Perspective makes your text stand-out.

This text perspective was created in Premiere using the Corner Pin effect.

Topic $TipTopic

If your NLE does not support adjusting text in 3D space, there’s an easy way to create the effect of text receding into the distance.

In Final Cut, its called Distort. In Premiere, you can use either Basic 3D or the Corner Pin effect. Older NLEs will probably only support corner pinning.

What corner pinning does is allow you to move each corner of a text or video clip and stretch it so that which is closest to the “camera” is wide, while that which falls into the distance is narrow.

3D rotation allows you to rotate a clip along its X (horizontal), Y (vertical) or Z (depth) axis. 3D is easier to use, but corner pinning provides far more bizarre effects, like a clip getting extruded through a bottle.

There’s no “magic number” on where to set values, use what looks good to your eyes. This screen shot, for instance, was created in Premiere using Corner Pin, the Stencil font and a bit of tweaking.

EXTRA CREDIT

You can animate this effect using keyframes.


Please rate the helpfulness of this tip.

Click on a star to rate it!

… for Apple Final Cut Pro X

Tip #332: How to Edit Export Tags

Larry Jordan – LarryJordan.com

Tags are useful, but almost never accurate.

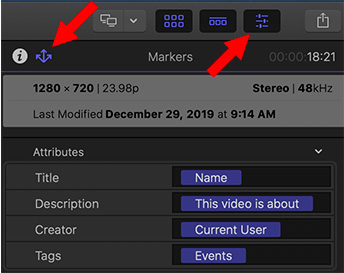
Project metadata Inspector in Apple Final Cut Pro X
Project tags can be changed in the Info Inspector.

Topic $TipTopic

You know those project “tags” that appear on the Info screen when you Share a project? Well, not only are they displayed during export, but they are also embedded in the metadata for your movie on export.

However, in my case, these are almost never right. Here’s how to change them.

  • Select the Project you want to modify in the Browser.
  • Open the Inspector and click the Info button.
  • The tags are displayed allowing you to edit them. Feel free to add or modify this text as you want.
  • Clicking outside the Inspector updates the data stored with your project.

Please rate the helpfulness of this tip.

Click on a star to rate it!