… for Visual Effects

Tip #468: How to Add Lens Flares

Larry Jordan – LarryJordan.com

Lens flares add life to a scene.

(Background image courtesy: Editstock.com. Lens flare courtesy: Rampant Design Tools.)

Topic $TipTopic

Lens flares occur when the sun, or a light, gets too close to the same level as a lens. In production, we try to avoid them because they can be unnecessarily distracting; and impossible to control. But, adding them later in post, where we can control them, adds life to an otherwise bland scene. The good news is that lens flares are easy to add, regardless of what editing software you are using.

There are two ways to create lens flares: using the computer, or shooting actual light with a camera. My preference is flares shot with a camera look more complex and believable.

Companies like Rampant Design Tools specialize in creating flares, fires and other visual effects in the camera. To add a flare:

  • Put the playhead in the background image.
  • Import and place the flare video on a layer above the background.
  • Select the flare clip and change the Blend mode to Screen.

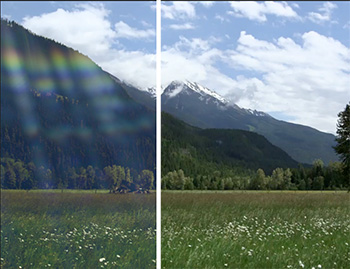
That’s it. Use standard effects controls to rotate and position the effect to your liking. The screen shot illustrates a before-and-after example of a lens flare.


Please rate the helpfulness of this tip.

Click on a star to rate it!

… for Adobe Premiere Pro CC

Tip #404: 6 Tips to Crop Images More Effectively

Settings for the Crop tool in Premiere Pro CC.

Topic $TipTopic

This article, written by Logan Baker, first appeared in PremiumBeat.com. This is an excerpt.

The Crop tool is an important tool in the video editor’s toolkit. Here are six tips to help you get more out of it.

  • Add a Crop. The Crop tool is located in Effects > Video Effects > Transform > Crop – or just search for “crop”. Then, drag it from the Effects panel onto your clip. You can crop using the Left, Right, Top, and Bottom parameters. These parameters are also animatable using keyframes.

NOTE: You can also crop using Adjustment Layers.

  • Wide screen. Add classic wide screen bars to the top and bottom of your image. (An adjustment layer will do this to your entire sequence.)
  • Text. Animate a crop to imaginatively reveal your text.
  • Create a split screen. Stack the clips you want to see, then apply the crop to the top clip.
  • Create a spicy transition. First, make sure the upcoming clip is atop the tail end of your current clip. Then, add the crop effect to both clips. For the bottom clip, enable the zoom (in the crop effect), then raise the bottom by about fifteen percent, with your keyframes set toward the end of the clip. This’ll stretch out the video downwards. Then, for the top clip, animate the bottom from one-hundred percent to zero percent. This’ll bring the clip down, following the first clip.
  • Reveal effects. Apply effects to your clip, then nest them. Duplicate the nest and stack it above the clips with the effects. Remove the effects from the clips in the top nest. Then, wipe between the two nests.

Please rate the helpfulness of this tip.

Click on a star to rate it!

… for Codecs & Media

Tip #455: Audio Compression Settings for YouTube

Larry Jordan – LarryJordan.com

YouTube always recompresses media, so send it a larger-than-normal file.

Audio compression settings for a stereo MP3 file for YouTube.

Topic $TipTopic

Last week, in Tip #451, I presented compression settings for audio you were posting for a podcast. YouTube and other social media settings are different, however. Here’s what you need to know.

YouTube, and other social media services, always recompress your data. This is necessary to support all the different playback devices, software and codecs in the real world.

If you send YouTube a perfectly compressed file, it will still recompress it – because it has to convert it to all these different codecs. In doing so, because there is not enough data, it will damage the quality of your audio.

To prevent this, we need to create a “mezzanine,” or middle, compression file so that when YouTube recompresses the file it has some bits it can throw away. MP3 is an excellent choice for audio-only files. AAC, which is part of H.264 compression, is a good choice when you are compressing audio with video.

Here are the settings:

Setting Mono Stereo
Codec for audio-only MP3 MP3
Codec for audio with video AAC AAC
Sample rate for audio-only 44.1 KHz 44.1k Khz
Sample rate for audio with video 48 KHz 48 Khz
Bit-depth 16-bits 16-bits
Data rate 160 kbps 320 kbps

EXTRA CREDIT

Tip #458 explains video compression settings for YouTube


Please rate the helpfulness of this tip.

Click on a star to rate it!

… for Codecs & Media

Tip #458: Video Compression Settings for YouTube

Larry Jordan – LarryJordan.com

Compensate during compression for social media recompressing your files by adjusting bit rates.

Social media compression defaults in Apple Compressor.

Topic $TipTopic

YouTube, and other social media services, always recompress your data. This is necessary to support all the different playback devices, software and codecs in the real world.

If you send YouTube a perfectly compressed file, it will still recompress it – because it has to convert it to all these different codecs. In doing so, because there is not enough data, it will damage the quality of your audio. To prevent this, we need to create a “mezzanine,” or middle, compression file so that when YouTube recompresses the file it has some bits it can throw away. H.264 is an excellent choice for this intermedia codec, provided you use a high-bit rate. Higher bit rates won’t hurt, they’ll just create larger files which will take longer to transfer.

NOTE: Both Apple Compressor and Adobe Media Encoder have default compression settings for social media. In most cases, their defaults should be fine.

Here are the settings:

Compressed Frame Size Bit Rate
720p At least 10,000 kbps / 10 mbps
1080p At least 15,000 kbps / 15 mbps
4K At least 20,000 kbps / 20 mbps

NOTE: These settings work for all frame rates up to 60 fps.

EXTRA CREDIT

Tip #455 explains audio compression settings for YouTube


Please rate the helpfulness of this tip.

Click on a star to rate it!

… for Apple Final Cut Pro X

Tip #439: Tips on Using the Position Tool

Larry Jordan – LarryJordan.com

The Position tool allows you to move any clip anywhere – even to leave gaps.

The Tool palette in Final Cut Pro X.

Topic $TipTopic

When Final Cut Pro X was first released, editors were aghast that the Magnetic Timeline prevented them from leaving gaps in the timeline. Leaving aside the issue of why you might, or might not, want to leave gaps, the answer is that since the beginning, FCP X has had the ability to create gaps in the timeline. It just isn’t obvious. Here’s how.

To access the Position tool, click the small arrow to the right of the Arrow tool at the top center of the Timeline. You can also use the keyboard shortcut of P.

With the Position tool:

  • When you drag a clip, the clip doesn’t spring back. Instead a media block of black video, called a gap, is inserted between the end of the previous clip and the one you are moving.
  • When you trim clips, it leaves a gap.
  • When you drag one clip on top of another, the edge of the new clip overwrites the old clip.
  • When you move a clip, any opened space is filled with a gap. This means that using the Position tool does not change the overall duration of a project.

Over the years, as I work in both Final Cut and Premiere, I’ve learned that the Position tool emulates older editing interfaces where dragging creates gaps and one clip overwrites another.

Final Cut gives us the ability to choose how our clips behave when we move them.


Please rate the helpfulness of this tip.

Click on a star to rate it!

… for Random Weirdness

Tip #441: Lighting for a Cinematic Look

Larry Jordan – LarryJordan.com

Less lighting, with more control, is the secret to “cinema lighting.”

When it comes to lighting, less is more.

Topic $TipTopic

This article, written by Zach Ramelan, first appeared in PremiumBeat.com. This is an excerpt.

A common misconception among aspiring or soon-to-be filmmakers is that you need a lot of huge, expensive lights to really pull of a professional, cinematic look. That was true once, but not anymore.

By taping dark household fabrics around an overhead light source you’re able to cone and channel the light so that it eliminates spill on the background.

NOTE: Be careful about excess heat burning your fabric.

If you want a realistic look chances are that’s actually with minimal light. Find one source that you can control and work around that.

A crucial key tip for cinematography is that direct light usually looks the worst. You can defuse it by pointing at a white wall or angle it so it makes a much more subtle glow on your subject. Unless it’s necessary to the style or story direct lighting looks unflattering and unnatural.


Please rate the helpfulness of this tip.

Click on a star to rate it!

… for Random Weirdness

Tip #443: Shooting Night-time Car Scenes

Keep shots tight and the background murky.

Image courtesy of pexels.com.
Blurry, dark backgrounds can imply just about anything.

Topic $TipTopic

This article, written by Logan Baker, first appeared in PremiumBeat.com. This is an excerpt of a conversation with the Coen brothers.

Shooting night-time car scenes can be tricky when working with a micro-budget. Fortunately, there are a few key techniques that can help you pull it off without leaving the garage.

For dialogue between the two characters that takes place while driving a car at night, consider shooting in your garage. Keep your depth of field shallow — put the focus on the actors while having the background out of focus. By doing this, it allows you to keep a level of vagueness to what’s really going on behind-the-scenes.

To further mask the unwanted backdrop of your garage or driveway, have a friend point a hose towards the windshield to create “rain.”

Purchase some cheap individual accent lights from Home Depot and place them inside the car to eliminate the need to set up a complicated lighting rig around the exterior (a rig that might actually show reflections). Consider having a grip or production assistant sit in the back of the car, moving one of the small lights up and down on the actor’s side to give the appearance of streetlights passing by.


Please rate the helpfulness of this tip.

Click on a star to rate it!

… for Apple Motion

Tip #448: How to Use LUTs in Motion

Larry Jordan – LarryJordan.com

LUTs don’t require rendering, making them VERY fast!

The Filters menu in Apple Motion 5.x.

Topic $TipTopic

This article is an excerpt from an Apple KnowledgeBase article.

The Custom LUT filter in Motion applies stylized film and video “looks” (such as Summer, Old Timey, Sci-Fi, and so on), camera LUTs, or tone mapping (to convert footage from one color space to another).

To use LUTs in Motion, add the Custom LUT filter to a layer in your project, import third-party LUTs into the filter, then choose the LUT you want to apply to your footage.

Stylized LUT effects are available from a variety of third-party sources. Camera LUTs, used to convert “flat” or “log” footage from high-end cameras to standard color spaces, are available from many camera manufacturers and other sources.

NOTE: Because Motion stores third-party LUTs externally (outside of Motion projects), it’s inadvisable to use LUTs in templates created for Final Cut Pro X.


Please rate the helpfulness of this tip.

Click on a star to rate it!

… for Apple Motion

Tip #447: Move Text Along an Unusual Path

Larry Jordan – LarryJordan.com

Any shape can form a path for text to travel around the screen.

The Text Inspector in Apple Motion 5.x.
Change the Layout Method to Path, then lower down, change the Path Options.

Topic $TipTopic

This article is an excerpt from an Apple KnowledgeBase article.

Most of the time, we want text in Motion to travel in a straight line. But, when you want that text to take strange shapes, Motion makes it easy. Here’s how to use a shape as a path for text.

  1. In Motion, import or draw the shape you want to use as the path source.
  2. Select text in the Layers list, canvas, or Timeline.
  3. In the Layout pane of the Text Inspector, click the Layout Method pop-up menu, then choose Path.
  4. In the Path Options section of the Layout pane, click the Path Shape pop-up menu, then choose Geometry. The Shape Source well appears in the Inspector.
  5. From the Layers list, drag the shape into the Shape Source well.
  6. When the pointer becomes a curved arrow, release the mouse button.
  7. A thumbnail of the shape appears in the well and the shape is used as the source shape for the text path.

NOTE: You might want to disable (deselect) the original source shape in the Layers list so it’s not visible in your project.


Please rate the helpfulness of this tip.

Click on a star to rate it!

… for Visual Effects

Tip #394: Why Use Vignettes

Larry Jordan – LarryJordan.com

Vignettes conjure emotions of the “old times,” romance, and warmth.

A vignette applied to a wedding photo.

Topic $TipTopic

A vignette, in film, darkens the edges of the frame to focus the attention of the eye on the brighter portion of the image at the center.

In the old days, photographs created these automatically because the lens was not particularly good at passing the same amount of light across the entire exposure. The center was always brighter than the edges.

Since those early days, lenses have improved tremendously, which is why we associate vignettes with older images, romance, or something historical.

This screen shot illustrates a vignette – see the darkening from the center out to the edges of the image? It also illustrates a typical use – to subtly highlight the subject at the center, while lending a feeling of warmth and romance to the image.

To be most effective, a vignette should be subtle; it’s a darkening of the edges, not a spotlight on the center.


Please rate the helpfulness of this tip.

Click on a star to rate it!