The Inside Tips encourages reader-contributed tips. Please share yours with us.
We don’t know what we don’t know until we learn it from someone else.
I want to encourage you to submit a tip or two for “The Inside Tips.” We all benefit when we take the time to share what we know.
The Inside Tips for Visual Effects is a Tip Letter focused on visual effects. This is a vast topic – far more than any single person can master.
Each of us, during our career, has benefited by learning from others – sometimes in a formal setting, more often in the course of daily work.
For this reason, it would be great if you could contribute a tip or two from your own experience. The Inside Tips are read in every state in the US, as well as 50 countries around the world.
Even the “simple things” only seem simple after we learn them.
https://www.theinsidetips.com/wp-content/uploads/2019/09/Tips-Logo-700x150.jpg00Larry Jordanhttps://www.theinsidetips.com/wp-content/uploads/2019/09/Tips-Logo-700x150.jpgLarry Jordan2020-12-02 01:30:002020-11-28 10:18:06Tip #1208: I Need Your Help
The Inside Tips encourages reader-contributed tips. Please share yours with us.
We don’t know what we don’t know until we learn it from someone else.
I want to encourage you to submit a tip or two for “The Inside Tips.” We all benefit when we take the time to share what we know.
The Inside Tips for Codecs & Media is a Tip Letter focused on the technical aspects of media and compression. This is a large topic – far more than any single person can master.
Each of us, during our career, has benefited by learning from others – sometimes in a formal setting, more often in the course of daily work.
For this reason, it would be great if you could contribute a tip or two from your own experience. The Inside Tips are read in every state in the US, as well as 50 countries around the world.
Even the “simple things” only seem simple after we learn them.
https://www.theinsidetips.com/wp-content/uploads/2019/09/Tips-Logo-700x150.jpg00Larry Jordanhttps://www.theinsidetips.com/wp-content/uploads/2019/09/Tips-Logo-700x150.jpgLarry Jordan2020-12-01 01:30:002020-11-28 10:01:25Tip #1209: I Need Your Help
Please, for the love of humanity, stop using the camera mic for dialog!
Not a camera mic. (Image courtesy of Pexels.com)
This article first appeared in MotionArray.com. This is a summary.
Not much is more distracting than bad audio in an otherwise good film or video.
Great sound typically goes unnoticed by the viewer. It stays in the subconscious, but as soon as you bring it to the conscious, that’s when you start hearing words like amateur, low budget, B-movie, and student film.
In this article, the author looks at how to improve audio recordings:
Use a Dedicated Microphone
Get Your Microphone Close to Your Subject
Don’t Clip Your Audio
Location
Get a Dead Cat
Capture Room Tone
It includes a details on each subject, along with a seven-minute tutorial video.
This article, written by Jourdan Aldredge, first appeared in PremiumBeat.com. This is a summary.
In this in-depth review and interview with YouTube vlogger Casey Neistat, Jourdan takes a look at the philosophy, gear and perspective of this highly-successful digital creator who, at his heart, is just another filmmaker and content creator trying to turn his creativity into art.
Jourdan: What sparks your creativity in today’s world of video content?
I find so much inspiration in how diversified YouTube is becoming. … Overall, it’s seeing creators really lean into what they’re passionate about rather than trying to conform to what some might feel is necessary to succeed.
What have you recently been shooting your videos on?
I’ve recently switched over entirely to Sony. It was a hard process because I think Canon makes fantastic cameras. For years, including my entire vlog series, I shot on Canon—I love the image straight from their cameras, love their color science—but when Sony launched the ZV-1, I really felt like it was the perfect camera for a YouTuber. Then, when the a7S III dropped with the articulating screen, it closed the deal for me.
Take us through your editing workflow and process for your videos?
I only edit my YouTube videos on a computer using Adobe Premiere Pro. …I only edit chronologically—start with the first frame of the video and don’t stop or review until I’ve made it to the end. Then, I backtrack and can rearrange and all that. I find editing scenes first to be confusing. I love discovering the story by forcing it to reveal itself this way. …Rather than cover up any scars or evidence that this video was made by one person, I embrace those flaws—often embellish them. Leaning into the imperfections is a way for me to say to my audience that I am not a pro, I am just a regular guy trying to tell a story.
What’s the single best way to create engaging videos?
I don’t know the answer to this but going back to the first question about what excites me; I think that being true to your passion, abiding by an unspoken understanding that if YOU find it interesting that someone else will also find it interesting, that then you will ultimately find your audience.
EXTRA CREDIT
The article has links to several of Casey’s videos, analysis of his answers and much more. It is quite in-depth and well-worth reading.
Please rate the helpfulness of this tip.
Click on a star to rate it!
https://www.theinsidetips.com/wp-content/uploads/2019/09/Tips-Logo-700x150.jpg00Larry Jordanhttps://www.theinsidetips.com/wp-content/uploads/2019/09/Tips-Logo-700x150.jpgLarry Jordan2020-11-27 01:30:002020-11-27 01:30:00Tip #1199: Video Creativity: Casey Neistat
The hardest step is getting started. Here’s a 10-video series that can help.
(Image courtesy of Foundry.com.)
Nuke is an industry standard compositing, editorial and review tool for single artists to full VFX houses. The hardest part of learning effects software is getting started. Foundry, the makers of Nuke, created the free “Nuke Studio for Beginners.”
This 10 video set takes just over an hour to watch and will get you started with basic editing, compositing and exporting in Nuke Studio. Designed for complete beginners and those new to Nuke, these tutorials describe the steps to make a simple project in Nuke Studio.
Nuke is different from more traditional effects packages found in most NLEs because it is node-based. As such, it takes some effort to shift our thinking into the possibilities that nodes present.
Both the tutorials and a trial version of Nuke are free. Here’s the link.
Please rate the helpfulness of this tip.
Click on a star to rate it!
https://www.theinsidetips.com/wp-content/uploads/2019/09/Tips-Logo-700x150.jpg00Larry Jordanhttps://www.theinsidetips.com/wp-content/uploads/2019/09/Tips-Logo-700x150.jpgLarry Jordan2020-11-25 01:30:002020-11-21 10:37:07Tip #1201: Get Started with Nuke
Interviews, showcases and tutorials to get you started with BorisFX Sapphire.
(Image courtesy of BorisFX.com.)
Sapphire plug-ins, published by BorisFX, let you create stunning organic looks unmatched by any host native effect tools. Key features include over 270 effects and 3000+ presets, a powerful Effect and Transition Builder, and integrated tracking and masking with the Academy Award-winning Mocha. Sapphire’s superior image quality, control, and render speed offers massive time-savings.
BorisFX has compiled a series of artist interviews and product tutorials that showcase Sapphire and provide an orientation to how it works.
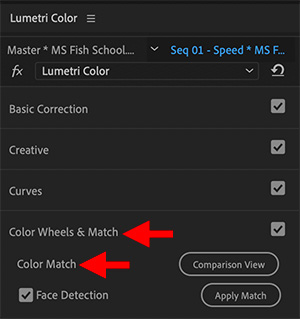
I find that Color Match gets me close, then I can tweak using the color wheels.
The Color Match section of the Lumetri Color panel.
Color Match allows fast color matching between timeline clips in Premiere. It’s been in the Lumetri Color panel for a while, but you may have overlooked it. Here’s how it works.
Put the playhead on a clip in the timeline who’s color needs adjustment.
Switch to the Color workspace, then reveal the Color Wheels & Match section (see screen shot).
Click Comparison view. This displays a second window in the Program Monitor to the left of the timeline image.
Drag the slider under the Comparison View until you find a frame who’s color you like.
In the Lumetri panel, click Apply Match (see screen shot).
Instantly, the color of the timeline clip shifts to match the overall tone of the frame in the Comparison View.
EXTRA CREDIT
No automated color tool works perfectly all the time. I find this technique to be a fast way to get a clip close to the colors I want. From there, it is easy to tweak it to its final look using the Color Wheels.
Please rate the helpfulness of this tip.
Click on a star to rate it!
https://www.theinsidetips.com/wp-content/uploads/2019/09/Tips-Logo-700x150.jpg00Larry Jordanhttps://www.theinsidetips.com/wp-content/uploads/2019/09/Tips-Logo-700x150.jpgLarry Jordan2020-11-24 01:30:002020-11-21 10:28:39Tip #1181: How Color Match Works
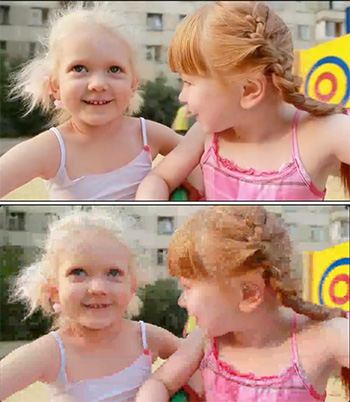
Compression artifacts are blurry rectangles in a compressed image.
A source image (top) compared to an image with severe artifacts.
Compression artifacts are caused by a compression data rate that is too low. These are most often seen as blurry rectangles that randomly “crawl” around an image.
In this screen shot, the source image is on top. The compressed image, with severe artifacts, is on the bottom.
Look at the lost detail in their hair, the “stair-steppy” edges along both girl’s shoulders and ugly blotches throughout their skin.
Artifacts most often show up in regions of similar color – skin, hair, sky, sand…
These can only be removed by recompressing your video at a higher (faster) bit rate.
Please rate the helpfulness of this tip.
Click on a star to rate it!
https://www.theinsidetips.com/wp-content/uploads/2019/09/Tips-Logo-700x150.jpg00Larry Jordanhttps://www.theinsidetips.com/wp-content/uploads/2019/09/Tips-Logo-700x150.jpgLarry Jordan2020-11-24 01:30:002020-11-24 01:30:00Tip #1192: What Are Compression Artifacts?
Many editors have questions about media compression – how to get the best results with the smallest files, or how to make projects look good on social media.
Larry Jordan is offering two free webinars to answer your questions: one covering Apple Compressor and the other Adobe Media Encoder.
Both webinars have similar content:
Basic compression terms
Explore the interface
How to create a custom location
How to compress a file for social media
How to modify an existing compression setting
How to create a new compression setting
How to automate compression
Explore special compression settings
Here’s the link to sign up for any of these four webinars – Wednesday at 9 AM or 12 PM.
Please rate the helpfulness of this tip.
Click on a star to rate it!
https://www.theinsidetips.com/wp-content/uploads/2019/09/Tips-Logo-700x150.jpg00Larry Jordanhttps://www.theinsidetips.com/wp-content/uploads/2019/09/Tips-Logo-700x150.jpgLarry Jordan2020-11-17 01:30:002020-11-14 10:22:42Tip #1170: Free Media Compression Webinars
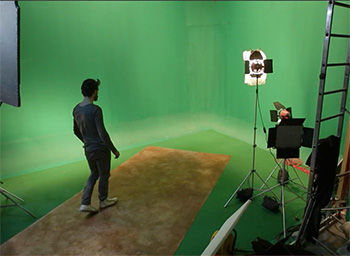
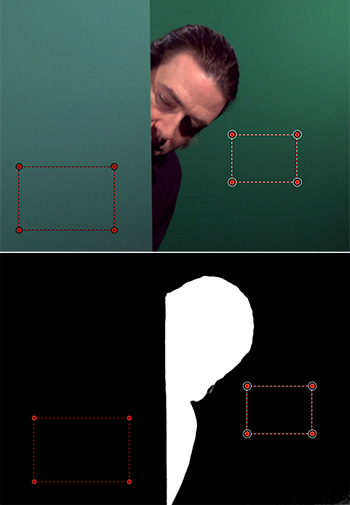
If you have multiple shades of green, use multiple Sample Color areas.
The source image (top) and the alpha channel results after adding two color section regions.
Chroma-keys, also called “green-screen keys,” allow us to remove a green (or any other color, actually) background and replace it with something more interesting. What you may not know, though, is that there is a hidden tool in Final Cut that makes selecting the correct shade of green a lot easier.
The top image in the screen shot illustrates the problem: there are two different shades of green in the background. To fix this, apply Keying > Keyer effect to the clip with a green background, then, go to the Video Inspector.
At the top of the Keyer effect are two controls:
Sample Color. This determines what color to “remove” (i.e. make transparent).
Edges. This helps determine where an edge is located, for those portions of an image where the edge is hard to see.
The trick, with Sample Color, is that you can apply more than one setting. For example, in the lower screen shot, one selection region was set for the foreground green, while a second was set for the background green.
What, at first, seemed like a very difficult key became easy when the second selection area was added.
While there is no limit to the number of selection areas you can add, the general rule is add as few as possible to select the color you want to make transparent.
Please rate the helpfulness of this tip.
Click on a star to rate it!
https://www.theinsidetips.com/wp-content/uploads/2019/09/Tips-Logo-700x150.jpg00Larry Jordanhttps://www.theinsidetips.com/wp-content/uploads/2019/09/Tips-Logo-700x150.jpgLarry Jordan2020-11-16 01:30:002020-11-14 10:14:46Tip #1152: Tips for a Better Chroma-Key
We may request cookies to be set on your device. We use cookies to let us know when you visit our websites, how you interact with us, to enrich your user experience, and to customize your relationship with our website.
Click on the different category headings to find out more. You can also change some of your preferences. Note that blocking some types of cookies may impact your experience on our websites and the services we are able to offer.
Essential Website Cookies
These cookies are strictly necessary to provide you with services available through our website and to use some of its features.
Because these cookies are strictly necessary to deliver the website, refuseing them will have impact how our site functions. You always can block or delete cookies by changing your browser settings and force blocking all cookies on this website. But this will always prompt you to accept/refuse cookies when revisiting our site.
We fully respect if you want to refuse cookies but to avoid asking you again and again kindly allow us to store a cookie for that. You are free to opt out any time or opt in for other cookies to get a better experience. If you refuse cookies we will remove all set cookies in our domain.
We provide you with a list of stored cookies on your computer in our domain so you can check what we stored. Due to security reasons we are not able to show or modify cookies from other domains. You can check these in your browser security settings.
Google Analytics Cookies
These cookies collect information that is used either in aggregate form to help us understand how our website is being used or how effective our marketing campaigns are, or to help us customize our website and application for you in order to enhance your experience.
If you do not want that we track your visit to our site you can disable tracking in your browser here:
Other external services
We also use different external services like Google Webfonts, Google Maps, and external Video providers. Since these providers may collect personal data like your IP address we allow you to block them here. Please be aware that this might heavily reduce the functionality and appearance of our site. Changes will take effect once you reload the page.
Google Webfont Settings:
Google Map Settings:
Google reCaptcha Settings:
Vimeo and Youtube video embeds:
Other cookies
The following cookies are also needed - You can choose if you want to allow them:
Privacy Policy
You can read about our cookies and privacy settings in detail on our Privacy Policy Page.