… for Apple Motion

Tip #1140: Create a Hold (Freeze) Frame

Larry Jordan – LarryJordan.com

Hold frames work both in the middle and at the end of a clip. Motion supports both.

Note this hold frame starts and ends in the middle of a clip.

Topic $TipTopic

As long as I’m thinking about speed changes (Tip #1139)
let me describe how to create a hold, or freeze, frame.

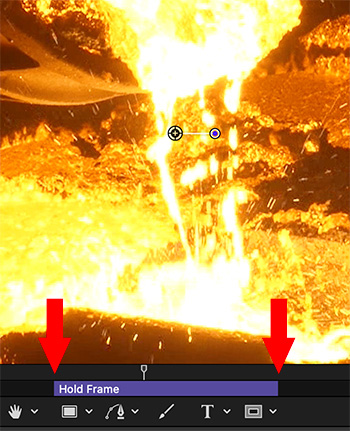
  • Put the playhead on the frame you want to freeze, then apply Behaviors > Retiming > Hold Frame.
  • This freezes the frame under the playhead until the end of the clip.

NOTE: However, any synced audio linked to that clip continues to play.

EXTRA CREDIT

To play a clip, pause in the middle, then resume playback:

  • Put the playhead in the mini-timeline where you want the pause to take effect
  • Choose Mark > Mark In from the menu bar. (Typing “I” won’t work.)
  • Move the playhead to where you want the freeze to end and choose Mark – Mark Out. (Again, typing “O” won’t work.)

Please rate the helpfulness of this tip.

Click on a star to rate it!

… for Visual Effects

Tip #1142: Tutorials from Toolfarm

Larry Jordan – LarryJordan.com

Covering 15 different applications with a wide variety of tutorials.

Software and categories from the Toolfarm website.

Topic $TipTopic

When it comes to effects tutorials for a wide variety of products, there are very few equals to Toolfarm.com.

Covering 15 different software titles – from Premiere and Final Cut to Autodesk and Maya – this website provides a wealth of tutorials for users from beginning to advanced.

Here’s the link to see what they have available.


Please rate the helpfulness of this tip.

Click on a star to rate it!

… for Apple Final Cut Pro X

Tip #1133: Adjust the Pitch of a Musical Clip

Larry Jordan – LarryJordan.com

Pitch can be adjusted without affecting timing or duration.

The Pitch audio effect, setting a musical clip 1/2 step lower.

Topic $TipTopic

Ed R. asked:

I have a karaoke song and want to lower the pitch. In other words change the key to a half step lower. I know I use the PITCH in audio, but how do I know what numbers are a half step lower?

In the Effects Browser, search for the Audio > Pitch effect, then add it to your clip.

In the Inspector, adjust the numerical slider. Every whole number represents 1/2 step in musical pitch.


Please rate the helpfulness of this tip.

Click on a star to rate it!

… for Apple Final Cut Pro X

Tip #1134: Use EQ to Enhance Voice Clarity

Larry Jordan – LarryJordan.com

Adjusting frequencies is the best way to improve the clarity of human speech.

This screen shot shows typical settings for a male voice in the Fat EQ filter.

Topic $TipTopic

Human hearing spans from 20 – 20,000 Hz; a ten-octave range. Human speech is a subset of this: from roughly 200 – 8,000 Hz.

Vowels are low frequency sounds, which give a voice its character, warmth and sexiness. Consonants are, generally, high frequency sounds, which make speech intelligible.

NOTE: For example, the difference between hearing an “F” or an “S” is whether the hiss is present. If you hear it, you hear an “S.” If not, you hear an “F.” And that hiss is around 6,200 Hz.

So, if you want to warm up a voice and make it more intelligible, select your dialog clips and apply: Effects Browser > Audio > EQ > Fat EQ filter.

Select the clip, open the Inspector, then click the small icon to the right of the Fat EQ title (top red arrow)

Then, make the following adjustments.

Improve Speech Clarity

GENDER FREQ. dB Q
Men 200 Hz 2-4 1
Men 3200 Hz 3-6 dB 1
Women 400 Hz 2-4 1
Women 4200 Hz 3-6 1

Please rate the helpfulness of this tip.

Click on a star to rate it!

… for Apple Final Cut Pro X

Tip #1135: Boost and Smooth Dialog Levels

Larry Jordan – LarryJordan.com

The Limiter effect raises softer audio levels without raising louder levels. It works magic with dialog.

The Limiter effect with typical settings applied.

Topic $TipTopic

Probably the most powerful audio filter for dialog is the Limiter effect. Here’s how to use it.

The Limiter filter dynamically raises softer audio levels without raising louder levels. It works magic with dialog – and does it in real-time! To apply it:

  • Select the dialog clip(s) you want to adjust.
  • Apply Effects Browser > Audio > Levels > Logic > Limiter. (There are several iterations, use the one in the Logic group.)
  • Click the small icon to the right of the name to reveal the settings panel (top red arrow).
  • Set Output Level to -3 dB.
  • Set Release to any number larger than 500.
  • Adjust Gain (lower right arrow) until you see about 1.5 – 3 dB levels in the Reduction meter (left red arrow).

And that’s it.

The difference this makes in adjusting levels is just magic. Most of the time, you won’t need to use audio keyframes at all.

BIG NOTE: If you apply multiple audio filters to the same clip, the Limiter filter MUST always be at the bottom of the effects list to prevent distortion.


Please rate the helpfulness of this tip.

Click on a star to rate it!

… for Random Weirdness

Tip #1121: 5 Hacks for Film & Video Lighting

Larry Jordan – LarryJordan.com

In an ideal world, we’d have time and money. In the real-world, we have these hacks.

(Image courtesy of MotionArray.com.)

Topic $TipTopic

This article first appeared in MotionArray.com. This is a summary.

Shooting a film or video without thinking about lighting is a recipe for disaster. Cameras don’t pick up light the same way our eyes do, so even if a scene looks to have plenty of light, the camera may not see it that way. Luckily, there are some hacks that can help you get a better shot on a budget or in a pinch. Here are 5 lighting hacks for film and video that you can try when you need a few tricks to get the job done.

  • Start With Bulbs. When shooting indoors, one of the very simplest things you can do to help your video lighting is to change the lightbulbs around you. Maybe you are shooting in a house with standard incandescent bulbs. A normal 60-watt incandescent puts out about 800 lumens of light. On the other hand, a compact fluorescent bulb in the 32-35 watt range will put out 2600 lumens, more than 3 times the amount of light. You can also get 2600 lumens out of a 25-28 watt LED light bulb. So, by simply grabbing some higher light-emitting bulbs, you can immediately make a positive impact on lighting for your film or video.
  • Bulking Up. For a very little extra cost, you can pick up a socket adaptor that will turn one regular light socket into 4. Remember that these bulb tips will not give you specific pointed light, but will enhance the overall ambient light on set. And that is the basis for a good lighting setup in most cases.
  • Reflectors. So, you have plenty of light now, but you don’t have it going in the direction you want. In a typical studio setting, you might break out a set of reflectors. Essentially any large solid surface in black or white will give you some level of reflection or shadow, but foam core board is a great solution. It’s fairly sturdy with a large surface area. It generally comes in black and white, with the white having a somewhat shiny white surface, and it’s cheap and easy to find.
  • Cheap Lamps. Getting ambient light from brighter bulbs is great, but sometimes you really need more strong directed light. After all, this is what a light kit is for. Setting up things like key, fill, and backlights won’t work with an overhead socket and bulb. But if you don’t have access or money for a lighting kit, there are lots of helpful options at the hardware store. For starters, these little clamp lamps can be very handy.
  • Diffusers. Of course, your fancy light kit will have various types of diffusers and maybe gels to work with. But we don’t have time for that. We are light-hackers. Guess what else makes a great diffuser? A bed sheet. A bed sheet will produce a similar effect to a softbox diffuser, and you probably have plenty of them laying around.

In a perfect world. we’d always have the extra lighting setup that we wanted, and all of the time and budget to make everything look perfect. But in the real world, with tight budgets, lack of access, and limited time, we have to make do with what we can get. And the reality is, there are a lot of good and cheap substitutes that will bring your lighting to a much higher level.

EXTRA CREDIT

The article, linked above, has more tips and video illustrating these concepts.


Please rate the helpfulness of this tip.

Click on a star to rate it!

… for Adobe Premiere Pro CC

Tip #1113: Mixed Frame Size Multicam Clips

Larry Jordan – LarryJordan.com

Premiere creates multi-camera source sequences based upon the first clip you select.

A 4k multicam clip (top), edited into a 1080p timeline (bottom).

Topic $TipTopic

Premiere has a special trick that allows it to easily create multi-camera source sequences (multicam) that contain clips of different frame sizes.

The secret is to make sure to select the clip with the largest frame size FIRST when selecting clips to include in a multicam clip.

Then, in the Create Multi-Camera Source Sequence window, set Sequence Preset to Automatic. This creates a multicam that matches the largest clip.

Next, create a sequence with the frame size you need and edit the multicam into it.

The screen shot illustrates a source multicam (top) where the image of earth is 4K, while the pouring steel shots are 1080p. The bottom image shows the same clip edited into a 1080p sequence. The pouring steel images are perfectly framed, while the 4K clip can now be scaled to whatever size you want using Effect Controls.

EXTRA CREDIT

For this to work, be sure to set Preferences > Media > Default Media Scaling to None.


Please rate the helpfulness of this tip.

Click on a star to rate it!

… for Random Weirdness

Tip #1101: Breaking into Documentaries at 40

Larry Jordan – LarryJordan.com

You don’t need to be young to be successful, but you do need a plan.

Jia Wertz (Image courtesy of NoFilmSchool.com.)

Topic $TipTopic

This article, written by Jia Wertz, first appeared in NoFilmSchool.com. This is a summary.

Filmmaking can be a tough industry to break into. And in Jia’s case, she thought it would be especially difficult in her 40’s. But just one year later, she has a documentary short screening at several film festivals and streaming on Amazon, a feature documentary that is in post- production, and a third in the planning stages.

Here are her key thoughts that she learned along the way.

  • Learn Everything You Possibly Can. I invested in a 6-week documentary filmmaking workshop, made connections with students and faculty, and attended every extra-curricular activity the program offered including elective evening courses, masterclasses, and additional shoots, and took every opportunity to ask questions and learn as much as possible.
  • Have a Rock-Solid Plan. Pick a subject or a topic you are very passionate about. Filming a documentary takes far too much time, money and resources for you to delve into something you won’t want to be working on for the next couple of years (or more).
  • Make Connections. Connect with professors, faculty, other filmmakers, festival programmers, and anyone else you come across in the industry, even other participants on Zoom calls. Getting involved in the community is key to keeping the momentum going, and getting organic word-of-mouth marketing for your film.
  • Be Smart About Your Film Festival Strategy. Treat it as a marketing campaign.
  • Lean Into the Transferable Skills You Already Have. I had absolutely no filmmaking skills last year. But I did have marketing and PR skills, extensive photography experience, and decades of experience managing large numbers of people. These skills were 100% transferable to filmmaking. Take advantage of whichever skills you have that can apply to the industry. You would be surprised at how many business skills—and not just creative skills—are required.
  • Market Yourself and Your Film. She provides a list of six techniques she’s found effective.
  • Ask for Referrals and Recommendations. Of course, when asking for referrals or anything else, think about what you can offer as well. Make yourself a resource for the people you are reaching out to. This will go a long way in building a long-lasting connection.

EXTRA CREDIT

The article provides more details and links to learn more.


Please rate the helpfulness of this tip.

Click on a star to rate it!

… for Visual Effects

Tip #1108: Beginner’s Guide to DaVinci Resolve

Larry Jordan – LarryJordan.com

This is a thorough guide to learning Resolve.

(Image courtesy of Blackmagic Design.)

Topic $TipTopic

Earlier this year, Paul Saccone and Dion Scoppettolo co-authored the “Beginner’s Guide to DaVinci Resolve.” This PDF is geared for people who prefer to learn by reading, rather than watching.

Published just a few months ago, this covers all the key features of the software, including audio and effects, that you need to know to use Resolve effectively.

Paul was the Senior Director of Marketing at BMD until he left a couple of months ago to join Frame.io. Dion is a Senior Product Marketing consultant and still working with Blackmagic. Prior to Blackmagic, both Paul and Dion were part of Apple’s Final Cut Pro team.

Here’s the link to get your free copy.

EXTRA CREDIT

Even better, because this is a PDF, you can download it to study at your own pace without needing to be online.


Please rate the helpfulness of this tip.

Click on a star to rate it!

… for Apple Final Cut Pro X

Tip #1091: What are Color Looks?

Larry Jordan – LarryJordan.com

Looks are a series of presets that allow you to quickly adjust the color of a clip.

9 of the 26 Looks provided in Final Cut. (Effects > Looks)

Topic $TipTopic

Mike Southon asks: “What are the Color Looks in Final Cut and what do they do?”

Looks are a very fast way to change the color “look” of a clip without requiring you understand how the color tools in Final Cut work.

At a technical level, looks are a color grading preset which was created by Apple and included with Final Cut. You could get the same effect using the color tools in Final Cut – if you had the color grading skills and sufficient time.

On a practical level, though, selecting a specific Look gives you the same result without investing the time or requiring the skills.

Looks are located in: Effects Browser > Looks.

  • To apply a look, drag it from the Effects Browser and drop it on the clip you want to adjust. (Or, select a group of clips you want to apply that look, then double-click the effect.)
  • To remove a look, select the clip(s) that contain it, go to the Video Inspector and delete it.

EXTRA CREDIT

  • Adjusting the color of a clip using the color tools gives you great precision and control.
  • Adjusting the color of a clip using Looks lets you pick a specific look in much less time.

Please rate the helpfulness of this tip.

Click on a star to rate it!